Alaska: Wrangell-St. Elias National Park- Bremner Glacier to Iceberg Overlook- Day 4

Alaska: Wrangell-St. Elias National Park- Bremner Glacier to Iceberg Overlook

Total Mileage- 9.1 miles

Total Elevation Gain- 1928 feet

Total Elevation Loss- 918 feet

Screen Shot 2018-08-19 at 5.03.16 PM

Screen Shot 2018-08-19 at 5.05.20 PM

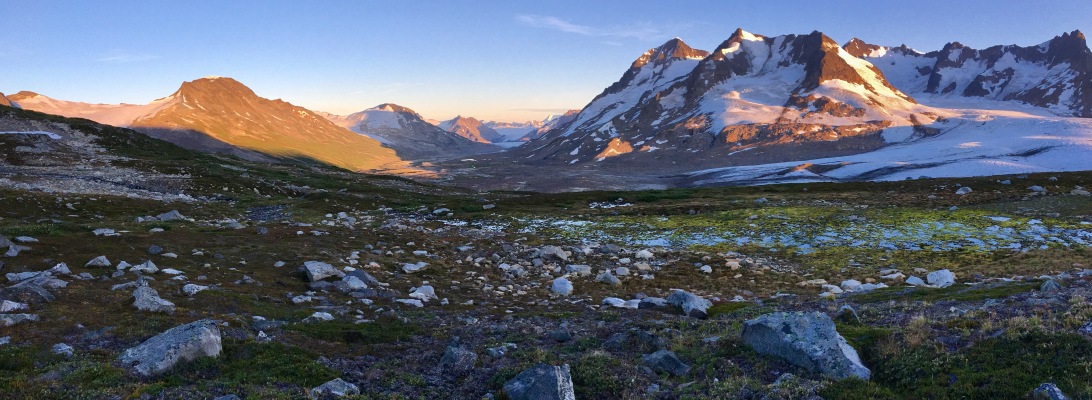
Day 4 in Wrangell-St. Elias National Park in Alaska would take us from Bremner Glacier to Iceberg Overlook. It is nearly impossible to locate names for areas in Wrangell, so I just made up the Iceberg Overlook, being that our campsite for this night faced the direction we would be heading… Iceberg Lake. I don’t recommend doing nine miles of trail-less backpacking in Alaska. Others may disagree, but I find that one mile per hour on difficult terrain is very taxing. And, I am not getting any younger. This particular day was 8 hours and 37 minutes of hiking time. This did not include breaks or lunch time. It was a long day, but one of the most beautifully stunning days we have had on any trip.

The day started brilliantly with exquisite views of Bremner Glacier and once we packed up we headed eastward from craggy rocks into sandy beaches. It was surreal to be in the middle of Alaska and to be walking in the sand in the middle of the mountains. The sand transitioned into a lush green valley floor that we would follow the rest of the day for about six miles.

IMG_4098IMG_4106IMG_4120IMG_4123IMG_4132

There were a few small creek crossings on this stretch. At one crossing we were searching for rocks to hop across (and looking a bit too myopically) and didn’t notice the brown sow with cubs lingering at the same creek about sixty yards from us. Fortunately the mother was pouncing on the ground for some small rodent to notice us. We cleared out of the area, but it didn’t take us long to see where the bears had been before us.IMG_4139IMG_4183IMG_4178IMG_4164IMG_4145IMG_4153IMG_4173IMG_4175

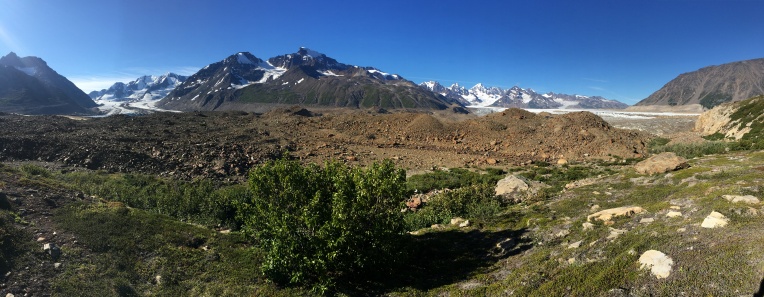
For the most part, the terrain was really straight forward. It was low scrub and soft, mossy mounds that were a little difficult to maneuver through. There was one creek/waterfall that we had to cross closer to our end destination. That is the way it always is in Alaska. I remember that crossing and the jump that had to be made from the last rock to the other side. It had to be a perfect landing… and we all hit it perfectly. The weather was perfect this entire day with highs in the mid to low 60’s F. IMG_4161IMG_4172IMG_4186IMG_4187IMG_4189IMG_4283

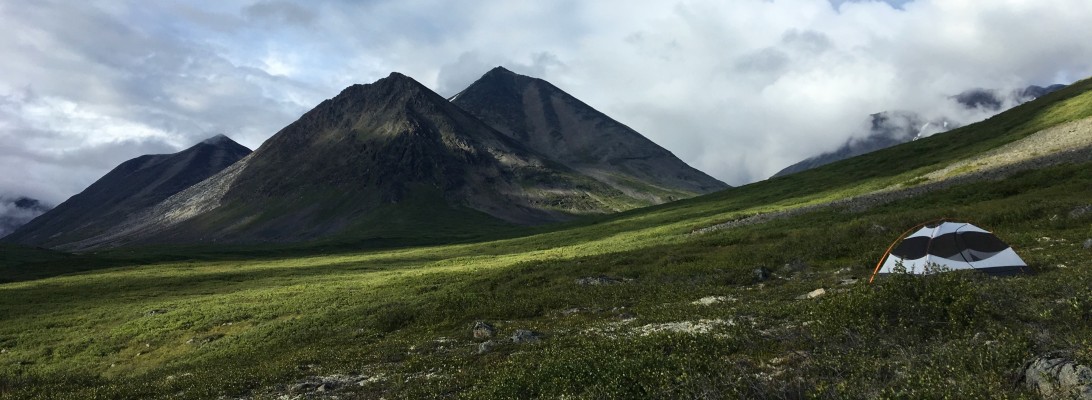
The spots where we camped are likely the best spots I have ever had in my life. The ground was soft and spongy underneath with a view that very few will ever see. As you can see from the evening shot above, it was an amazing location. And it got even more epic the next morning. On day five we will do an early morning day hike up to a hidden lake and then make our way toward Iceberg Lake.

Day 5- Iceberg Overlook to Iceberg Lake

Alaska: Wrangell-St. Elias National Park- Monahan Creek to Bremner Glacier Overlook- Day 2

Alaska: Wrangell-St. Elias National Park- Monahan Creek to Bremner Glacier Overlook

Total Mileage- 8.83 miles

Total Elevation Gain- 1475 feet

Total Elevation Loss- 2350 feet

Day two in Wrangell-St. Elias National Park would take us from the Monahan Creek area to a beautiful overlook of the Bremner Glacier, which we would be tackling on Day three. The day started out in classic Alaskan style- gray skies, low hanging clouds, and rain. The goal for the morning was to stay above the brushy areas, but stay below the loose and steep scree areas. If this is done correctly it will be relatively easy trekking across some basketball-sized rocks. The key is to work your way down the valley with an eye toward the Monahan Creek junction and the saddle which you will be passing over. The best advice is to minimize areas of alder while working your way toward Monahan Creek. We had to search for a while to find a spot to cross over the creek, but eventually found some stepping stones that kept us from getting our boots wet. That was a huge win. But you have to keep your eyes open, because much of the area has steep walls to the creek or water moving too powerfully to cross.

Upon the creek crossing we were on our way over the saddle that would lead to Bremner Glacier. We had to make a decision on how far we really wanted to go on this day. If we went too far, we would commit to several hours of dense alders that descended to the glacier. Did we really want to end the day with that kind of battle? If we went into the alder for the remaining part of the day, would there be anywhere to camp without having to commit to crossing the glacier in the same day? Committing close to nine untrailed, Alaskan miles before the alder and glacier seemed like enough for one day. So we knew that the next day was going to be the monster day- alder/glacier. At least we would have the evening and night to mentally prepare for it. Dense alder will make you wish you were back on the dirt trails in Indiana. I have yet to find a fan of alder bushwhacking. Nonetheless, the terrain for this portion of Day 2 was ideal for backpacking, but the boulders heading up to the saddle was a little work.

Once we hit the saddle we could see where the dense cloud cover was coming from- the glacier. And we saw for the first time… blue skies. As I mentioned in the previous post, the Bremner area from which we came seems as if it gets a lot of cloud cover and rain, likely due to the cold air coming from the glacier. Am I no meteorologist, so I am likely wrong, but on subsequent days we would look back and see gray skies and rain even though we were in clear skies. The green in front of us was a beautiful, but I am not sure how to classify it. It was a somewhat marshy area with a mixture of knee-high scrub, longish tussock, and scattered alder. The issue, as you can imagine, is where to set up a tent. If there was a spot clear enough for a tent…it was marshy. To be honest, even though it wasn’t a huge issue, I feel like finding spots to camp throughout the week took some work. It’s not like you can just pop a tent anywhere. Most areas were overgrown or rock strewn or not close to fresh water, etc. On this day we had to make due with a bit of an angle, which made for a cool pic below, but it was really the best we could do. I think the other guys got to the flat spot before us and we got the consolation angle. I slept well regardless.

The next day, Day 3, would take us through the alder and down to Bremner Glacier for one spectacular day.

Day 3- Bremner Glacier Overlook to Bremner Glacier

Arizona: Escalante Route- Grand Canyon Natonal Park

We recently completed a 3 night, 4 day 33-mile backpacking trip along the Escalante Route in Grand Canyon National Park.  What drew our interest in this particular route was that Backpacker Magazine hailed it as one of their “Best Hikes Ever,” saying that “there’s no better route for the access, solitude, and scenery.”  Granted, we had just completed a 70-mile epically beautiful and hard-to-top hike in Glacier National Park (Montana) referred to as the North Circle Route, so we knew that any backpacking trip would struggle to even come close to how amazing North Circle was… but we also knew that, in order to avoid comparison, we should do something 180 degrees opposite from Montana.  So after a handful of options were on the table along with some quick deliberations, Escalante had our hearts.

Route on Map - Whole Canyon

Route on Map - Whole Route

A couple of quick things to note.  The Escalante Route is not a maintained trail by Grand Canyon NP.  In fact, it is technically not a trail at all.  It is an unmarked route in which GPS, compass, map, and orienting skills are necessary.  But, and this is a big BUT, the route appears as if it has had so much traffic over the years that a clear trail is visible the entire way.  Even more, in areas where the trail may not be completely visible there are cairns leading the way.  I don’t want to give you a false sense of security by saying that, because the entire route is certainly not for beginners, but don’t let this route scare the pants off of you either.

Also, while there are several ways to access the Escalante Route, we entered at Lipan Point along Tanner Trail to access Escalante and traveled east to west.  We exited Escalante via Tonto Trail and Grandview Trail to Grandview Point.  This is the exact route that Backpacker Magazine suggested, however we reduced the number of days on the trail from the suggested five to four.

Route on Map - From the East

Day 1

Lipan Point to Tanner Rapids

Total Mileage- 9.0 miles

Total Elevation Gain- 0 feet

Total Elevation Loss- 4650 feet

Day 2

Tanner Rapids to Escalante Creek Mouth

Total Mileage- 8.6 miles

Total Elevation Gain- 1200 feet

Total Elevation Loss- 1200 feet

Day 3

Escalante Creek Mouth to Hance Creek

Total Mileage- 9.9 miles

Total Elevation Gain- 1200 feet

Total Elevation Loss- 0 feet

Day 4

Hance Creek to Grandview Point

Total Mileage- 6.0 miles

Total Elevation Gain- 3700 feet

Total Elevation Loss- 0 feet

Also… if you are interested in our planning for this trip read Planning a Grand Canyon Backpacking Trip.

If you have any questions about the Escalante Route… feel free to write to me in the comments.

Peace…

Brandon

Arizona: Grand Canyon National Park- Escalante Route- Hance Creek to Grandview Point- Day 4

Hance Creek to Grandview Point

Total Mileage- 6.0 miles

Total Elevation Gain- 3700 feet

Total Elevation Loss- 0 feet

IMG_2018Route on Map - Whole RouteRoute on Map - Last Day 3D

When we began to pack up all of our gear on the fourth morning at Hance Creek we didn’t anticipate it being our last day.  Our hike had us leaving Hance Creek and climbing Horseshoe Mesa where we would spend our fourth night.  We knew that one big obstacle to staying an extra night at Horseshoe Mesa was the lack of drinkable water.  That meant that whatever water we would pack at Hance Creek would be the water we would have for drinking and cooking for the next day and a half.  As we geared up, each of us packed 4-liters (8 pounds) of water.  It is worth noting that we were attacked by hundreds of mosquito-like bugs as we packed up.  They didn’t sting but they were insistent upon flying in our eyes, noses, and mouths.  It was pretty overwhelming honestly.  Ultimately we had to cover our faces so that we could pack up.

IMG_1951 IMG_1952 IMG_1957 IMG_1959 IMG_1960 IMG_1961

We could not have asked for a more beautiful mid-April day- blue skies, breezy, and warm.  The colors and contrasts were as beautiful as any of the previous days along the Escalante.  Tonto Trail would be leading us to Horseshoe Mesa on this morning and there were three different approaches that we could take in order to get on top of the Mesa.  In our initial planning we decided that we would circle the mesa in a counter-clockwise direction along Tonto (following Cottonwood Creek) and then trail up the western side of the western arm.  This route meant significantly more mileage and more difficulty because it is more exposed and washed out.  While the closest option, the eastern route that passes Page Spring, would be a shorter hike… it too is difficult and exposed.  In light of this we decided to take the most direct route to the eastern side of the western arm of Horseshoe Mesa.  There was a juncture a couple of miles from Hance Creek where you could take the path to the left or right- the route we took was to the right.

IMG_1965

Just before the base of Horseshoe Mesa we stopped for one last break in the shade before tackling the steep ascent.  It was a hot day and once we would begin the hike there would not be any reprieve from the sun.  While we relaxed in the shade and as we took in the rich and exquisite view, one of the guys said, “It would be great if we were listening to Iron & Wine while we were standing here.”  Being Mr. Johnny on the Spot, I pressed play on the handy iPhone and we stood there for the next four minutes listening to Sam Beam sing about that “Passing Afternoon.”  And all was good and right in the world… at least at that moment.

IMG_1971 IMG_1973

In the next picture you will see us approaching the western arm of Horseshoe Mesa.  For even greater perspective you will see Grandview Point in the distance at the top left.  What we didn’t know at the time of this picture was that we would arrive on top of Horseshoe Mesa around 11:15am, which was only a 3-hour hike from Hance Creek, and decide to hike out to Grandview Point after our lunch break rather than stay the night on top of the Mesa.

IMG_1968

The views atop Horseshoe Mesa…

IMG_1978IMG_1981

Horseshoe Mesa has several campsites which require a permit.  Day-hikers can access Horseshoe Mesa from Grandview Point and take the 2600 foot plunge over 3-miles to enjoy the views and old copper mine remnants.  The signage below is from an old masonry structure that is falling apart near the mining area.

IMG_1980

The last three miles were all up, up, up.  Keep in mind that Horseshoe Mesa is around 4800 feet above sea level and Grandview Point is about 7400 feet.  That means that the air is thinner and you will be even more winded climbing out of the canyon.  To be honest, it was hard work.  At about the end of every switchback I stopped for a short breather.  I also stopped in the shade occasionally because, once again, the noon sun was bearing down.  The trail itself was interesting, to say the least.  It was a vertical cobblestone below and throughout most of the Coconino Saddle.  I found this type of cobblestone trail very cumbersome and difficult to hike upon… but the views… well… made me forget about the dang cobblestone.

IMG_1982 IMG_1987

This three night, four day Escalante Route backpacking trip was phenomenal.  I personally give it a 10 out of 10 and would highly recommend it to backpackers who are ready to up their game and hit some difficult terrain.  The Grand Canyon gave us everything, and more, that we were looking for- epic panoramas, beautiful river views, slot canyons, beaches and swimming, and tons of memories.

IMG_1988

Until Denali in September!

Brandon

To read the first post for Escalante Route click here

Arizona: Grand Canyon National Park- Escalante Route- Escalante Creek Mouth to Hance Creek- Day 3

Escalante Creek Mouth to Hance Creek

Total Mileage- 9.9 miles

Total Elevation Gain- 1200 feet

Total Elevation Loss- 0 feet

Route on Map - Day 3IMG_2018

This was by far our longest day… but maybe one of our best in terms of seeing everything the Grand Canyon had to offer.  This trek from Escalante Mouth Creek to Hance Creek ended up taking us 11.5 hours.  We began at 8am and reached Hance Creek at 7:30pm.  You may be wondering how in the world we moved at less than a mile per hour.  Well… because we stopped a thousand times to take pictures.  We took a two hour lunch break that involved swimming, pumping water, and washing out our sweaty clothes.  And we reached three different spots in which we ran around like little kids because it was so spectacular.  We wasted a ton of time… but it was beyond worth it.  And other than the hike being 10 miles in distance… the actual terrain was relatively easy to move across.

IMG_1851 IMG_1853 IMG_1857

From Escalante Creek Mouth we immediately began an ascent leaving the river.  Opportunities for hiking close to the river were absent because the beaches yielded to cliffs and walls.  By following the trail, and the cairns, the trail began to cut sharply to the southeast to circumvent steep cliffs and walls that hugged the river.  The Escalante Route was taking us to a point where we could drop down into the dry Escalante Creek.  We would then follow the creek bed through some sweet slot canyons and then back to hiking just above the river until we reached another beach that introduced the Papago Wall.

IMG_1865 IMG_1866 IMG_1872 IMG_1878IMG_1881 IMG_1891

There was a bit of a discussion/debate about this portion of our hike.  We could either scale the 40-foot Papago Wall and then navigate Papago Slide back down to another beach which would take close to an hour total to tackle – or – we could float our packs on our inflated sleeping pads and walk them down the river about 70-feet to the next beach.  Either route would lead to the same destination… with the water option looking like a lot less work.  I am sure that whatever time would have saved doing the water option was obliterated by how much time we spent discussing both options.  It was finally decided that we would tackle Papago because the water was too cold and because the water option was too unpredictable.  As it turned out… Papago Wall and Papago Slide were pretty cool to navigate.  We took a break at Hance Rapids before hiking back to our Hance Creek destination.  We had lunch, did some cooling off in the river, and pumped some water before we began our biggest ascent of the day.

IMG_2006 IMG_1906 IMG_1910 IMG_1914 IMG_1916

This portion of our hike, from Hance Rapids to Hance Creek, was the best and longest portion of our hike.  While there were spectacular, unbelievable, astounding views all around us… it seemed as if we would never make it to Hance Creek.  Even more… I seriously wondered if Hance Creek would even have water.  Every single saddle that we went over and every single bend that we turned was evidence of dry creek after dry creek.  If it wasn’t for the views and two separate picture-taking diversions I may have gone crazy.  Anyway, check out these pictures.  The panorama was almost, almost, almost as epic as our panorama from 50 Mountain in Glacier… both extraordinary in their own unique way.  Wow!

OLYMPUS DIGITAL CAMERAIMG_1999 IMG_1995photo21OLYMPUS DIGITAL CAMERA

IMG_1942IMG_1943 IMG_1947 IMG_1948

As it turned out, Hance Creek did have water.  When we were about a quarter mile away we saw this lush, green habitat right in the middle of this rocky, dry arid canyon.  We knew water was near.  And as we drew closer to Hance Creek we began to hear the cadence of frogs beginning to come out for the night.  We knew we were entering a strange ecosystem… but we just didn’t know how strange.  We dropped the packs and set up the tents.  We were spent.  But we also had to pump water because most or all of us were dry and we were also very hungry.  Upon examining the 2-inch deep creek that moved just enough to keep it from being stagnate… we saw hundreds of tadpoles in the water and dozens of frogs making their debut for the night.  Their roar was louder than their size.  They could really belt it out.  It wasn’t five minutes into pumping that one of the guys began to yell that white mice were attacking our packs.  Upon investigation, the mice had chewed through two packs and were looking for food.  Being that our food was already secure, the mice only found wrappers.  But their deed was already done.  They made holes and pooped around the packs.  All they could do was watch us while we ate our warm meals… and they did.

Our hike for the next day would take us up to Horseshoe Mesa and, surprisingly, out of the canyon to Grandview Point.  We ended up forgoing our stay on Horseshoe Mesa and opting to make the final push out in one day.

For the first post in this series click here.

Arizona: Grand Canyon National Park- Escalante Route- Tanner to Escalante Creek Mouth- Day 2

Tanner Rapids to Escalante Creek Mouth

Total Mileage- 8.6 miles

Total Elevation Gain- 1200 feet

Total Elevation Loss- 1200 feet

Route on Map - Day 2


IMG_2018

The morning at Tanner Beach was cool in the low 50’s… which was perfect.  The skies were promising- already a clear and beautiful blue.  I could tell the pictures for this day were going to be epic.  The morning views at the river were dramatically different than even the evening prior.  Our plan for the day included an 8.6 mile hike with 1200 feet of ascent taking us away from the Colorado, and then 1200 feet of descent back to the river.  Our camping destination would be just short of the most talked about landmark that we would encounter- Papago Wall.

IMG_1666 IMG_1672IMG_1676

For the next day and a half we would be on the Escalante Route.  As you can see from the picture above there is a clear pathway heading west from Tanner Beach that delineates where the route begins.  Our permit had us camping in Cardenas at the end of this day, which could be reached after just three miles of hiking but would leave us almost fifteen miles from our destination of Hance Creek at the end of day three.  After some conversations with the Backcountry Office several months earlier, they advised that we hike to the far western edge of Cardenas and camp east of Papago Wall.  That would even up our hikes for both days.  Their advice was invaluable and really helped us on both days.  I would highly recommend, when working on an Escalante itinerary, to check in with the Backcountry Office.  They can give you a realistic perspective on the distances between points.  But, they also told me that our proposed and accepted itinerary of four nights, five days may be too difficult for us (and we ended up doing it in four days).  Take their advice and then be realistic with the condition and expertise of your group.

IMG_1699 IMG_1702

IMG_1996 IMG_1721 IMG_1723


Around lunch time we detoured to the river and spent some time cooling off at Cardenas Beach.  It was a beautiful spot to relax and swim and I would highly recommend it.  I am not sure what the temperature of the water is in the summer months, but in mid-April it was ice cold.  I stayed in it for about 10-15 minutes and checked the temperature on my watch, which had it around mid-50F, but it was still going down when I got out.  Nonetheless, this blue/green water cooled us down before the 1200 foot ascent.

IMG_1738 IMG_1743 IMG_1746


There were some absolutely AMAZING views throughout this hike and this portion of the Escalante had some of the most stunning.  It didn’t hurt that we had clear skies, for the moment.

IMG_1749 IMG_1752 IMG_1759 IMG_1767

OLYMPUS DIGITAL CAMERA IMG_1993

OLYMPUS DIGITAL CAMERA


I am not much for naming all of the landmarks and geologic strata so if that is your thing… I am sorry that I can’t be of much help.  However, one of the guys in our group spent a ton of time researching and knew the name of every single thing that we saw during our hike.  I will have him write a guest post so that you will have some sort of idea what to look for during this hike.

IMG_1777 IMG_1786 IMG_1787 IMG_1793 IMG_1806

During our ascent it began to cloud up quickly and hint of rain.  When it began to sprinkle we were fortunate enough to have an area with some rock caves and carve outs, which we ducked into for about thirty minutes while it rained.  I suppose this added to the excitement of the trip.  If nothing else the sun, which had been baking us during our ascent, was now hidden.  Even though it was April… it was still very hot.  The remainder of the hike took us down Escalante Creek (which is dry) to the Colorado once again.  The evening cleared up spectacularly with clear skies and an amazing opportunity for star gazing.  I commented to the guys that this particular camping area (Escalante Creek Mouth) ranked as one of my favorites on any trip.  Not as good as Elizabeth Lake and Fifty Mountain in Glacier or the Boulderfield going to Long’s Peak… but in my top five. And again, we took advantage of pumping directly from the Colorado without any problems. The water situation the next day at Hance Creek was interesting, to say the least. But more on that in the next post.

IMG_1832 IMG_1835 IMG_1838 IMG_1842

The next day would take us to Hance Creek, which ended up being the longest hiking day and the strangest location that we would encounter on this trip.

Arizona: Grand Canyon National Park- Escalante Route- Lipan to Tanner- Day 1

Lipan Point to Tanner Rapids

Total Mileage- 9.0 miles

Total Elevation Gain- 0 feet

Total Elevation Loss- 4650 feet

Route on Map - From the East

IMG_2018

Our first day would take us from Lipan Point to Tanner Rapids. Being that this route is a point to point, a couple of the guys dropped our vehicle at Grandview Point and hitchhiked back to Lipan Point. Lipan Point trailhead travels directly to the Colorado via Tanner Trail.  This 9-mile route drops nearly a mile straight down which means you better have your trekking poles out and adjusted appropriately.  On this mid-April day the temperature at the rim was in the high fifties and we expected it to warm considerably as we descended… but it was also overcast with a threat of light rain.  Our first night camp destination was Tanner Beach.

IMG_1499

IMG_1518

IMG_1527

I would note that the common theme throughout our four day hike was that we spent more time looking at our feet than at the views.  Of course that is a bit overstated, because we got everything and more from the picturesque views at every point throughout the hike, but there is also some real truth to the fact that we spent an enormous amount of time looking down.  Without question, this was the most difficult, sustained terrain I have ever hiked.  That is not to say that it is the most difficult in the world, but just the most difficult terrain I have hiked to this point.  Case in point- despite trimming my toenails before the trip and lacing my boots tight… the descent wreaked havoc on my big toes, pressing them up against the end of my boots.  My big toes swelled twice their normal size and I am currently losing the toenails of each toe.  Too much info?  Probably.  But all that to say, going a mile straight down can really strain your body- ankles, knees, toes, etc.  Prepare well and do not push yourself too hard.  The park guidance states that it takes 12-15 hours to Tanner Beach… and the Backcountry Office told me that I should count on half of our group getting their butt kicked on the first day because of the length of the hike and terrain.  That’s a long day for sure, but we did it in about seven hours, and we were all intact when we set up camp.  In fact, we had some energy to spare.

IMG_1546

IMG_1551

IMG_1554 IMG_1557

There was a really cool place where we took a lunch break.  I believe it was called Escalante Saddle.  It was really well marked with vertical rocks and had great views on either side.  It was a really nice spot to take a break.  The saddle was about 2.5 miles into the hike and about 1700 feet down from Lipan.

IMG_1568 IMG_1573 IMG_1578

The views that of the Colorado that become apparent are spectacular, even for an overcast day.  At about 2000 below the rim, the view of the Palisades with their magnificent and varying color is truly amazing.  I believe it was at this point that we were scratching our heads expecting the Colorado to be more brown than blue.  I was quietly hoping that we would be surprised by a clean river from which to pump.  My hopes would be realized for sure as the river became even greener and bluer the closer we got to it.

IMG_1588IMG_1599 IMG_1601 IMG_1607

As we approached Tanner Beach the temperature was in the low 70’s.  It was sure to be a warmer night than the previous night on the rim, which was in the mid 30’s.  There were several spots from which to choose.  I believe that Tanner Beach could accommodate 4-5 groups easily.  There were only two other groups in the area that night, but we would see even fewer as we started the Escalante Route the next day. The best surprise was that the Colorado River was, in fact, a nice blue-green color with hardly any silt. This was huge because we could use our water filters without any problems at all.

IMG_1621 IMG_1630 IMG_1640

The next day we would begin our march along the Escalante Route from Tanner to a site near at Escalante Creek Mouth, just a mile before the Papago Wall.  The gray skies succumbed to the blue and the sun was radiant.  Day Two would be a day to remember for sure.

You may also be interested in reading:

Planning a Grand Canyon Backpacking Trip

Escalante Route (Grand Canyon NP) Quick Summary


Indiana: Charles Deam Wilderness- Peninsula Trail

We recently took a weekend guys hiking/camping trip to Charles Deam Wilderness, which is south of Bloomington, Indiana and nestled right up against the Hoosier National Forestry. If you remember… a handful of us braved a single-digit weekend excursion to Deam this past January, putting all of our survival skills to the test! In January, we navigated Axsom Branch as well as portions of Grubb Ridge Loop. This time we set out without any sort of plan, except that we wanted to spend some time on Monroe Lake.

We parked at the parking lot southwest of Axsom Branch and headed northwest on Grubb Ridge Loop. Being that we started the hike in the evening, we didn’t want to be too ambitious. Our goal was to set up camp close to the split of Grubb Ridge Loop trail and the Peninsula Trail. The temperature that autumn evening was a fantastic and cool low 60’s with a low overnight in the high 40’s (perfect Indiana camping weather). We set up the tents in a really nice area with thick pine needle covering and spent the late evening around a fire.

The next morning we decided to continue on the Peninsula Trail until we hit the end of the trail at Monroe Lake. We took our time packing up and got a late morning start. With no agenda, our only goal was to enjoy our time venturing through the wilderness. With many of our trips it seems as if we are always moving and trying to get to the next destination at a reasonable time to set up before sun down. It was actually really nice to take our time. It was around noon when we made it to the end of the trail at Monroe Lake. As I looked out into the lake I saw what appeared to be an island about 1/2 mile offshore. I jokingly commented that we ought to swim out to it. And of course a few guys got really serious about it. For the next ten minutes they were just waiting for someone else to say let’s do it! I finally began to take off my boots and socks, “Let’s do it boys.” We stripped and gingerly made our way over the jagged rocks to the lake’s edge. We began to wade slowly into the cool water and then just began to swim. Our amateur voyage to the island took about 40 minutes and we were all glad that the swim was over. We walked on the other bank, looked at each other, and then wondered aloud how we were going to get back to the other side.

Never one to do more physical work when I can use my brain to avoid work, I suggested that we wave down one of the boats on the lake to take us back to the other side. Being that is was turning into a really nice afternoon, the lake activity was beginning to pick up. Our first victims came over in their speed boat and assured us that they had no interest in disrupting their fishing expedition to take us to the other side. Not to be disheartened, we began to wave down a pontoon boat that was around the bend of the lake. We thought it was unlikely that they would see us, but we began to hear cackling and merriment and knew that our arm-waving had become a source of great entertainment. Fortunately enough for us, the pontoon began to creep in our direction…and the jovial uproar grew. It was infectious, as we began to laugh as well. And we laughed even harder when we realized the boat was full of 50-60 year old ladies who had been imbibing the spirits as breakfast and lunch. Needless to say, they were more than happy to pick up some hapless, beleaguered, and shirtless hunks on beach. We boarded… became the focal point of all sloshy conversation, and then were greeted by heckles and jeers from the rest of our contingency. What a story. Too bad we don’t have photos of that huh? : )

After lunch, we decided to stay along the lake side and hike to one of the campsites on Monroe Lake.

This was a stunningly beautiful hike along the lake. The sun brought out all of the early fall vibrancy- the yellows, greens, and browns. Just being able to breath deep and enjoy such beauty recharges one’s batteries and refills one’s soul. As much as I would highly recommend this particular hike and route, there were a couple of things to take into account. Our decision to hike along the lake overall was a good idea because we didn’t have to backtrack at the peninsula. However, there were about four areas where we no longer had a path to walk so we had to hike up the steep hill, walk through the woods, and then back down to a walkable path on the lake’s edge. Maybe the greatest challenge hiking along the lake’s edge was when the terrain turned almost exclusively into an angled pathway comprised of wet shale rock. It was incredibly slick and we had at least two or three guys slip and fall. The final thing to take into account is pumping water. We brought our pumps and at our final camping destination we went into the lake to pump. It was a slow and laborious process because the water was so green that we had to clean our filters several times to get a few bottles of water.

Nonetheless, the sunset on Monroe Lake was exquisite and it was a joy to watch it settle in behind such a magnificent backdrop.

peace…

brandon

Indiana: Brown County State Park- Trail 10

Will and I traveled to Brown County State Park early this morning before it got too hot in order to hike the 2.2 mile loop simply known as Trail 10.  The early morning temperature forecast showed 85 degrees but this trail has excellent tree covering so i knew it would be a bit cooler.

Trail 10 is extraordinarily well-maintained only narrowing in one spot on the back end of the loop.  The specs on this trail list it as a moderate trail with 400 elevation descent and ascent.  I would probably describe this trail as leisurely with very gradual elevation changes over the 2 miles.  The temperature stayed at about 75 degrees but I worked up a small sweat with it being quite humid.

The greatest compliment I can pay to Trail 10 this morning is the gift it gave…and that I received-solitude and silence.  Will and I had the woods to ourselves and the birds entertained us in song while the trees welcomed us along.  Breathing easy and taking in the sweet Spring aromas, I was reminded of something I wrote a while back that perfectly describes what I experienced this morning:

It is an understatement to say that our lives are full of chaos. We do not take the time to stop and realize how dependent and addicted we are to the noise and the rush around us. Every minute of the day is full noise and busyness. It is the television, music, conversation, kids, and incessant chatter. When we finally come up for air we gasp, “God, where are you? This hardly feels like the abundant life you promised. Where is the peace?” We don’t stop to think how our minds have become so conditioned to the three second snippet or the fast paced motion of life. It is no wonder we are so anxious, impatient, discontented, addicted, and medicated. My God, where is the peace?

Think about how this affects us. We do not stop to listen to others. We are constantly thinking about what we are going to say next or do later or the next thing on our schedules. We are unable to concentrate and sit in silence and just listen. We have to speak. We have to turn up the volume. Is it not true that we live lives that make it seemingly unable to quiet those things around us and those things in our heads? We are unable to just sit still and breathe, contemplate, find peace, and hear God.

In solitude and silence, we intentionally remove ourselves from everything and everyone for a period of time. We cut ourselves off from everything we have become dependent upon or addicted to…standing still and alone with God. Solitude and silence strips away everything that we have filled ourselves with and leaves the infinite void of our soul wide open and exposed…preventing everything but God to fill us. In solitude and silence we realize that there is no thing or no one to trust in but God alone, and this is an excellent beginning point for all of us.

Today I am thanking God for the peace and solitude of the leisurely Trail 10.

peace…

brandon