Canada: Great Divide Trail- Sunset Pass TH to Pinto Lake- Day 1

Canada: Canadian Rockies- Sunset Pass TH to Pinto Lake

Total Mileage- 8.50 miles

Total Elevation Gain- 2608 feet

Total Elevation Loss- 1742 feet

The Canadian Rockies! When a person thinks of the best backpacking and most stunning terrain in Canada, Jasper National Park in Alberta is always at the top of the list. Our plan for this 7 night/8 day, 100-mile adventure was to hike from Sunset Pass TH to Pinto Lake where we would hop on the Great Divide Trail and then end our hike on Skyline Trail, which is considered to be the best route in Alberta. Day 1 would take us from the Sunset Pass trail head to Pinto Lake.

Here is a link and free download to the GDT Map Atlas that we used to plan this trip. You can see Pinto Lake on the map above. Our route on the Great Divide Trail (marked in yellow) started on map E50 and counted upward (E51, E52, etc.) Please note that the mileage markers on the map are in kilometers, not miles.

We flew into Calgary, got a rental car, and made a quick trip to the MEC to pick up some bear spray and a few other accessories. MEC is the Canadian equivalent to REI. It is thirty minutes from the airport and along the route to Jasper. As an FYI, you may want to do some research into purchasing bear spray in Canada. If my memory serves me correctly it was quite a process which involved paperwork and a driver’s license. Our plan was to make the five-hour drive to Jasper and stay at the Best Western, which was a couple of hours from the trailhead, and start the hike early the morning of August 3. If you stay in Jasper you need to check out Bear Paw’s Bakery for some amazing pastries and coffee.

We took Highway 93 from Jasper to Sunset Pass TH. This particular trail is not a part of the Great Divide Trail, but connects to it at Pinto Lake where we would be setting up camp for the night. Let me tell you… there is nothing better than driving for five hours, parking, and then immediately starting hiking UP! For Indiana boys who live at 650 feet above sea level, jumping onto a trail a mile above sea level and immediately climbing to 7300 feet is really something for the lungs.

The good thing about our route was that it was all really well maintained and never too overgrown. Compared to the off-trail trips we have done in the past this trail was easy walking. Crossings were made easy through bridges and the dense scrub was easily navigable.

At about the five mile mark we finally got above the tree line and caught an absolutely spectacular panoramic view from above Pinto Lake. When I think back about this area it reminds me of a hybrid between the sawtooth mountains of Glacier National Park in Montana and Denali National Park’s expansiveness.

The trail goes down to the north side of Pinto Lake and is a little over two miles from the highest point. As you can see from the map above, once you connect at the Great Divide Trail juncture there are camping spots near the lake. For Pinto Lake camping there are not any permits to purchase. I didn’t get any pictures of the camping area (sorry), but I believe there were plenty of spots to camp.

Day 2 will take us from Pinto Lake along the Great Divide Trail in the White Goat Wilderness to Cataract Pass.

Alaska: Wrangell-St. Elias National Park- Iceberg Overlook to Iceberg Lake- Day 5

Alaska: Wrangell-St. Elias National Park- Iceberg Overlook to Iceberg Lake

Total Mileage- 6.04 miles

Total Elevation Gain- 891 feet

Total Elevation Loss- 1889 feet

Screen Shot 2018-12-08 at 8.32.22 PM

Screen Shot 2018-12-08 at 8.48.54 PM

Day 5 in Wrangell St. Elias National Park in southeast Alaska started with a day hike and ended with our trek to Iceberg Lake where the bush plane would be picking us up on day 7. Logistically there was a discussion on how we would play day five. From Iceberg Overlook (where our camp was set) we definitely wanted to do a day hike to find a hidden lake that had Patrick and Josh obsessed. But after the day hike, we discussed camping one additional night on Iceberg Overlook because it was just such a stinking great spot, likely one of my favorite campsites on any trip. But, with some rain likely late in the afternoon we decided to go ahead and make our break toward Iceberg Lake after the day hike.

IMG_4288IMG_0137

Our day hike took us north northeast away from Iceberg Lake and up about 900 feet. As is typical with Alaska, there were blueberries once again covering every step. I have to admit feeling guilty when backpacking Alaska, because you just can’t walk without stepping on blueberries! Our hiking time doubles because we can’t help but continually stop and forage. So much goodness and abundance. Not to mention that this was a STUNNING hike. The higher we ascended, the more ridiculous the panoramic views became. If you ever make it into this area of Wrangell, figure out a way to spend an entire down day hiking around and exploring. You will be better for it.

IMG_4198IMG_4216IMG_4201IMG_43462234F482-4A39-4C15-987D-C8A2CE3DDB99IMG_4205

Honestly, there isn’t much to say about this other than… wow wow wow. Out of every trip we have taken… THIS is the most beautiful spot I have ever stood. I could have stayed the entire week in this place.

FullSizeRender 20IMG_4199

After we broke camp, we began our five mile jaunt to Iceberg Lake. This is where we were planning to camp on night five and day hike from on day six. That plan would change, but we still had to get to Iceberg Lake and find the landing strip. We headed down the gentle slopes of soft, spongy tundra laden with rocks and boulders and it was a pleasant, leisurely trek. That is until we got down to the braided glacial streams that reminded us that Alaska is never to be taken leisurely! While the streams look like you could just jump over them in the pictures, let me assure you that isn’t the case. They are deep and very fast moving. Admittedly, we waste a lot of time trying to find narrow portions that are easier to traverse, rather than just jumping in and going for it. I have said this about other trips, but I hate wet boots. I will jump in, but I always look for an option that keeps my boots dry. But as you soon figure out in the wilderness, you just have to suck it up and get across.

The only hiccup we had with the crossings was that Adam lost one trekking pole a couple of days earlier, which was going to decrease his stability in crossing. I would either lock arms with him on a crossing, or throw one of my poles to him after I had crossed. On this particular section there wasn’t anything that required anything more than trekking poles and a basic understanding of how to cross. The deepest we encountered was just above the knees.

One additional navigational point. As you are traveling south from Iceberg Overlook, I would recommend hugging a bit more toward the west. If you look at the very rough Google Map above, you will see that cutting too far east will get you into trouble, as the terrain gets very step and hard to traverse. Also, if you err toward the east, you will have an incredibly difficult time getting back to the airstrip because the crossings become too difficult. There isn’t any real way to tell you how to do it other than to stay away from the more eastern route.

IMG_4217imageIMG_4223

As is typical with difficult sections, I rarely take pictures. Sorry. It was cold and rainy and we were pretty wet from the crossings. After finishing the last portion of stream crossings and getting into the sand, we ducked into a small sand carve out to block the incessant and biting winds, and to also figure out our navigation points. It is at that point that we used the GPS device to check the weather. What we saw was that the rain was going to continue for the next day unabated at 100%. We debated what we ought to do, because the next day was to be a full day of day hikes. We decided to send a text to the bush plane company to see if they were going to be in the area the next day. As it turned out, they would be dropping a group at the exact spot where we would be camping. While it was unfortunate to bail one day early, none of us felt like getting hypothermia. We set our tents up in the sand while it poured rain (yup, nothing there but sand!). After getting off the cold, wet clothing and drying out the tent, I went to bed in my toasty sleeping bag.

The next morning was cold and rainy, as expected, but it wasn’t long before we could hear the low roar of our ride out. Wrangell St. Elias was everything and more and more and more. I absolutely cannot wait to go back there one day.

IMG_4229IMG_4233

Alaska: Wrangell-St. Elias National Park- Bremner Glacier to Iceberg Overlook- Day 4

Alaska: Wrangell-St. Elias National Park- Bremner Glacier to Iceberg Overlook

Total Mileage- 9.1 miles

Total Elevation Gain- 1928 feet

Total Elevation Loss- 918 feet

Screen Shot 2018-08-19 at 5.03.16 PM

Screen Shot 2018-08-19 at 5.05.20 PM

Day 4 in Wrangell-St. Elias National Park in Alaska would take us from Bremner Glacier to Iceberg Overlook. It is nearly impossible to locate names for areas in Wrangell, so I just made up the Iceberg Overlook, being that our campsite for this night faced the direction we would be heading… Iceberg Lake. I don’t recommend doing nine miles of trail-less backpacking in Alaska. Others may disagree, but I find that one mile per hour on difficult terrain is very taxing. And, I am not getting any younger. This particular day was 8 hours and 37 minutes of hiking time. This did not include breaks or lunch time. It was a long day, but one of the most beautifully stunning days we have had on any trip.

The day started brilliantly with exquisite views of Bremner Glacier and once we packed up we headed eastward from craggy rocks into sandy beaches. It was surreal to be in the middle of Alaska and to be walking in the sand in the middle of the mountains. The sand transitioned into a lush green valley floor that we would follow the rest of the day for about six miles.

IMG_4098IMG_4106IMG_4120IMG_4123IMG_4132

There were a few small creek crossings on this stretch. At one crossing we were searching for rocks to hop across (and looking a bit too myopically) and didn’t notice the brown sow with cubs lingering at the same creek about sixty yards from us. Fortunately the mother was pouncing on the ground for some small rodent to notice us. We cleared out of the area, but it didn’t take us long to see where the bears had been before us.IMG_4139IMG_4183IMG_4178IMG_4164IMG_4145IMG_4153IMG_4173IMG_4175

For the most part, the terrain was really straight forward. It was low scrub and soft, mossy mounds that were a little difficult to maneuver through. There was one creek/waterfall that we had to cross closer to our end destination. That is the way it always is in Alaska. I remember that crossing and the jump that had to be made from the last rock to the other side. It had to be a perfect landing… and we all hit it perfectly. The weather was perfect this entire day with highs in the mid to low 60’s F. IMG_4161IMG_4172IMG_4186IMG_4187IMG_4189IMG_4283

The spots where we camped are likely the best spots I have ever had in my life. The ground was soft and spongy underneath with a view that very few will ever see. As you can see from the evening shot above, it was an amazing location. And it got even more epic the next morning. On day five we will do an early morning day hike up to a hidden lake and then make our way toward Iceberg Lake.

Day 5- Iceberg Overlook to Iceberg Lake

Alaska: Wrangell-St. Elias National Park- Monahan Creek to Bremner Glacier Overlook- Day 2

Alaska: Wrangell-St. Elias National Park- Monahan Creek to Bremner Glacier Overlook

Total Mileage- 8.83 miles

Total Elevation Gain- 1475 feet

Total Elevation Loss- 2350 feet

Day two in Wrangell-St. Elias National Park would take us from the Monahan Creek area to a beautiful overlook of the Bremner Glacier, which we would be tackling on Day three. The day started out in classic Alaskan style- gray skies, low hanging clouds, and rain. The goal for the morning was to stay above the brushy areas, but stay below the loose and steep scree areas. If this is done correctly it will be relatively easy trekking across some basketball-sized rocks. The key is to work your way down the valley with an eye toward the Monahan Creek junction and the saddle which you will be passing over. The best advice is to minimize areas of alder while working your way toward Monahan Creek. We had to search for a while to find a spot to cross over the creek, but eventually found some stepping stones that kept us from getting our boots wet. That was a huge win. But you have to keep your eyes open, because much of the area has steep walls to the creek or water moving too powerfully to cross.

Upon the creek crossing we were on our way over the saddle that would lead to Bremner Glacier. We had to make a decision on how far we really wanted to go on this day. If we went too far, we would commit to several hours of dense alders that descended to the glacier. Did we really want to end the day with that kind of battle? If we went into the alder for the remaining part of the day, would there be anywhere to camp without having to commit to crossing the glacier in the same day? Committing close to nine untrailed, Alaskan miles before the alder and glacier seemed like enough for one day. So we knew that the next day was going to be the monster day- alder/glacier. At least we would have the evening and night to mentally prepare for it. Dense alder will make you wish you were back on the dirt trails in Indiana. I have yet to find a fan of alder bushwhacking. Nonetheless, the terrain for this portion of Day 2 was ideal for backpacking, but the boulders heading up to the saddle was a little work.

Once we hit the saddle we could see where the dense cloud cover was coming from- the glacier. And we saw for the first time… blue skies. As I mentioned in the previous post, the Bremner area from which we came seems as if it gets a lot of cloud cover and rain, likely due to the cold air coming from the glacier. Am I no meteorologist, so I am likely wrong, but on subsequent days we would look back and see gray skies and rain even though we were in clear skies. The green in front of us was a beautiful, but I am not sure how to classify it. It was a somewhat marshy area with a mixture of knee-high scrub, longish tussock, and scattered alder. The issue, as you can imagine, is where to set up a tent. If there was a spot clear enough for a tent…it was marshy. To be honest, even though it wasn’t a huge issue, I feel like finding spots to camp throughout the week took some work. It’s not like you can just pop a tent anywhere. Most areas were overgrown or rock strewn or not close to fresh water, etc. On this day we had to make due with a bit of an angle, which made for a cool pic below, but it was really the best we could do. I think the other guys got to the flat spot before us and we got the consolation angle. I slept well regardless.

The next day, Day 3, would take us through the alder and down to Bremner Glacier for one spectacular day.

Day 3- Bremner Glacier Overlook to Bremner Glacier

Alaska: Wrangell-St. Elias National Park- Bremner to Monahan Creek- Day 1

Alaska: Wrangell-St. Elias National Park- Bremner to Monahan Creek

Total Mileage- 6.24 miles

Total Elevation Gain- 2673 feet

Total Elevation Loss- 2391 feet

Wrangell-St. Elias. That’s enough to get your heart pumping and your blood rushing. Just the name of it. And all it takes is a little bit of research to realize that this behemoth of a National Park is everything you imagined it would be- towering mountains, braided rivers, pulverizing glaciers, and the most unadulterated peace and beauty you have ever seen in your life.

If you need more convincing that this, this trip isn’t for you.

With a four-hour time difference between Alaska and Indiana, we were ready bright and early, but it seemed as if our morning took forever. We had everything strapped up and ready to go hours before we were to meet up with Wrangell Mountain Air for a shuttle over to the airfield. Once the shuttle arrived at the main office of Wrangell Mountain Air, which is on the main dirt road in McCarthy, it only took us about 25 minutes to get to the airfield. We unloaded the packs and took them over to the bush plane, the DeHavilland Beaver (aka The Beaver). We gave the pilot our bear spray and he duct taped them to the wing of the plane, so we didn’t have any crazy mishaps during the flight, and then threw our packs in to be secured for our fifty mile ride to Bremner.

Despite the blue skies at take off, the weather quickly changed as we got into the mountains. I’m not sure what the weather is like in Bremner typically, but it seemed like it’s own little weather systems consisting of continual gray clouds and a misty rain. That is what we experienced once we landed, into the next morning, and even as we looked back in that direction on subsequent days. Being that there are no trails in Wrangell-St. Elias, all trekking would be done with the assistance of USGS Topo Maps (Bering Gl. D6, D7 and McCarthy A6, A7) to serve as a guide as to our route and direction. In preparation this trip we purchased Falcon Guides Hiking Alaska’s Wrangell-St. Elias book that details the Seven Pass Route from Iceberg Lake to Bremner, but as I mentioned in the last post, we decided to do the route backwards. We decided to go the opposite direction after talking to some locals several months in advance and then determining that we wanted the “most epic” portion of our hike to be at the very end. This choice made the book a little more difficult to understand because it was written going the other direction. Nonetheless, if you decide to do this route… I would recommend the way we did it because of the views. The one thing I can tell you about this route, you are not going to find much information about it, which makes this trip a little more epic in my opinion. You truly have to do it on your own.


Our goal for the day is to head in a southerly route and hit a shoulder to the southeast. It’s really easy to spot, if you are paying attention, but if you miss the turn you will go out of your way to get around this small range. The initial portion of this route from Bremner is easy hiking with low scrub and brush with the occasional boulder field. For the most part we avoided walking through the boulders by staying on the outer edges, but we did have an occasional short stomp through the rocks. This area is just a warm-up to what is coming later in the trip with car size boulders for miles, but for today it is an easy trek for the first two miles when we hit our cut through.

As we ascended our route began to take a northeastern turn, all of which was really great trekking terrain. Compared to our prior experience in Denali, there were very few obstacles thus far in Wrangell. Of course, later in the trip there would be significant alders to contend with but for this first day we welcomed the easy route. The colors, even on this mostly overcast day, were nothing short of spectacular. The air was clean and crisp and we took it all in with every breath. This is everything you imagine Alaskan backpacking to be and more.

The final push for Day 1 would drop down into a valley through which Monahan Creek runs. Being that we really couldn’t plan camping spots in advance, our plan was to hike about six miles each day and then look for a flat area close to fresh water and hopefully a decent (or great) view. The only way we were going to get anything close to a flat spot close to fresh water was to drop all the way down to the valley floor and look for a spot among the alders. While we were still relatively high up, we eyeballed some areas that seemed to open up in the bush. We determined that the darker green areas were high bush and the lighter area were flatter areas with little bush. We just didn’t know how much the difference would be until we got down to it. After working our way through the maze of alder, we ultimately made it to the spot we had scouted. It wasn’t as ideal as we had hoped, as it was still a little more brushy than we would have like, but after looking around for a few minutes we landed a nice spot to through up the tents.

Our trek on Day 2 will take us from Monahan Creek area to our first view of the stunning Bremner Glacier, which we will cross on Day 3.

Day 2- Monahan Creek to Bremner Glacier Overlook


Wyoming: Wind River Range- Titcomb Lakes to Trails End Campground- Day 4

Wyoming: Wind River Range- Titcomb Lakes to Trail’s End Campground

Total Mileage- 14.00 miles

Total Elevation Gain- 2125 feet

Total Elevation Loss- 3334 feet

screen-shot-2016-12-07-at-6-03-08-pm screen-shot-2016-12-10-at-6-37-04-pm

Our fourth and final day in the Wind River Range area of Wyoming would take us from Titcomb Lakes to Trail’s End Campground.  The previous day threw a monkey wrench into our plans, as we were planning to hit Bonney Pass and take The High Route north for several days.  An expected snowfall would have made our attempt too risky so we opted to exit through Titcomb Basin to Trail’s End Campground.  While this was a massive downer, our trek through the basin was amazing.  The views were nothing less than spectacular.  The big decision that we had for this day was whether we were going to hit the full 14 miles to get out- or – do one more night.  At this point it was really a decision based on how everyone was feeling.

img_1535img_1556img_1557img_1561img_1567img_1574img_1575

This 14-mile trek would add up to some significant elevation changes, both ascending and descending.  To be honest, I was a little surprised that we gained over 2000 feet, but we had not game-planned this route and really did not know what to expect.  Surprisingly, the only reason we had a map for this trail is that on the previous day when we decided to not tackle Bonney we ran into some speed packers who let us take some pictures of their map.  I suppose had we not had their map as a reference we would have still made the same trail out, but their map gave us an approximate mileage and an approximate end destination.  But for the time being, we saw a beach and a lake.  And that ALWAYS means a polar plunge.  No joke, the water temperature was in the 40’s.

img_1581img_5071img_1597img_1598img_1602img_1810img_1607img_1611

To give you a bit of an idea about this 14-mile hike, about the first half of it (the portion coming from Titcomb Lakes) is amazing.  The entire time I was hiking I thought that it would be a great stretch to hike and camp with my kids on another trip.  Camping at Titcomb Lakes was nothing short of stunning and the views of lakes/mountains was really special.  However, the final half of the hike is not pretty at all.  It is mainly a wide multi-use trail that descends among the trees making for a long, repetitive seven miles.  That was the unfortunate part of this last portion- if you wanted to hike to Titcomb Basin and hit the lakes… it would take a really long and suffocating initial hike to get there.  Needless to say, I didn’t take a lot of pictures the last seven miles.

img_1639img_1641img_1647img_2369img_1659img_1672img_1675img_1676

We popped out of the woods and into the parking lot close to Trail’s End Campground.  We were not intending to camp there, but were looking to hitchhike back to Pinedale for the night.  Our vehicle was still at the Green River Lake parking lot.  The unfortunate part of ending our hike at Trail’s End Campground without a vehicle was that this road was sparsely traveled… and the people who actual did drive by were… surprise, surprise… coming back to camp for the evening and NOT going to Pinedale.  We had a couple of people stop, but they were unwilling to drive us into town.  Cell coverage was terrible and extremely spotty, but one of the guys was able to text his wife and ask her to get a shuttle set up for us.  Unfortunately, communication between us and the shuttle service completely broke down and they said that the earliest they could get us (even if they wanted to) was 11pm.  This was strange because we were only a 30-minute drive from them.  We think they were unclear on where we actually were.  To our complete dismay, we were planning to camp in the parking lot, but then… all of a sudden… a truck slowly turned on to our road.  With three of our guys working at the corporate headquarters of Cummins Engine Company in Columbus, Indiana… they were surprised and blown away that the driver of the truck not only had a Cummins engine in his truck… he was wearing a Cummins baseball cap.  The stars aligned.  As it turned out, the man, his wife, and daughter came up to that area to release balloons in remeberance of the daughter’s husband who had passed away a year from that date.  They had just finished when they decided to just crusie around and look at the views before they went back to Pinedale.  They very kindly loaded five guys, five packs into the covered bed of the truck and we were off to Pinedale.  There are still some amazing people in this world and we were fortunate to have crossed paths with them.

img_5119img_1679


Wyoming: Wind River Range- Peak Lake to Titcomb Lakes- Day 3

Wyoming: Wind River Range- Peak Lake to Titcomb Lakes

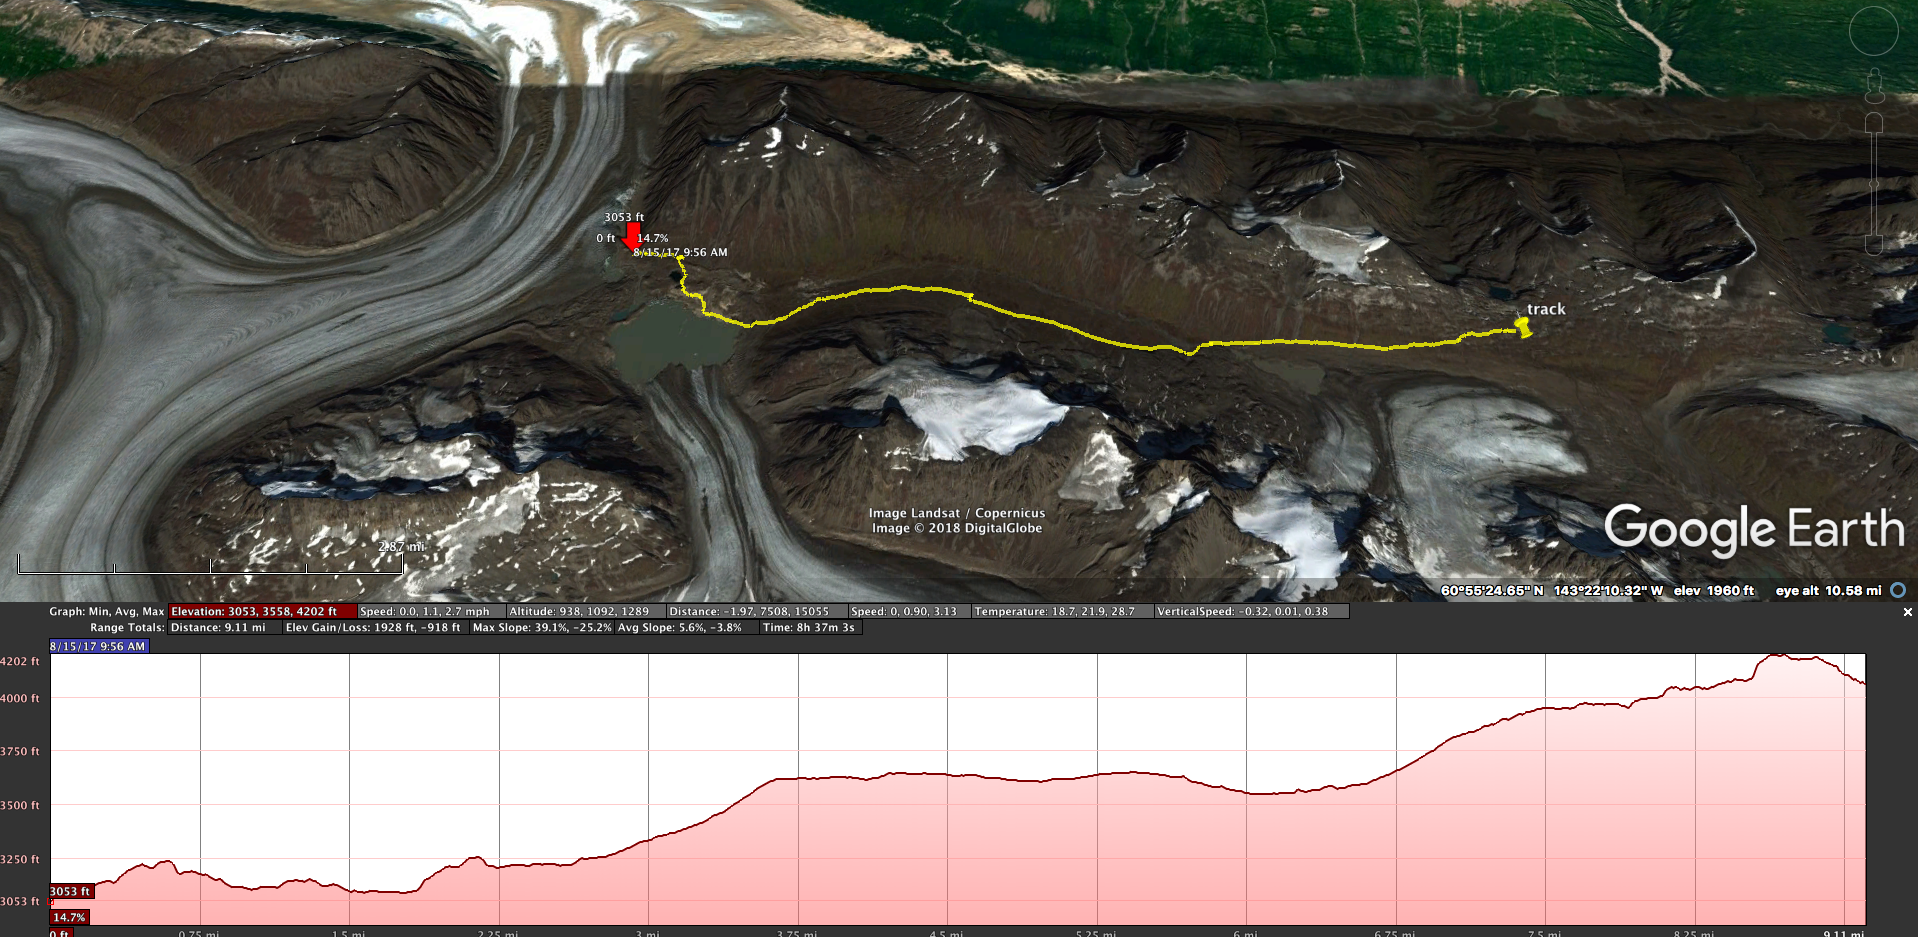
Total Mileage- 7.42 miles

Total Elevation Gain- 2165 feet

Total Elevation Loss- 2205 feet

screen-shot-2016-12-07-at-6-02-13-pmscreen-shot-2016-12-10-at-6-35-46-pm

At 2am into our third day there was a sound as if someone was taking their hands and hitting our 2-man tent violently.  We awakened perplexed as to what the sound could be.  We were not underneath of trees.  It sounded more violent than wind.  I looked out the window and saw massive amounts of snow falling from the sky.  Our three season tent (not winter) was beginning to sag from the weight and accumulation of snow.  We knocked it off from inside.  We were not expecting snow.  Sure there is always a chance, especially at higher altitudes, but we thought we had another couple of weeks before this area would see snow.  For a moment I was a bit nervous about our situation.  I didn’t know how much snow would accumulate and knew that both routes forward and backward would be completely treacherous and dangerous if the snow was too deep.  The boulder field was a difficult traverse without snow and ice. And going forward off-trail to hit two passes in one day in the 12,000-13,000 range would be even more difficult.  We stayed awake until it stopped snowing after about 30 minutes.  We reached out through the tent vestibule and noticed that it was only about four or five inches.  That’s doable.  We put our heads down to go back to sleep, but heard a lot of commotion and saw a lot of headlamp movement coming from the other three-man tent.  We thought they were just acting silly because of the snow.  We went back to sleep.

img_1372img_1371

It was really cold the next morning and there wasn’t much urgency getting out into it.  There are many difficult things about backpacking, but I would say that the most difficult for me is unzipping my warm and cozy sleeping bag and getting out of it when the temps are freezing.  Maybe you already do this, but I usually grab the clothes I will be putting on and stick them in my sleeping bag with me to warm up before dressing.  Anyway, we got up retrieved our bear cans for breakfast.  As we all began to circle up, we heard what all of the commotion was about the previous night from the other tent.  The other tent began to sag significantly from the weight of the snow.  The three guys woke up and began to knock it off.  Sometime during the activity Patrick began to feel nauseous, likely from a mild bit of altitude sickness, and tried to open the tent but struggled with zipper.  Before they knew it he had thrown up in the tent on his sleeping bag.  That is the commotion that we heard.  He stepped out into the frigid 20-degree air with accumulating (only wearing his boxers) on to clean off his sleeping bag.  With him still feeling under the weather at breakfast and the fact that our route was now covered in ice and snow… we had to figure out a plan.  This particular day was supposed to be our biggest day with two passes, one of which was the steep Bonney Pass that would take us into The High Route.  With the weather at higher elevations now unpredictable, we were concerned that if we punched up to 13,000 feet we could put ourselves into a situation in which we could not get out.  Ever cautious and conservative in our planning, we already knew that hitting The High Route (the crown jewel of our hike) was not likely to happen.  But we had one immediate decision- do we backtrack to get out or do we at least hit the first pass and then evaluate our situation?  We decided that backtracking was way too precarious through the now icy boulderfield.  With 40 pounds on our backs we did not need to snap a leg.  We were going to press forward and make the pass between Twin Peaks and Winifred Peaks, which was about a 1600 foot climb, and then descend the steep and broken rock that runs parallel to Twins Glacier.

img_1381
img_1380img_1375img_1383img_1386img_1388img_1394img_1395

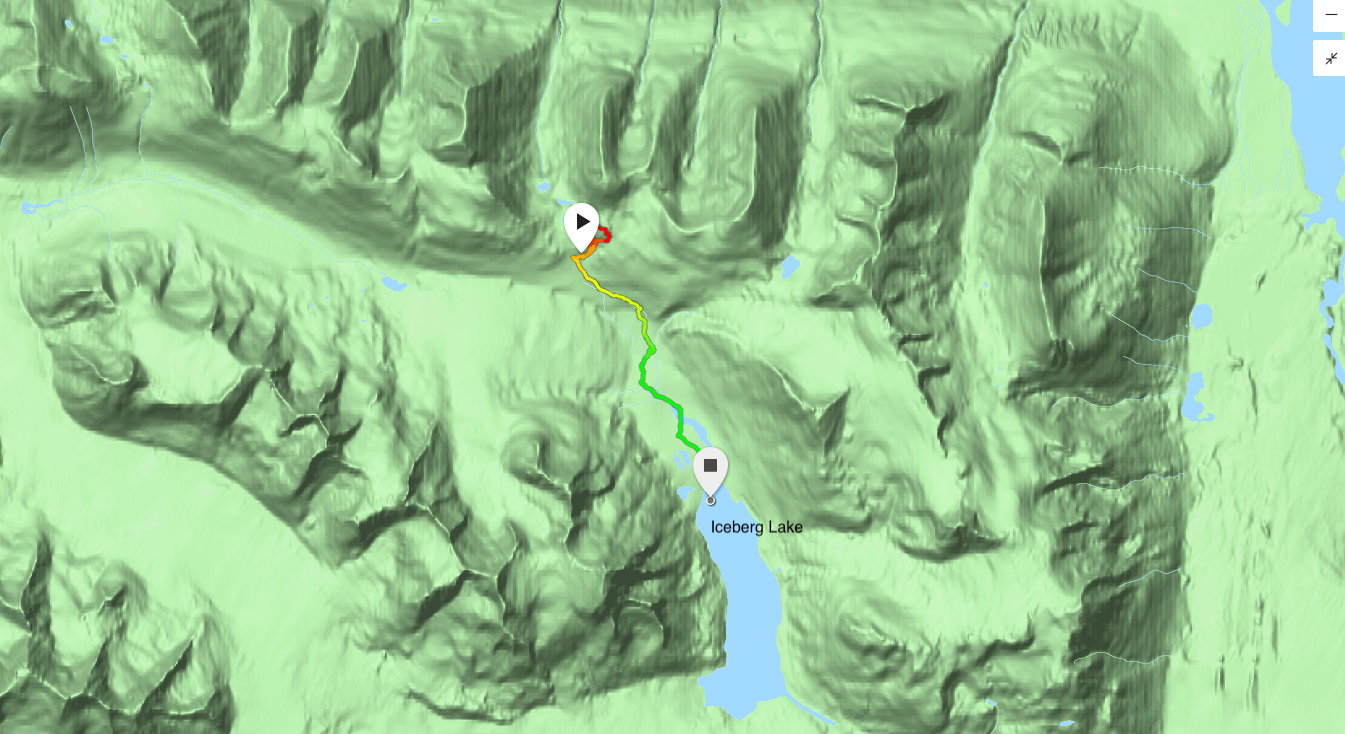
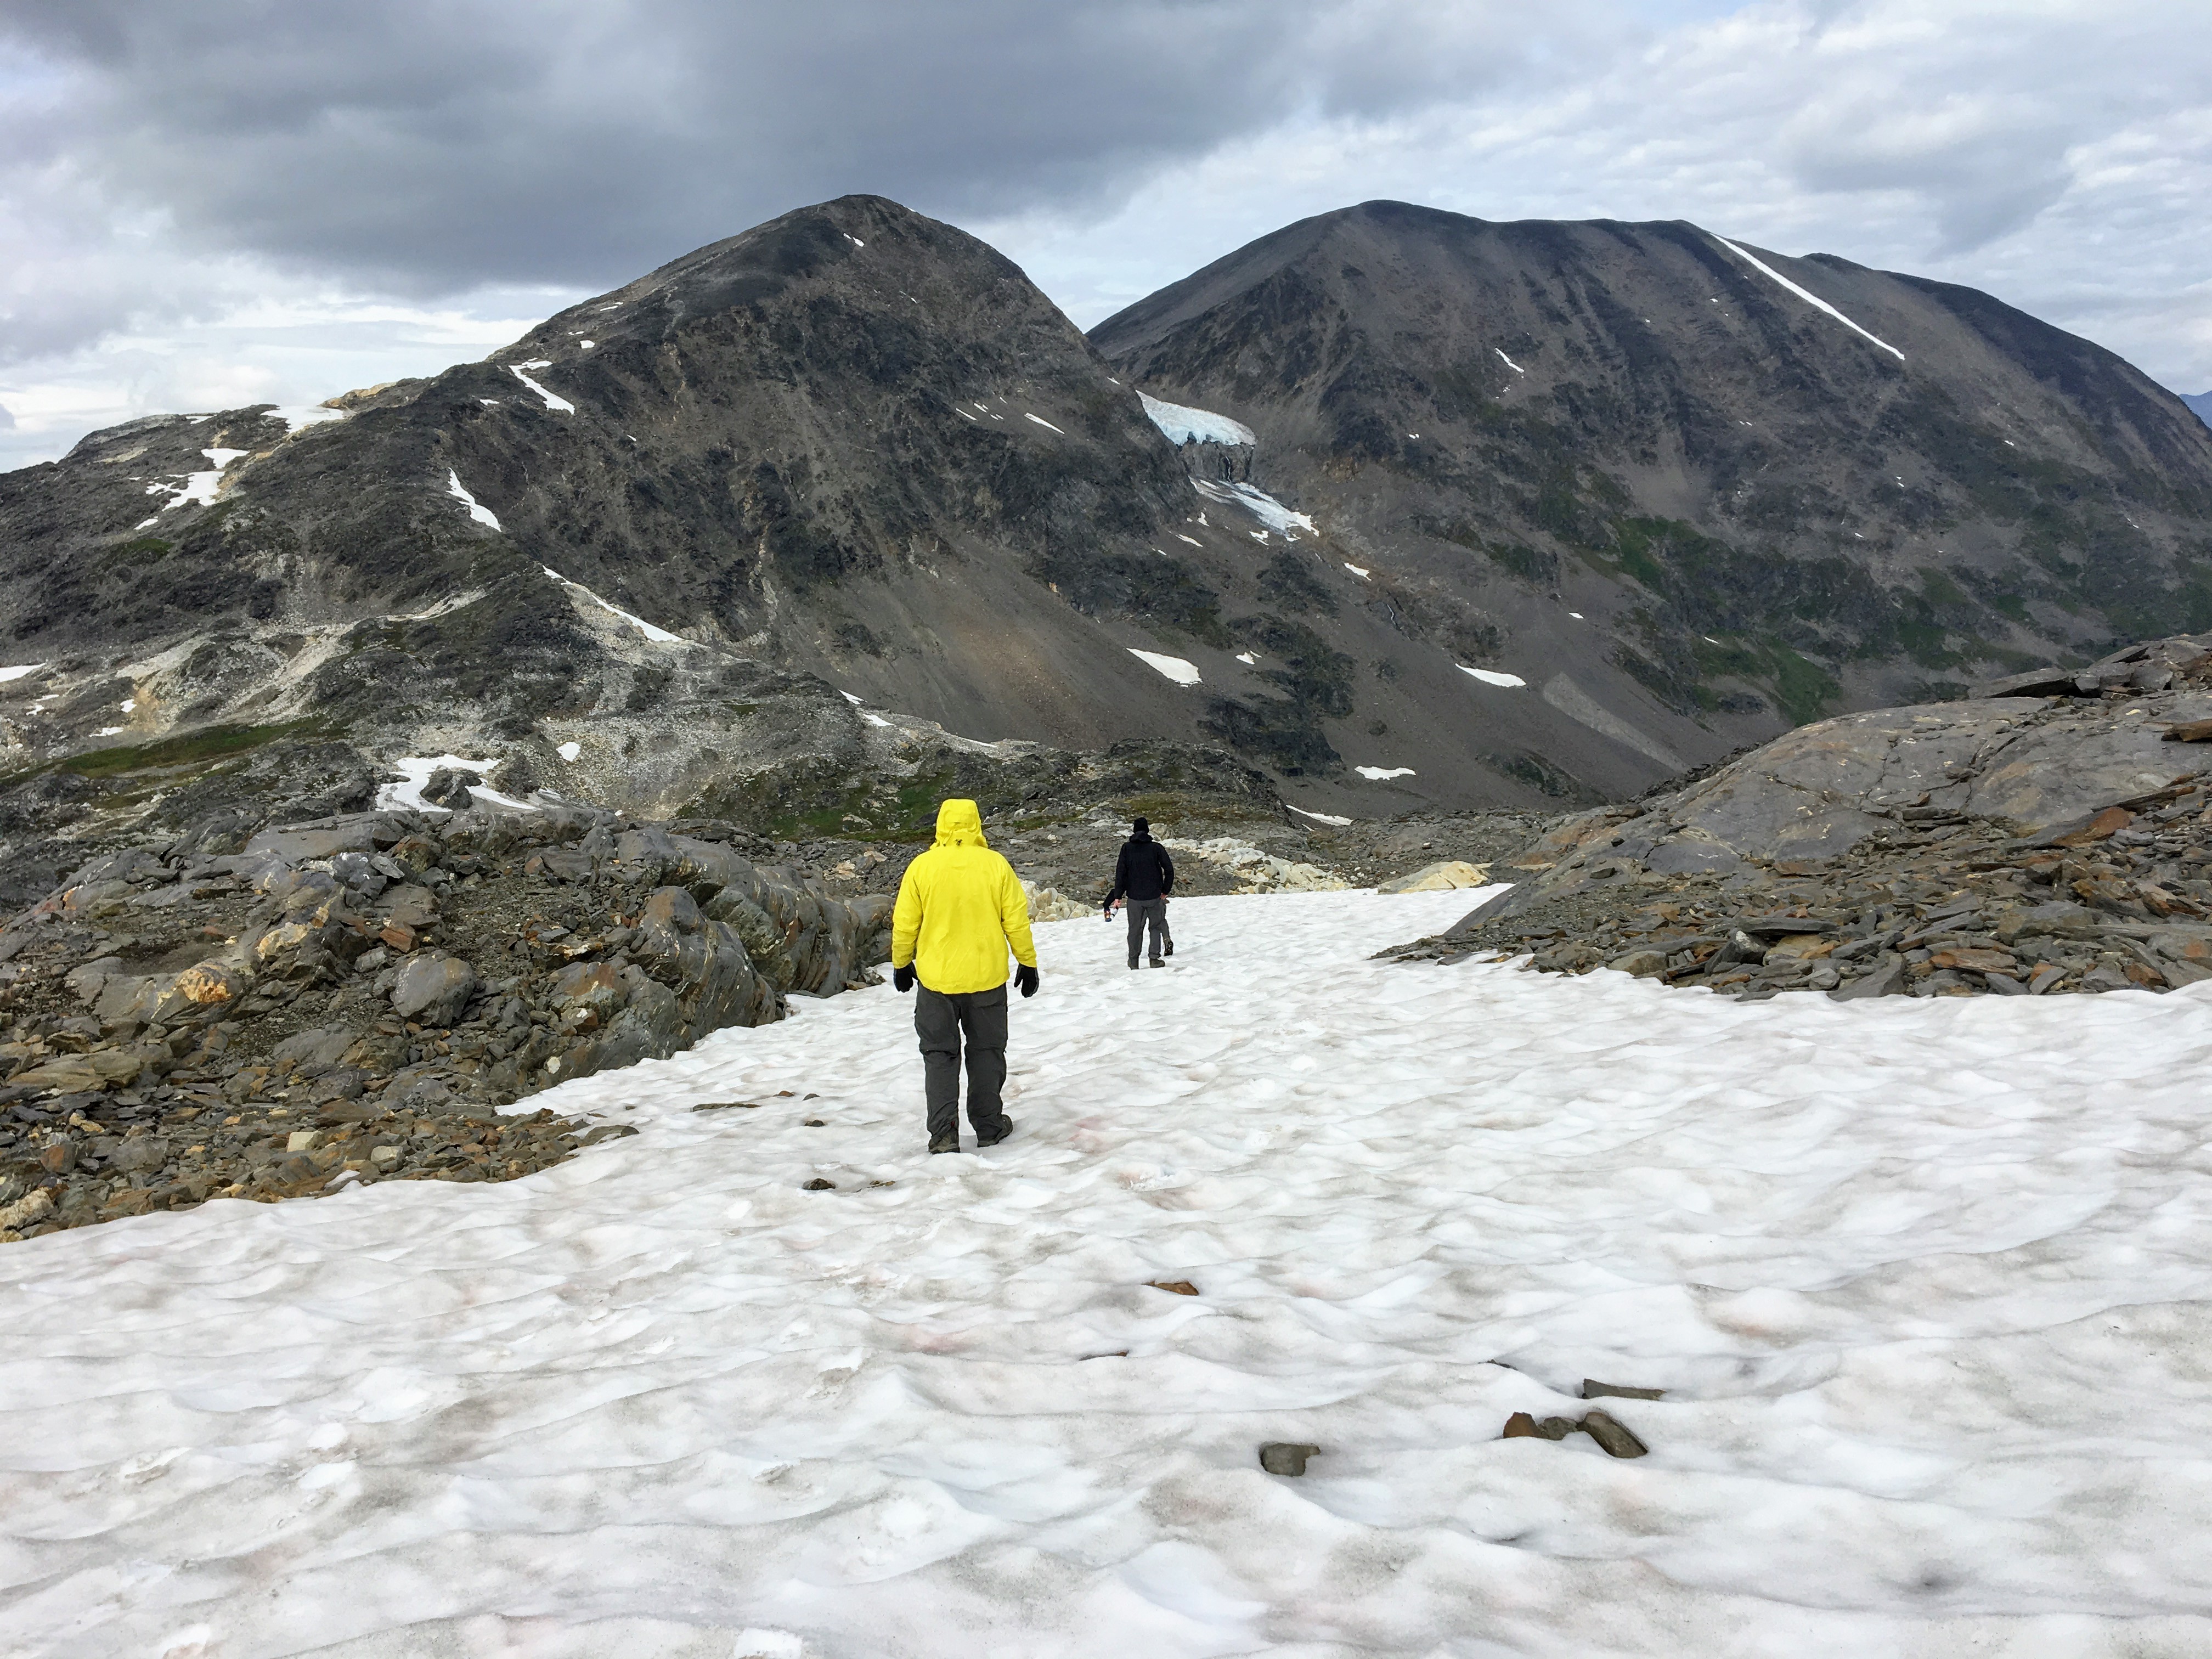
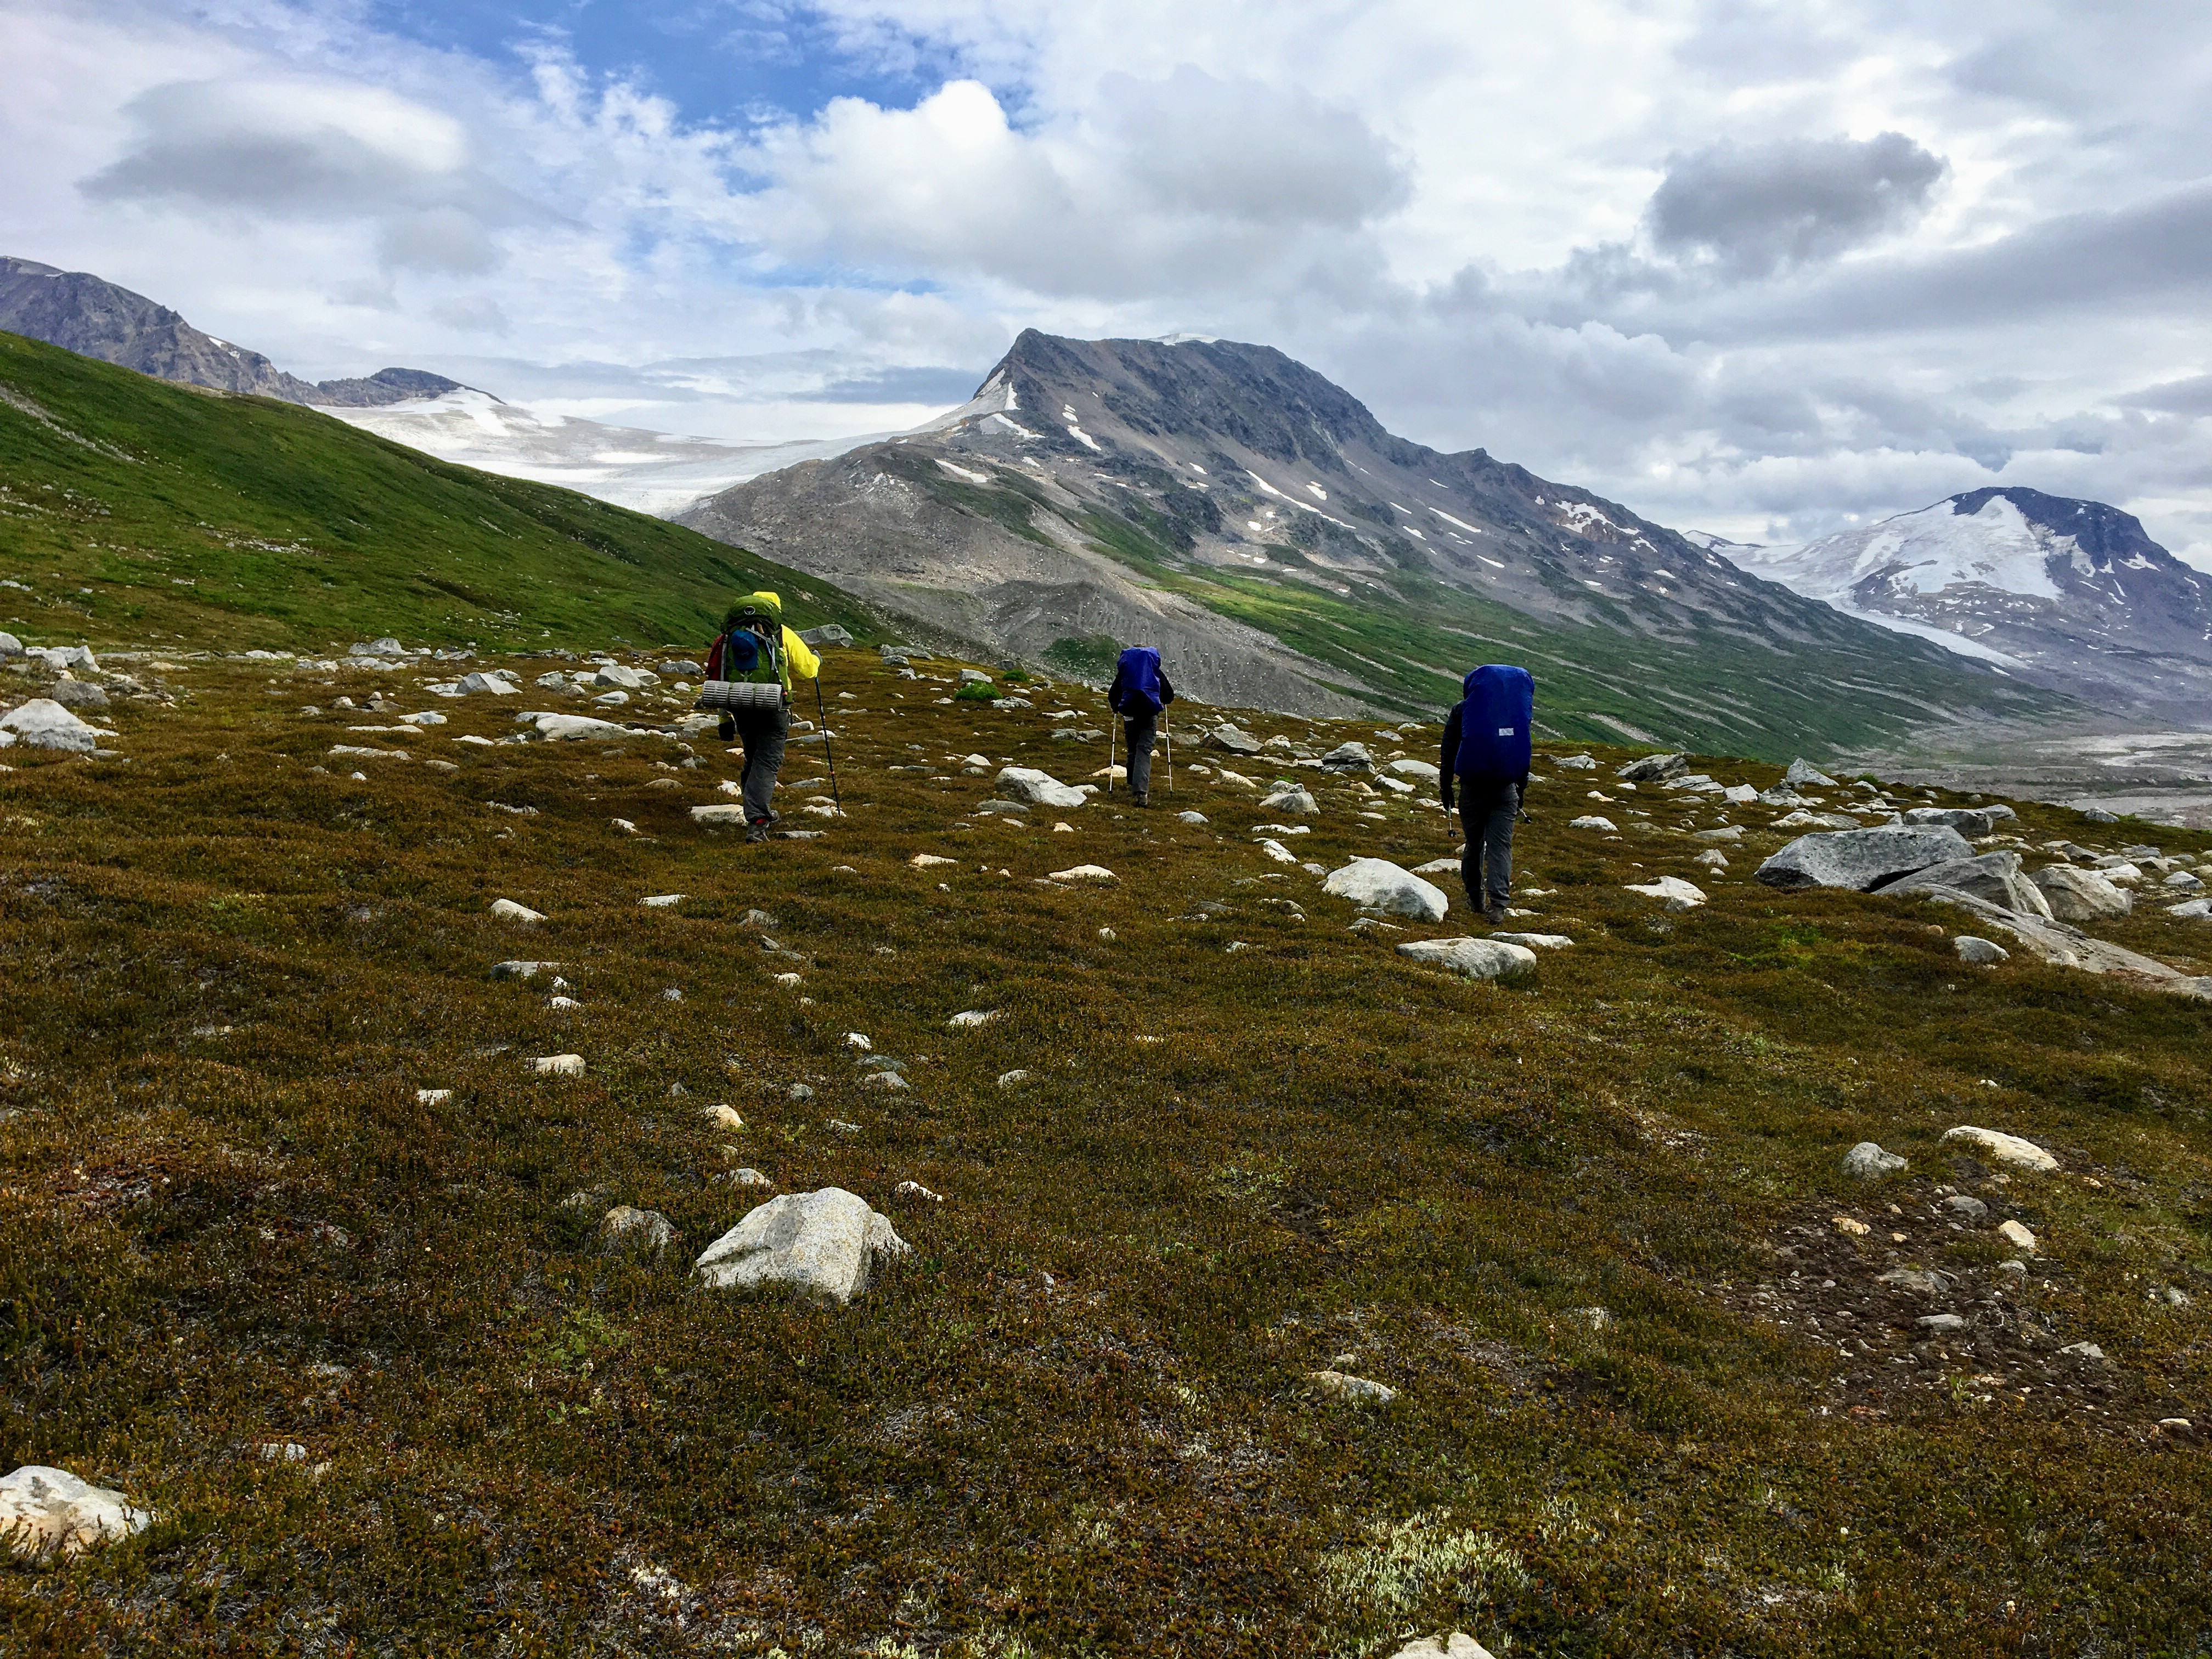
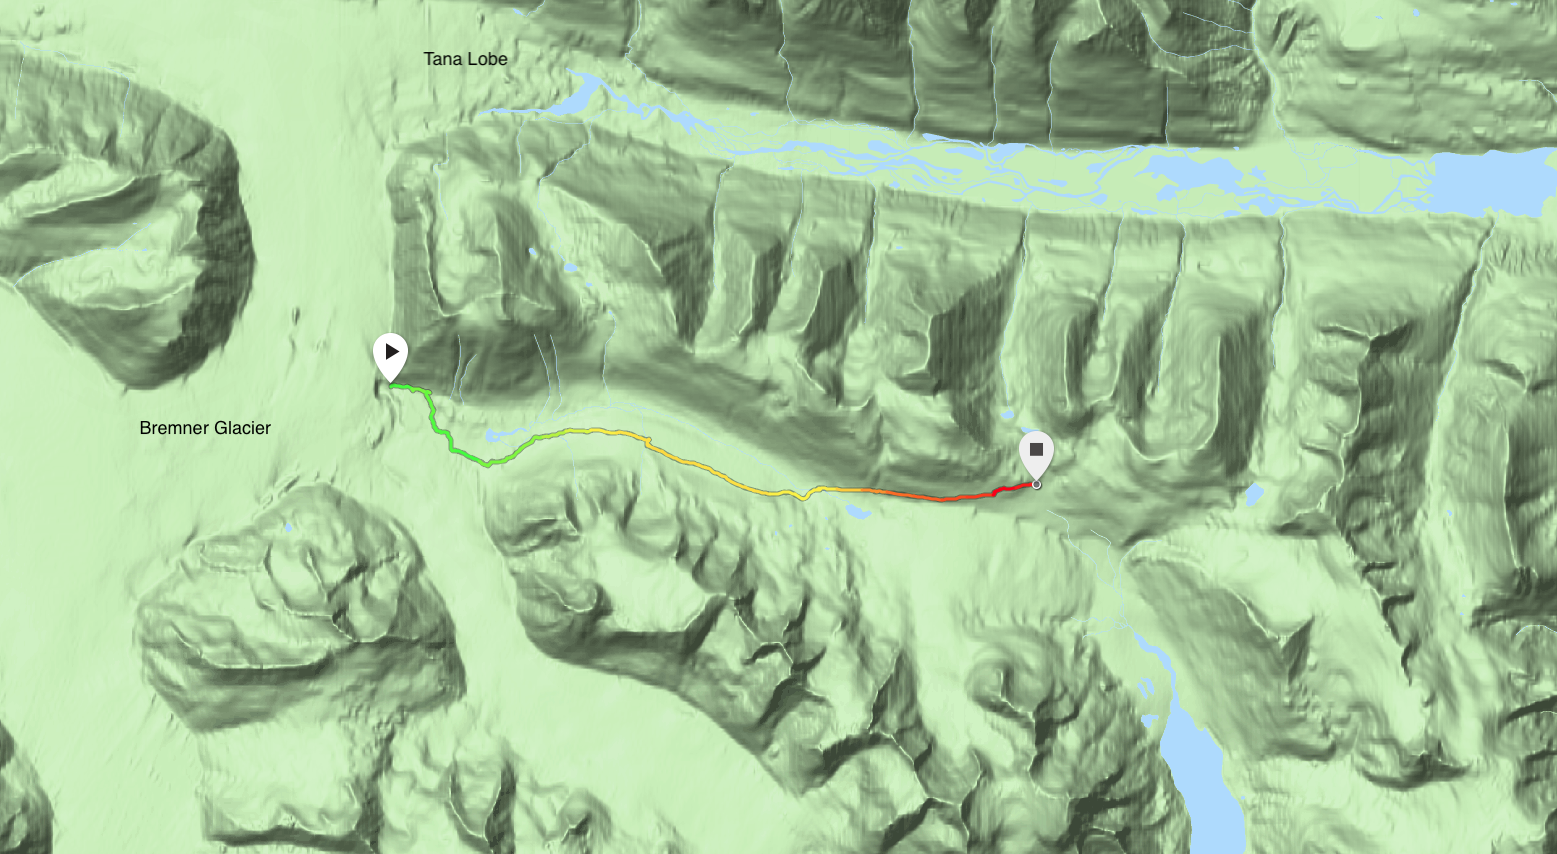
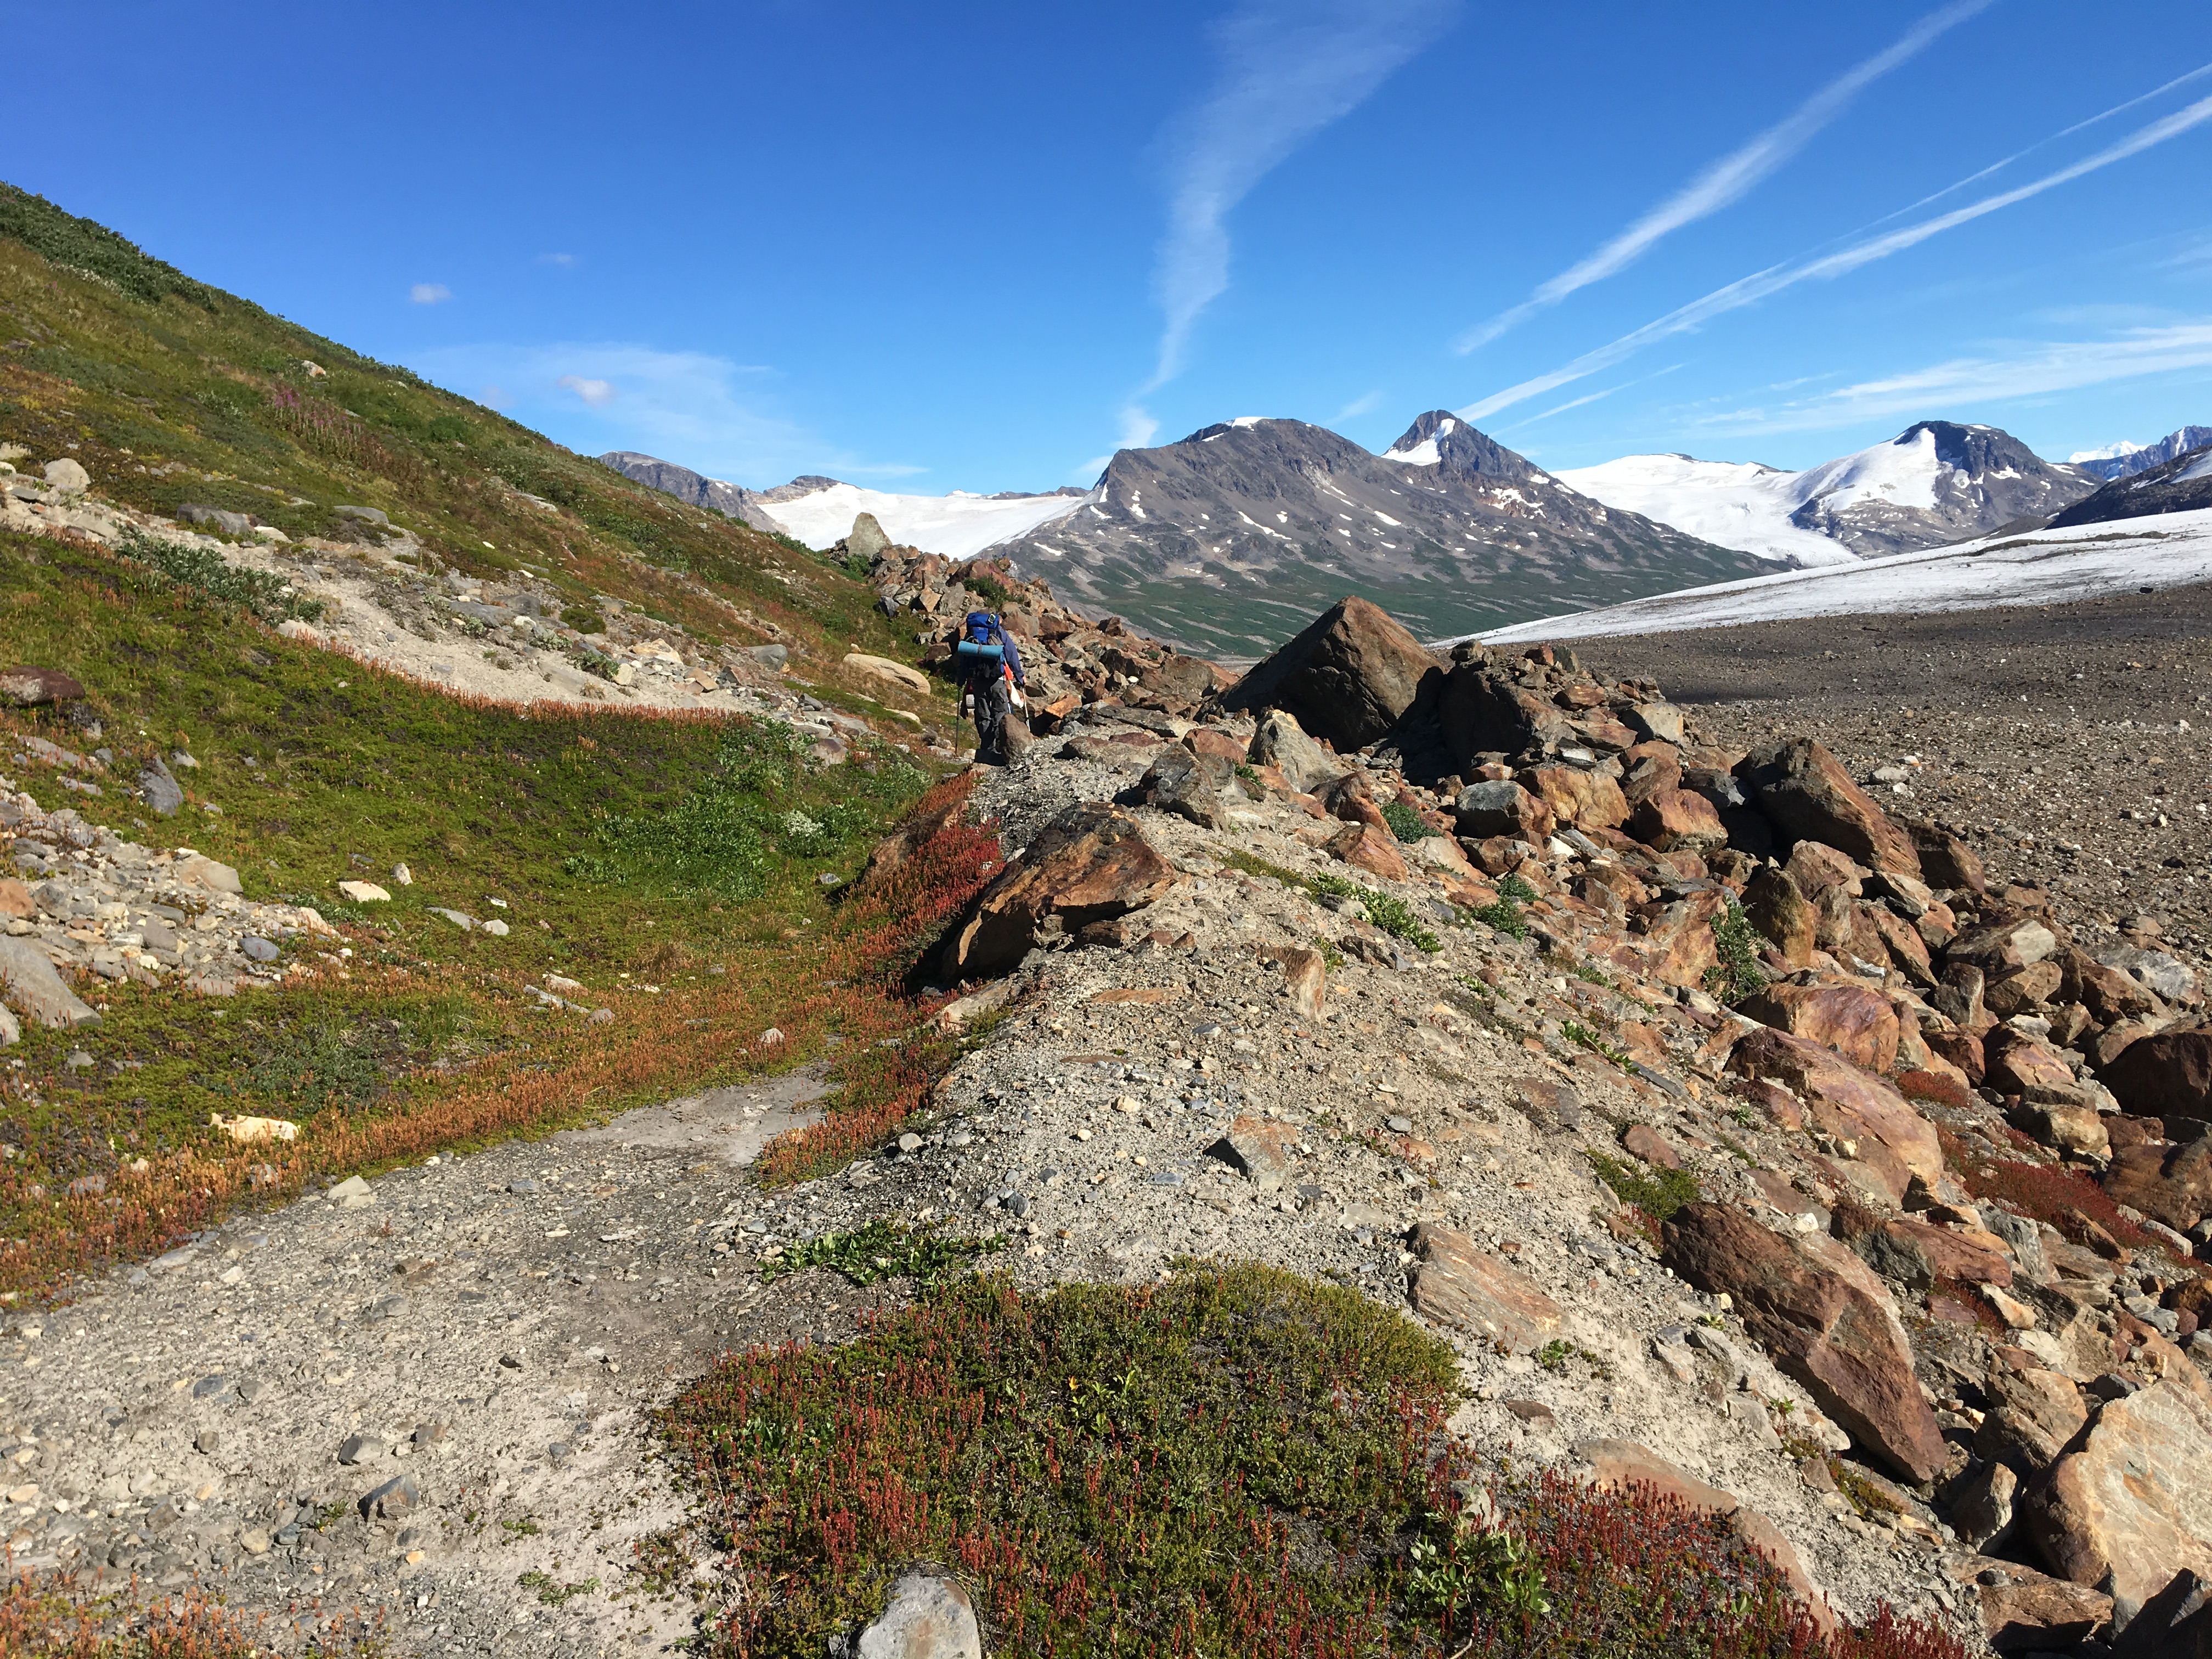
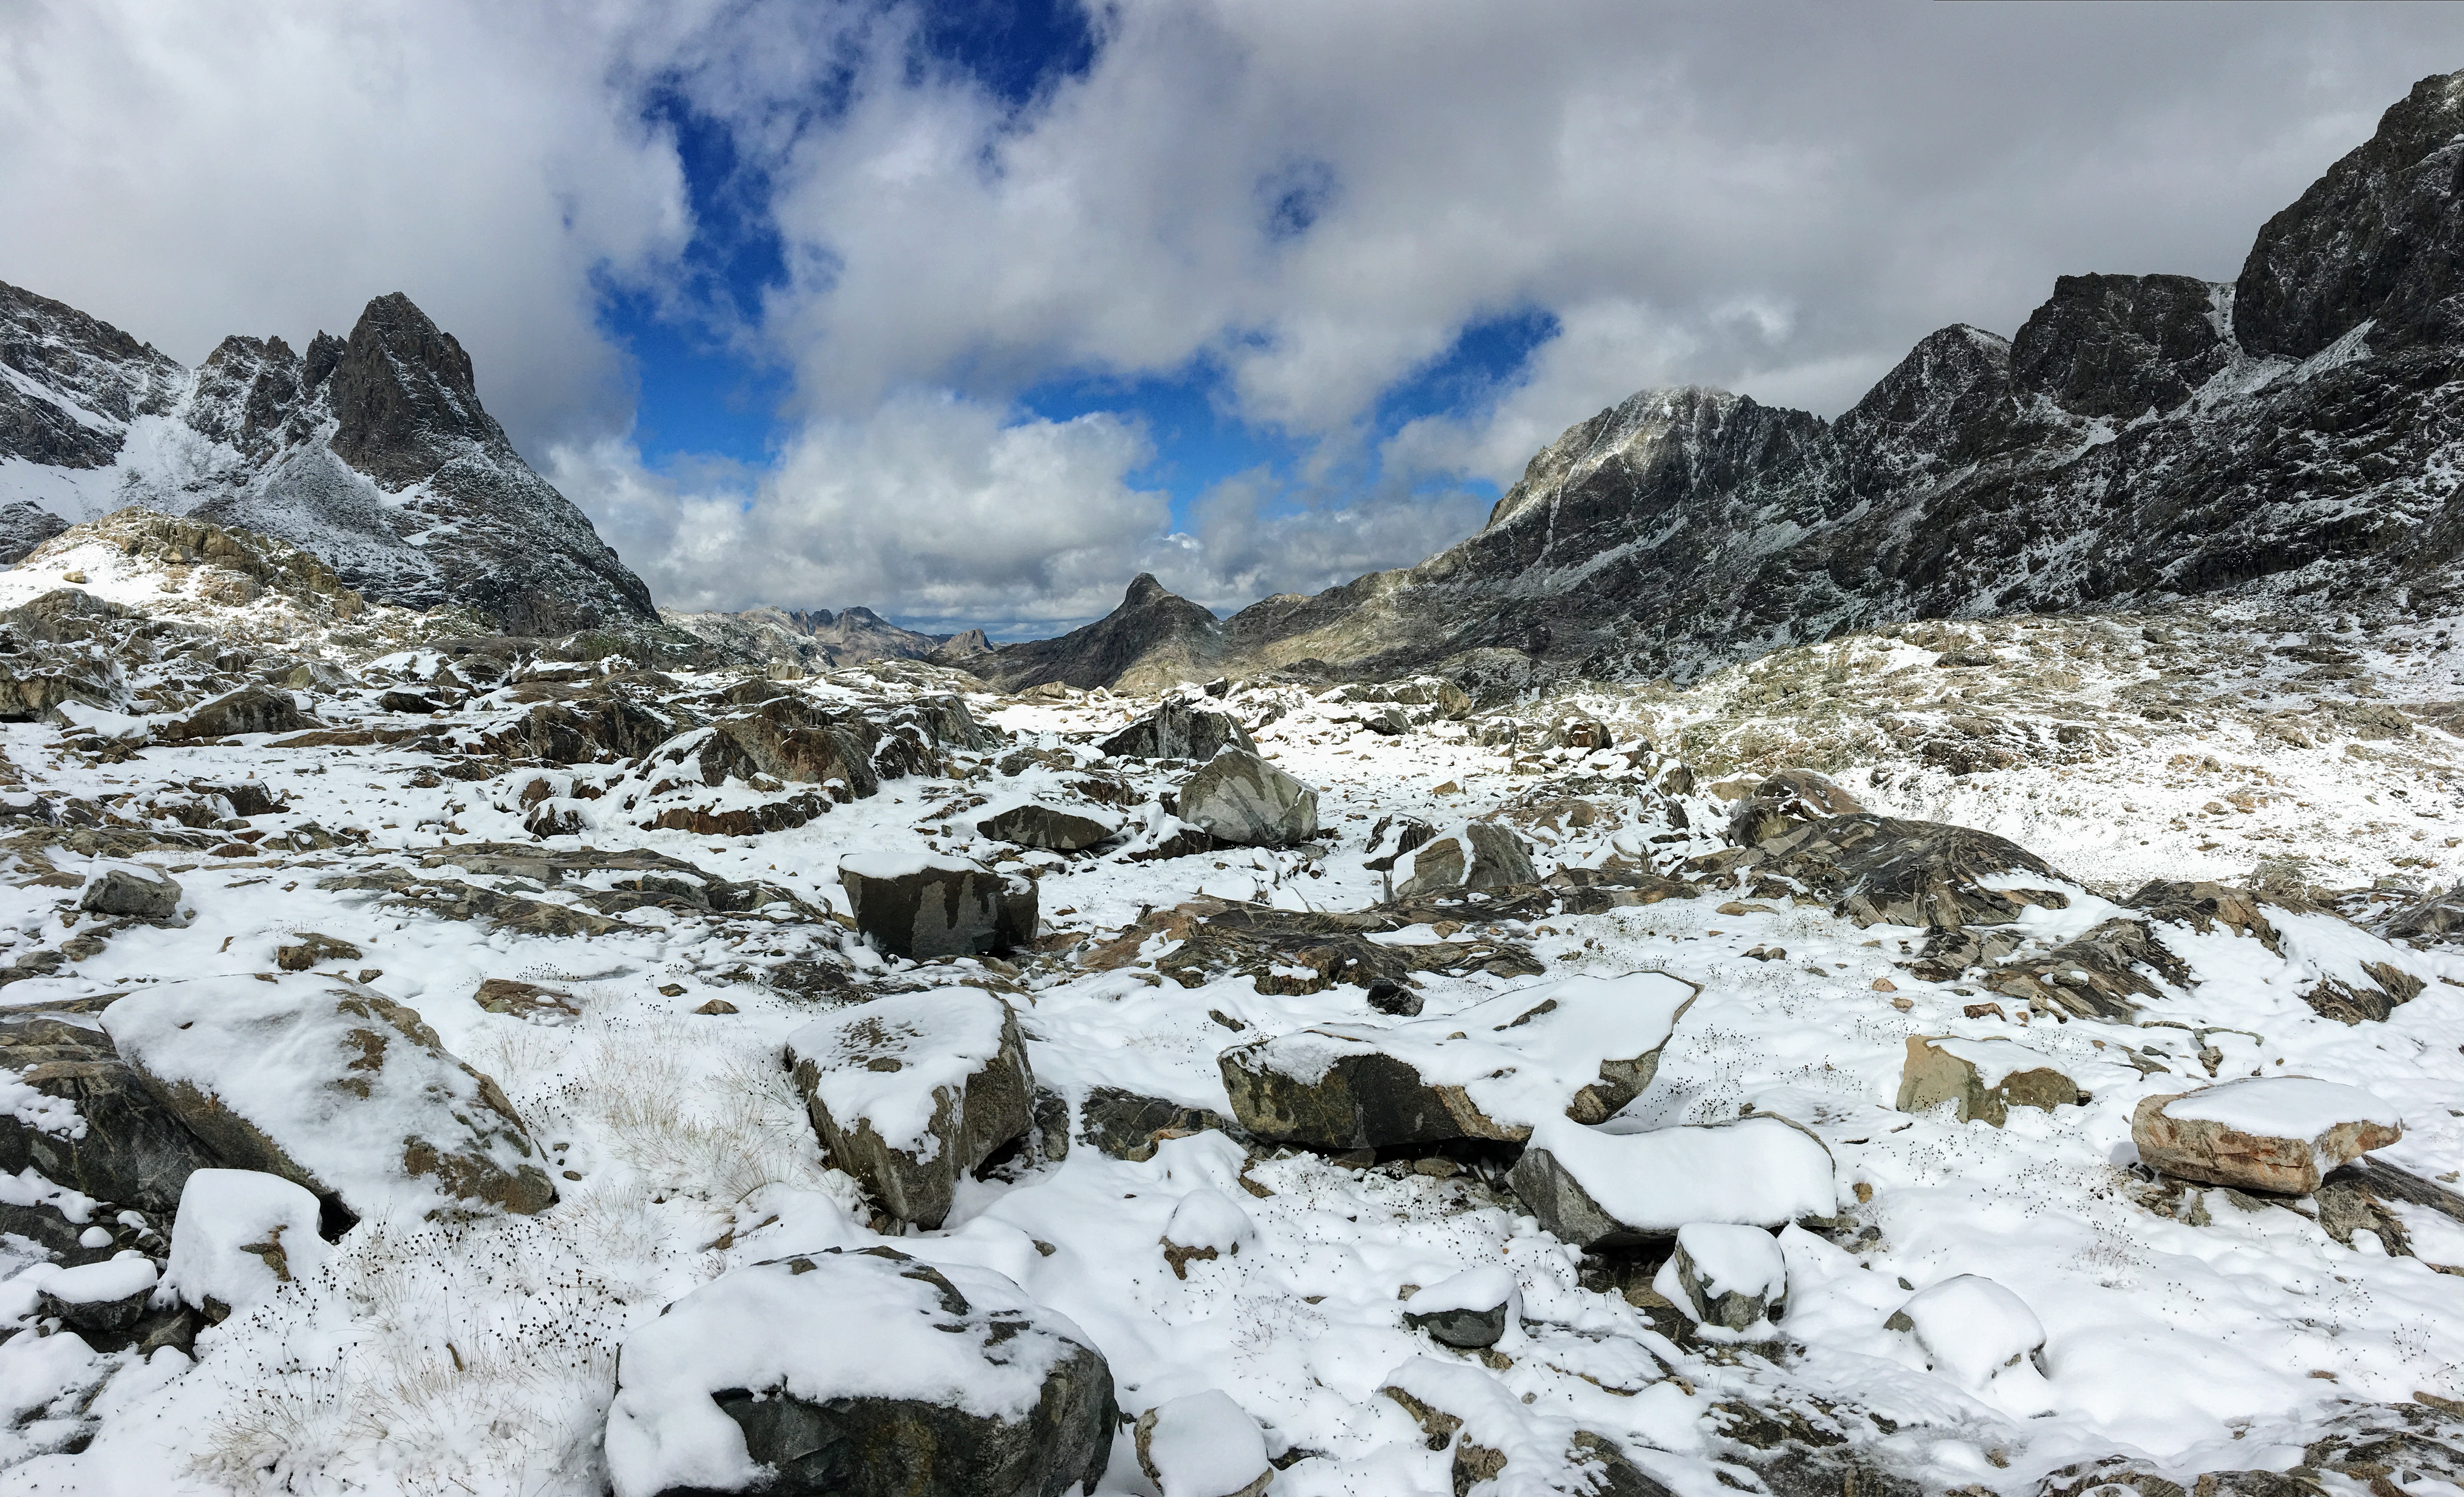
Even without a trail and with accumulated snow, the first mile was really pretty easy.  It was the next two and a half miles that would really slow us down.  As you can see from the map at the very top of this post, the route for this day was mostly green.  It was only our ascent and descent to and from the pass that was in the red, or was significantly slower.  The hardest part on either side of the pass was our footing.  Without a trail we were obviously making our own route.  With each step up we had to make sure that the rocks under our feet were not loose or wobbly, because we could not see the rocks.  This was a painstaking process, but it wasn’t the end of the world.  It just took time.

img_1398img_1409img_1421img_1423

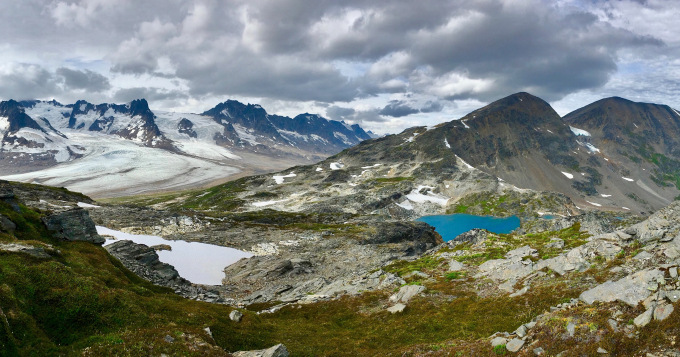
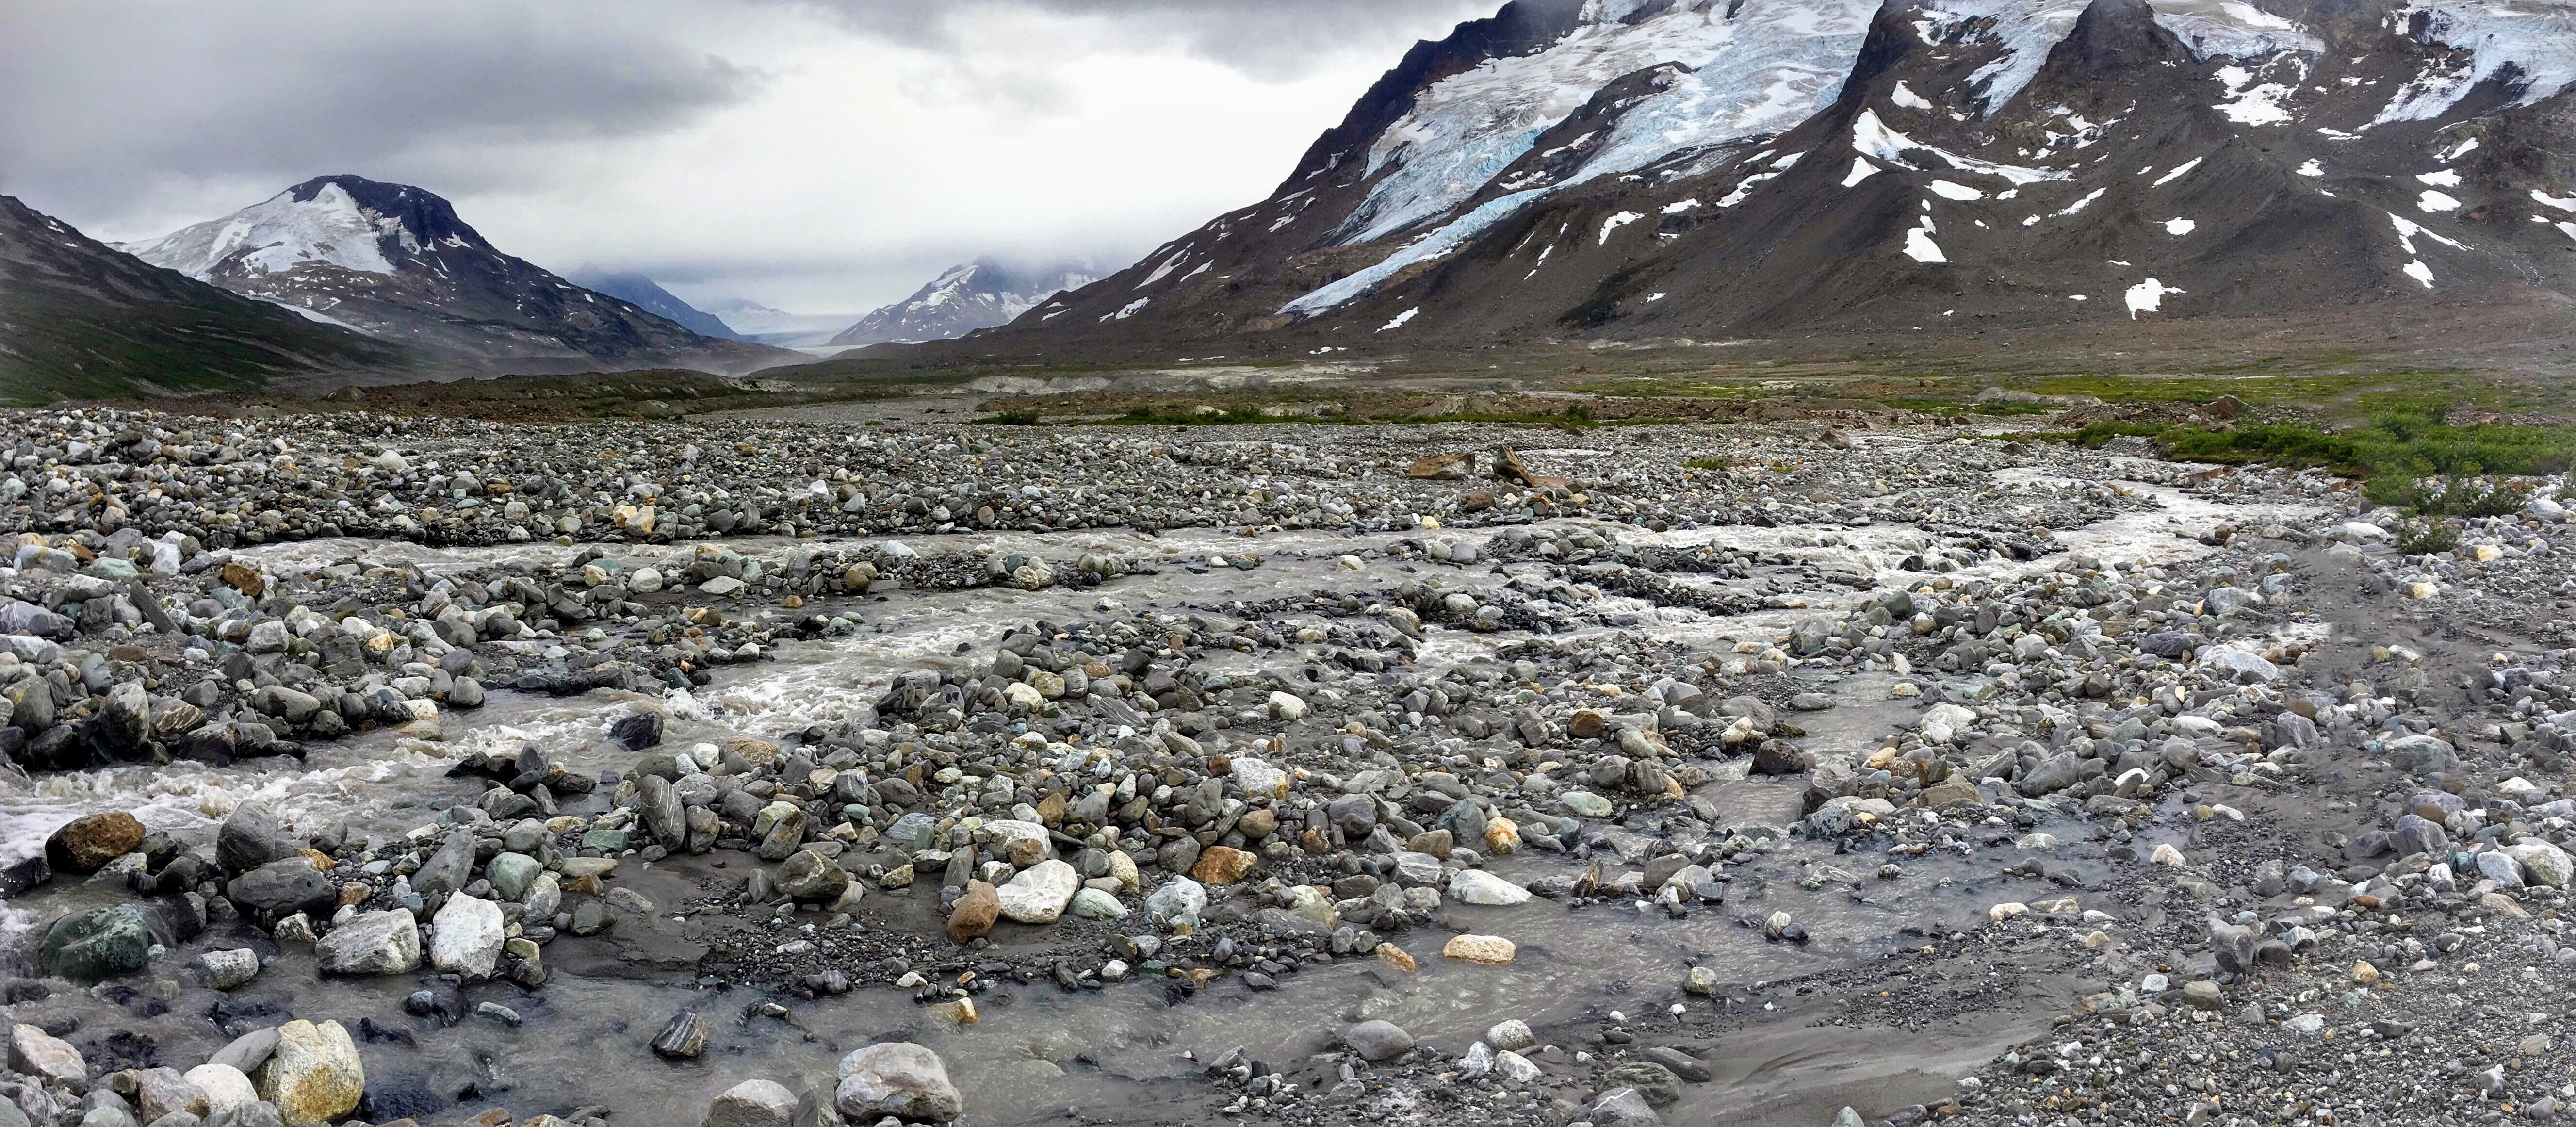
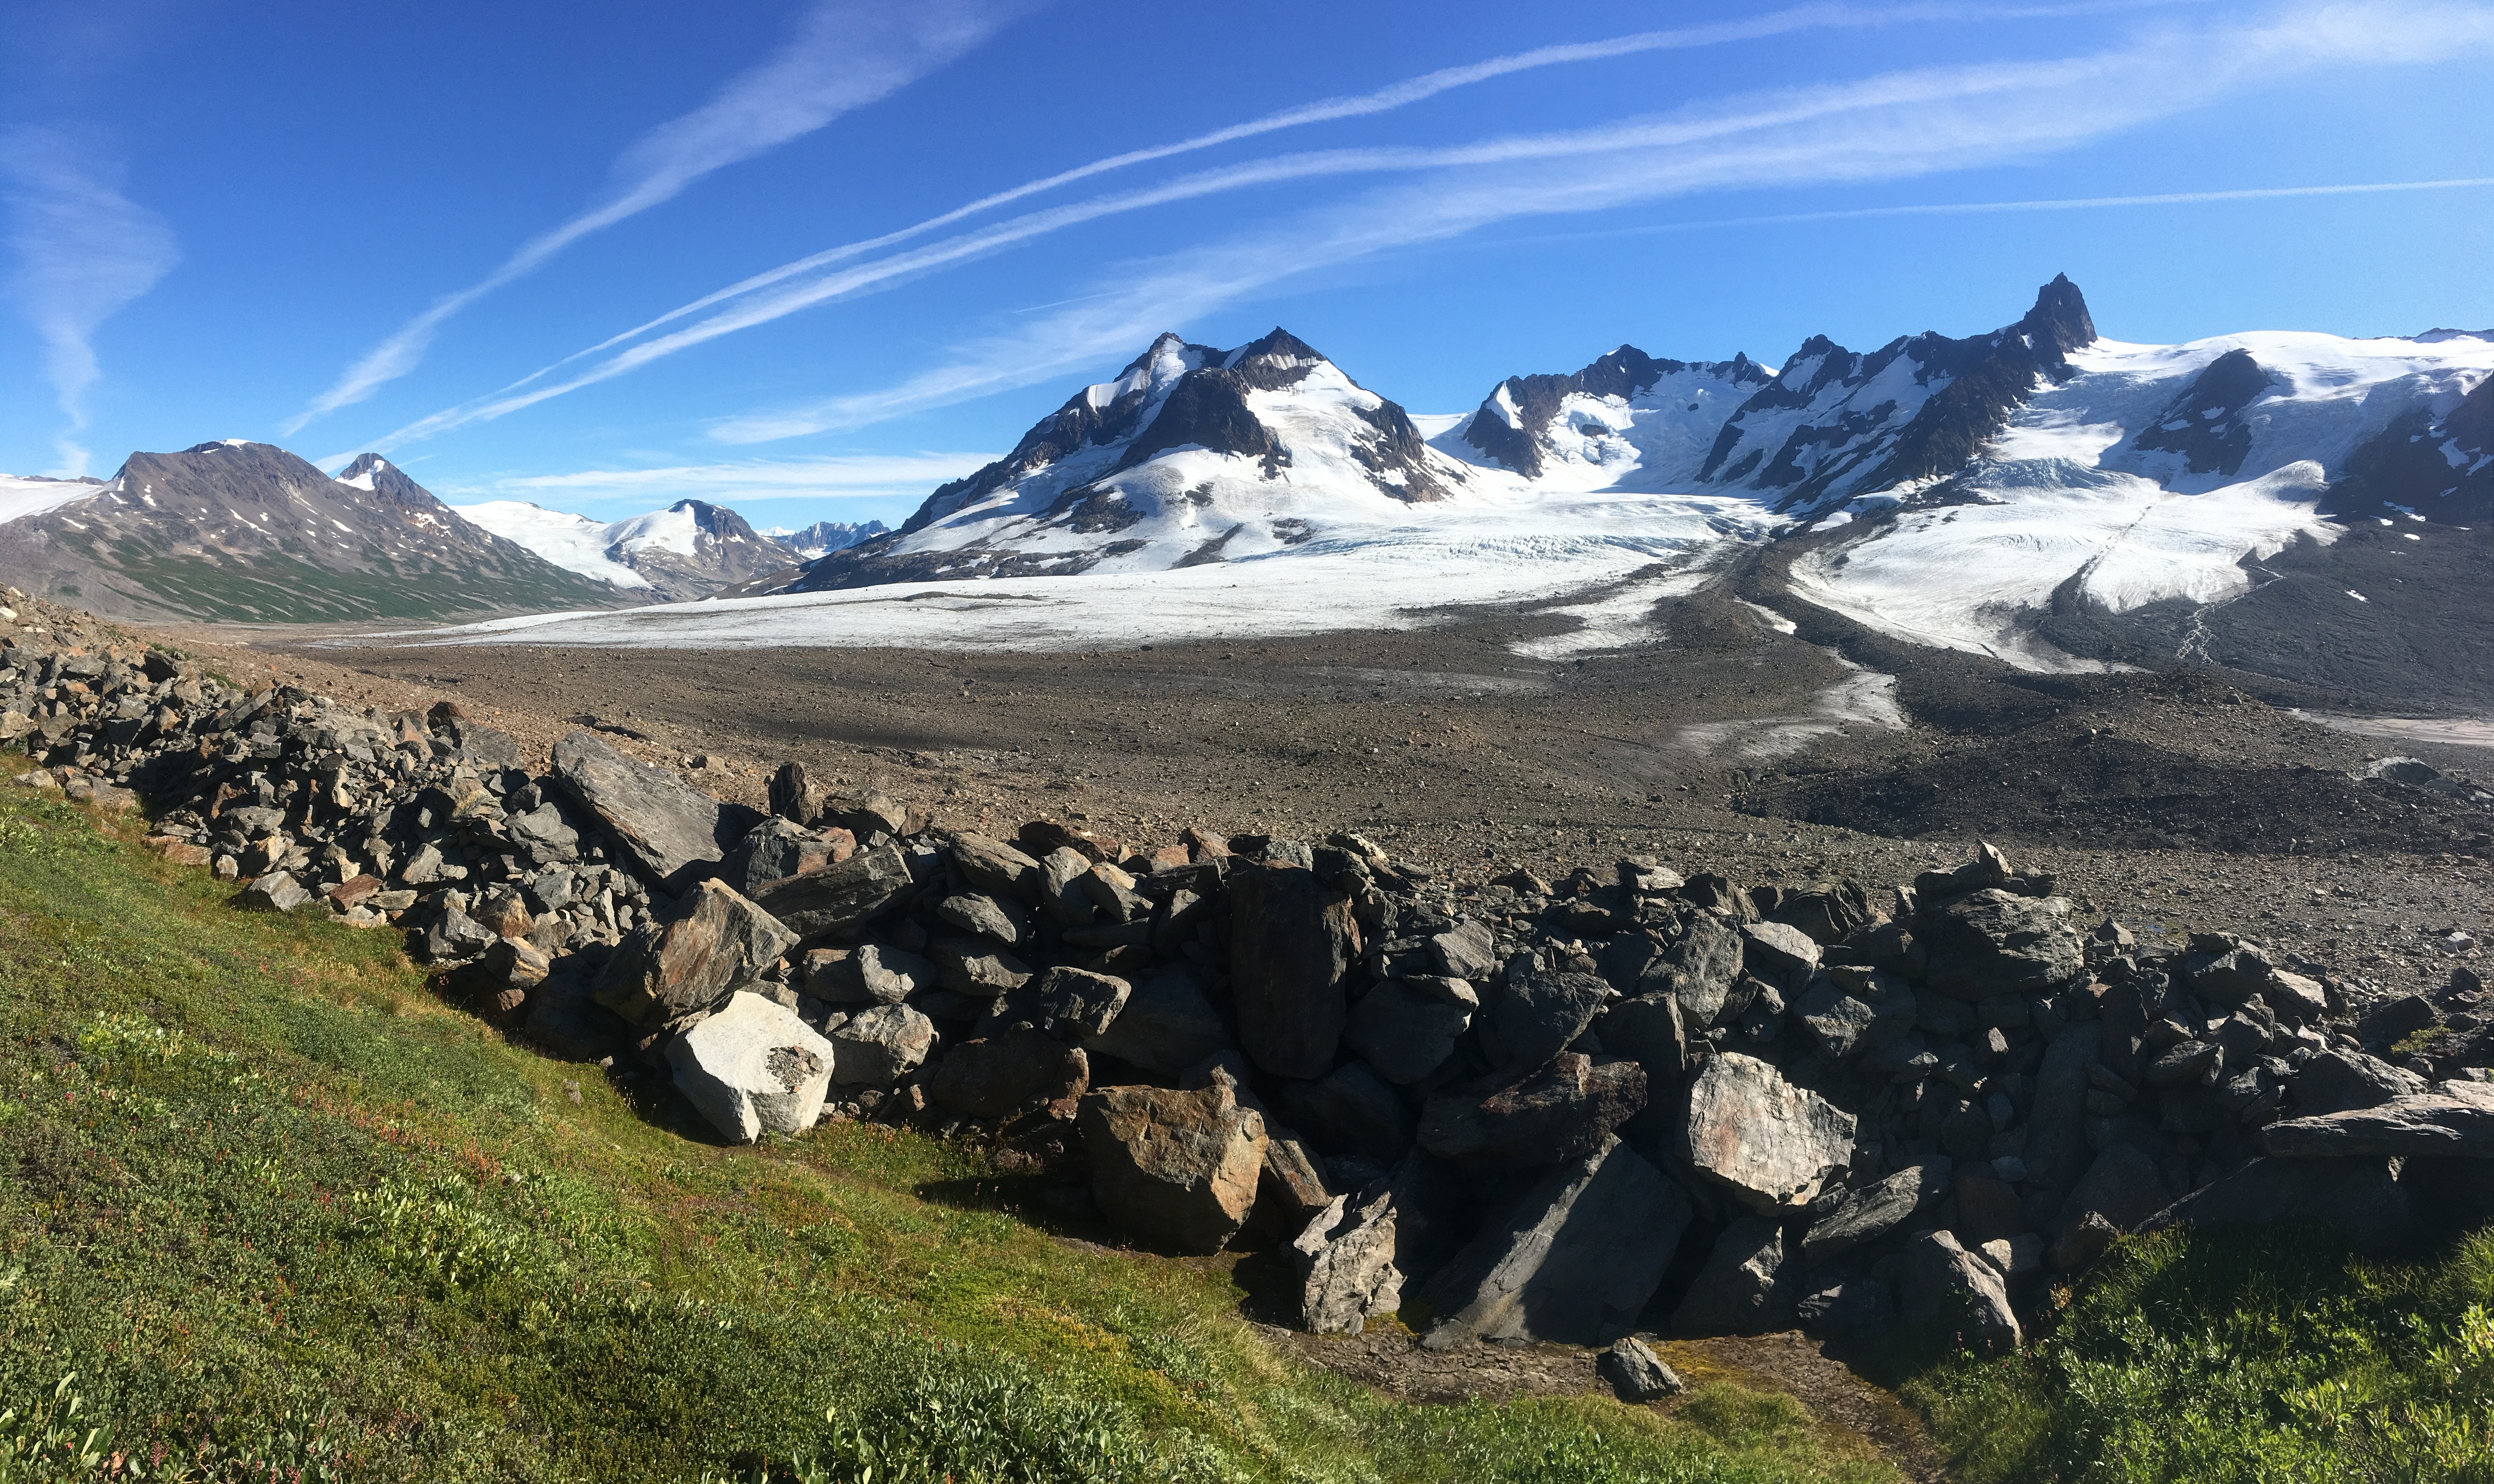
We were sucking wind going up to 12,200.  Because we thought that the previous days would gradually acclimate us, we didn’t take any Diamox for this trip to speed the process.  While we had gradually increased our elevation over the previous days, these Indiana boys live at 650 feet above sea level.  Once we hit the pass I didn’t take any pictures going down Knapsack.  It was too steep and treacherous.  We heavily relied on our trekking poles for stability.  I think I fell a couple of times due to loose rocks.  It was certainly more difficult going down than going up.  So the next pictures you see are at the bottom of Knapsack where we had to make a decision about our route.  Would we try to hit Bonney or take an alternate route?

img_1435img_1437img_1439img_1440

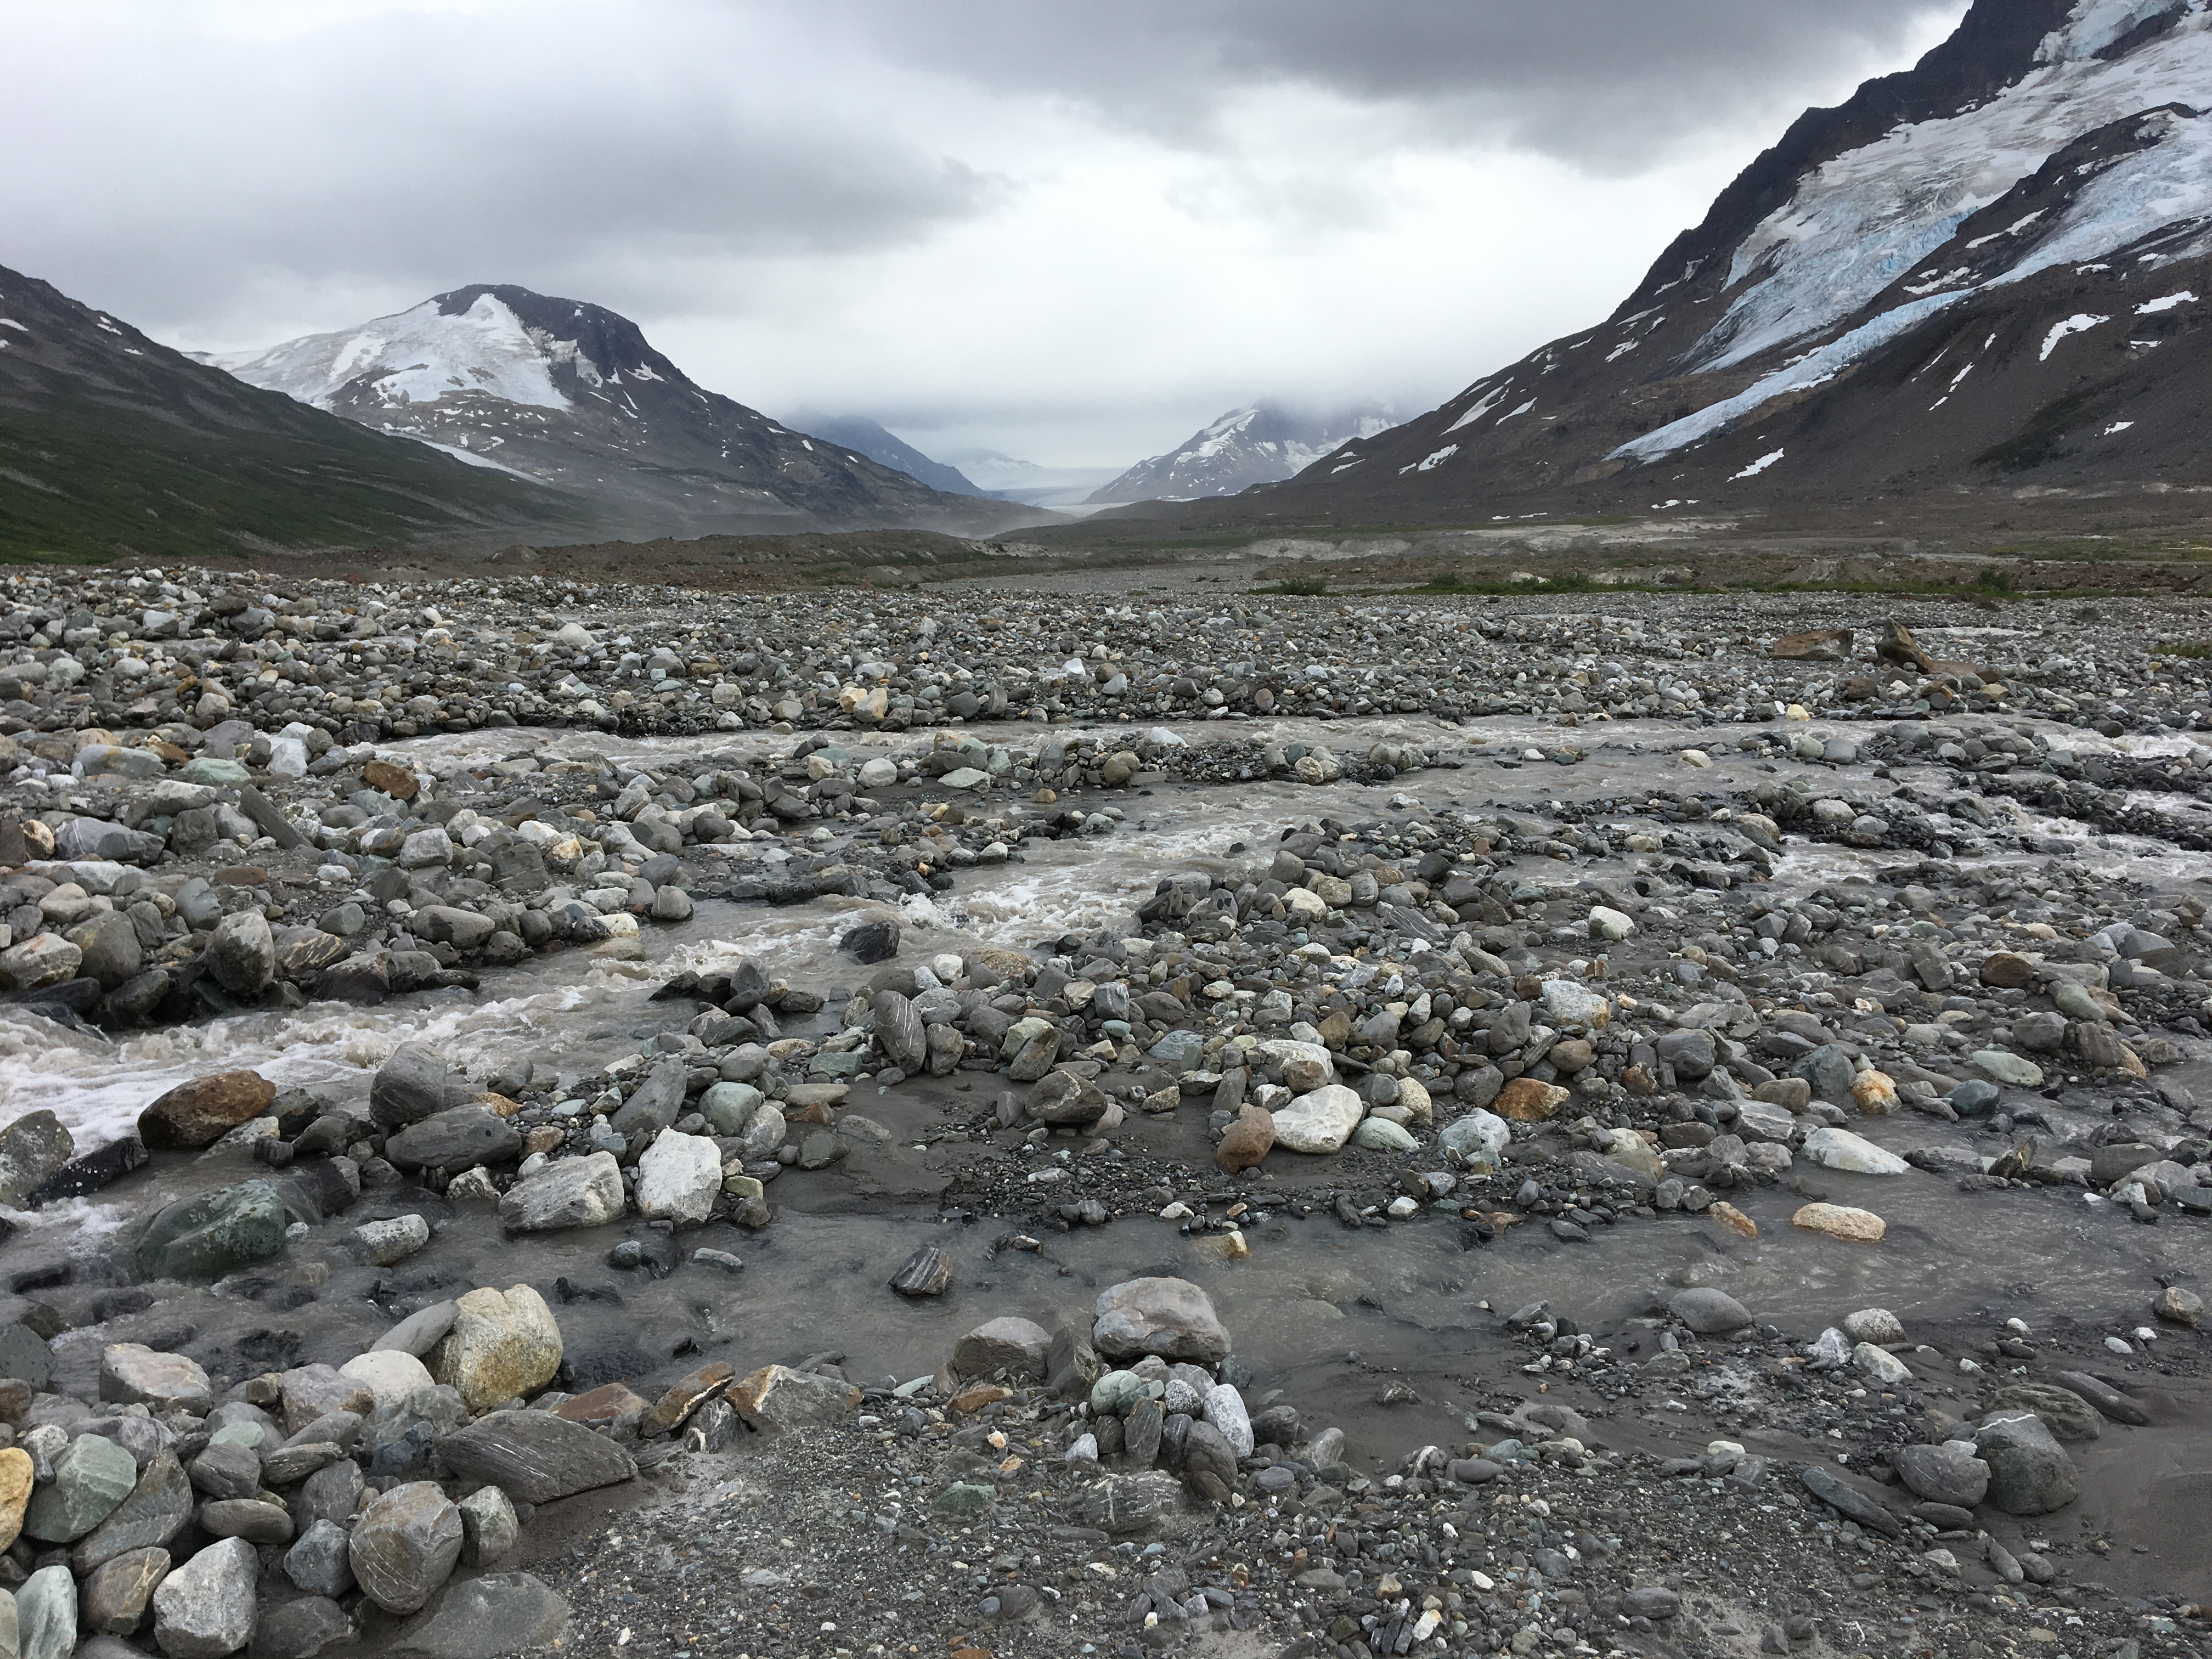
We stopped for lunch to put together a plan.  The most unfortunate part was that we were already into the early afternoon, which meant that a Bonney Pass attempt likely would not be wise for the time it would take.  Another factor that weighed heavily was the possibility of more intense inclement weather at 13,000, if we went ahead and hit The High Route.  The last thing that any of us wanted was to get into a situation in which the weather worsened at higher elevations and necessitated a rescue.  Maybe that wasn’t likely, but we don’t know the area that well.  We actually thought the snow window may have opened a couple weeks after our trip, but it didn’t.  So who knew what we may have been getting ourselves in to.  The third factor was that one of the guys was still not feeling well.  That made our decision really quite easy.  With Bonney Pass looking really gnarly, steep, and slick, the unpredictable weather at higher elevations, and a person possibly suffering from mild altitude sickness… we decided to take a twenty mile exit through Titcomb Basin and out.  Of course this was disheartening because it wasn’t our original plan, but it was the wise decision.

img_1446img_1448img_1456img_1457img_1458

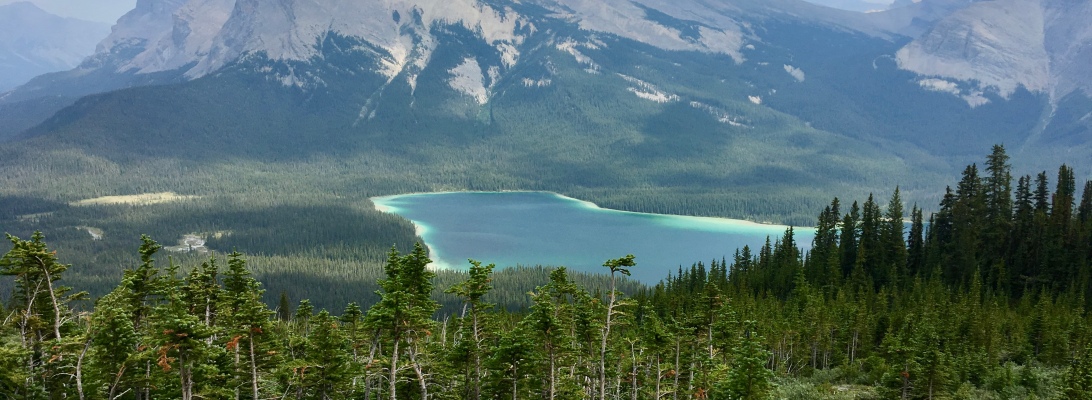
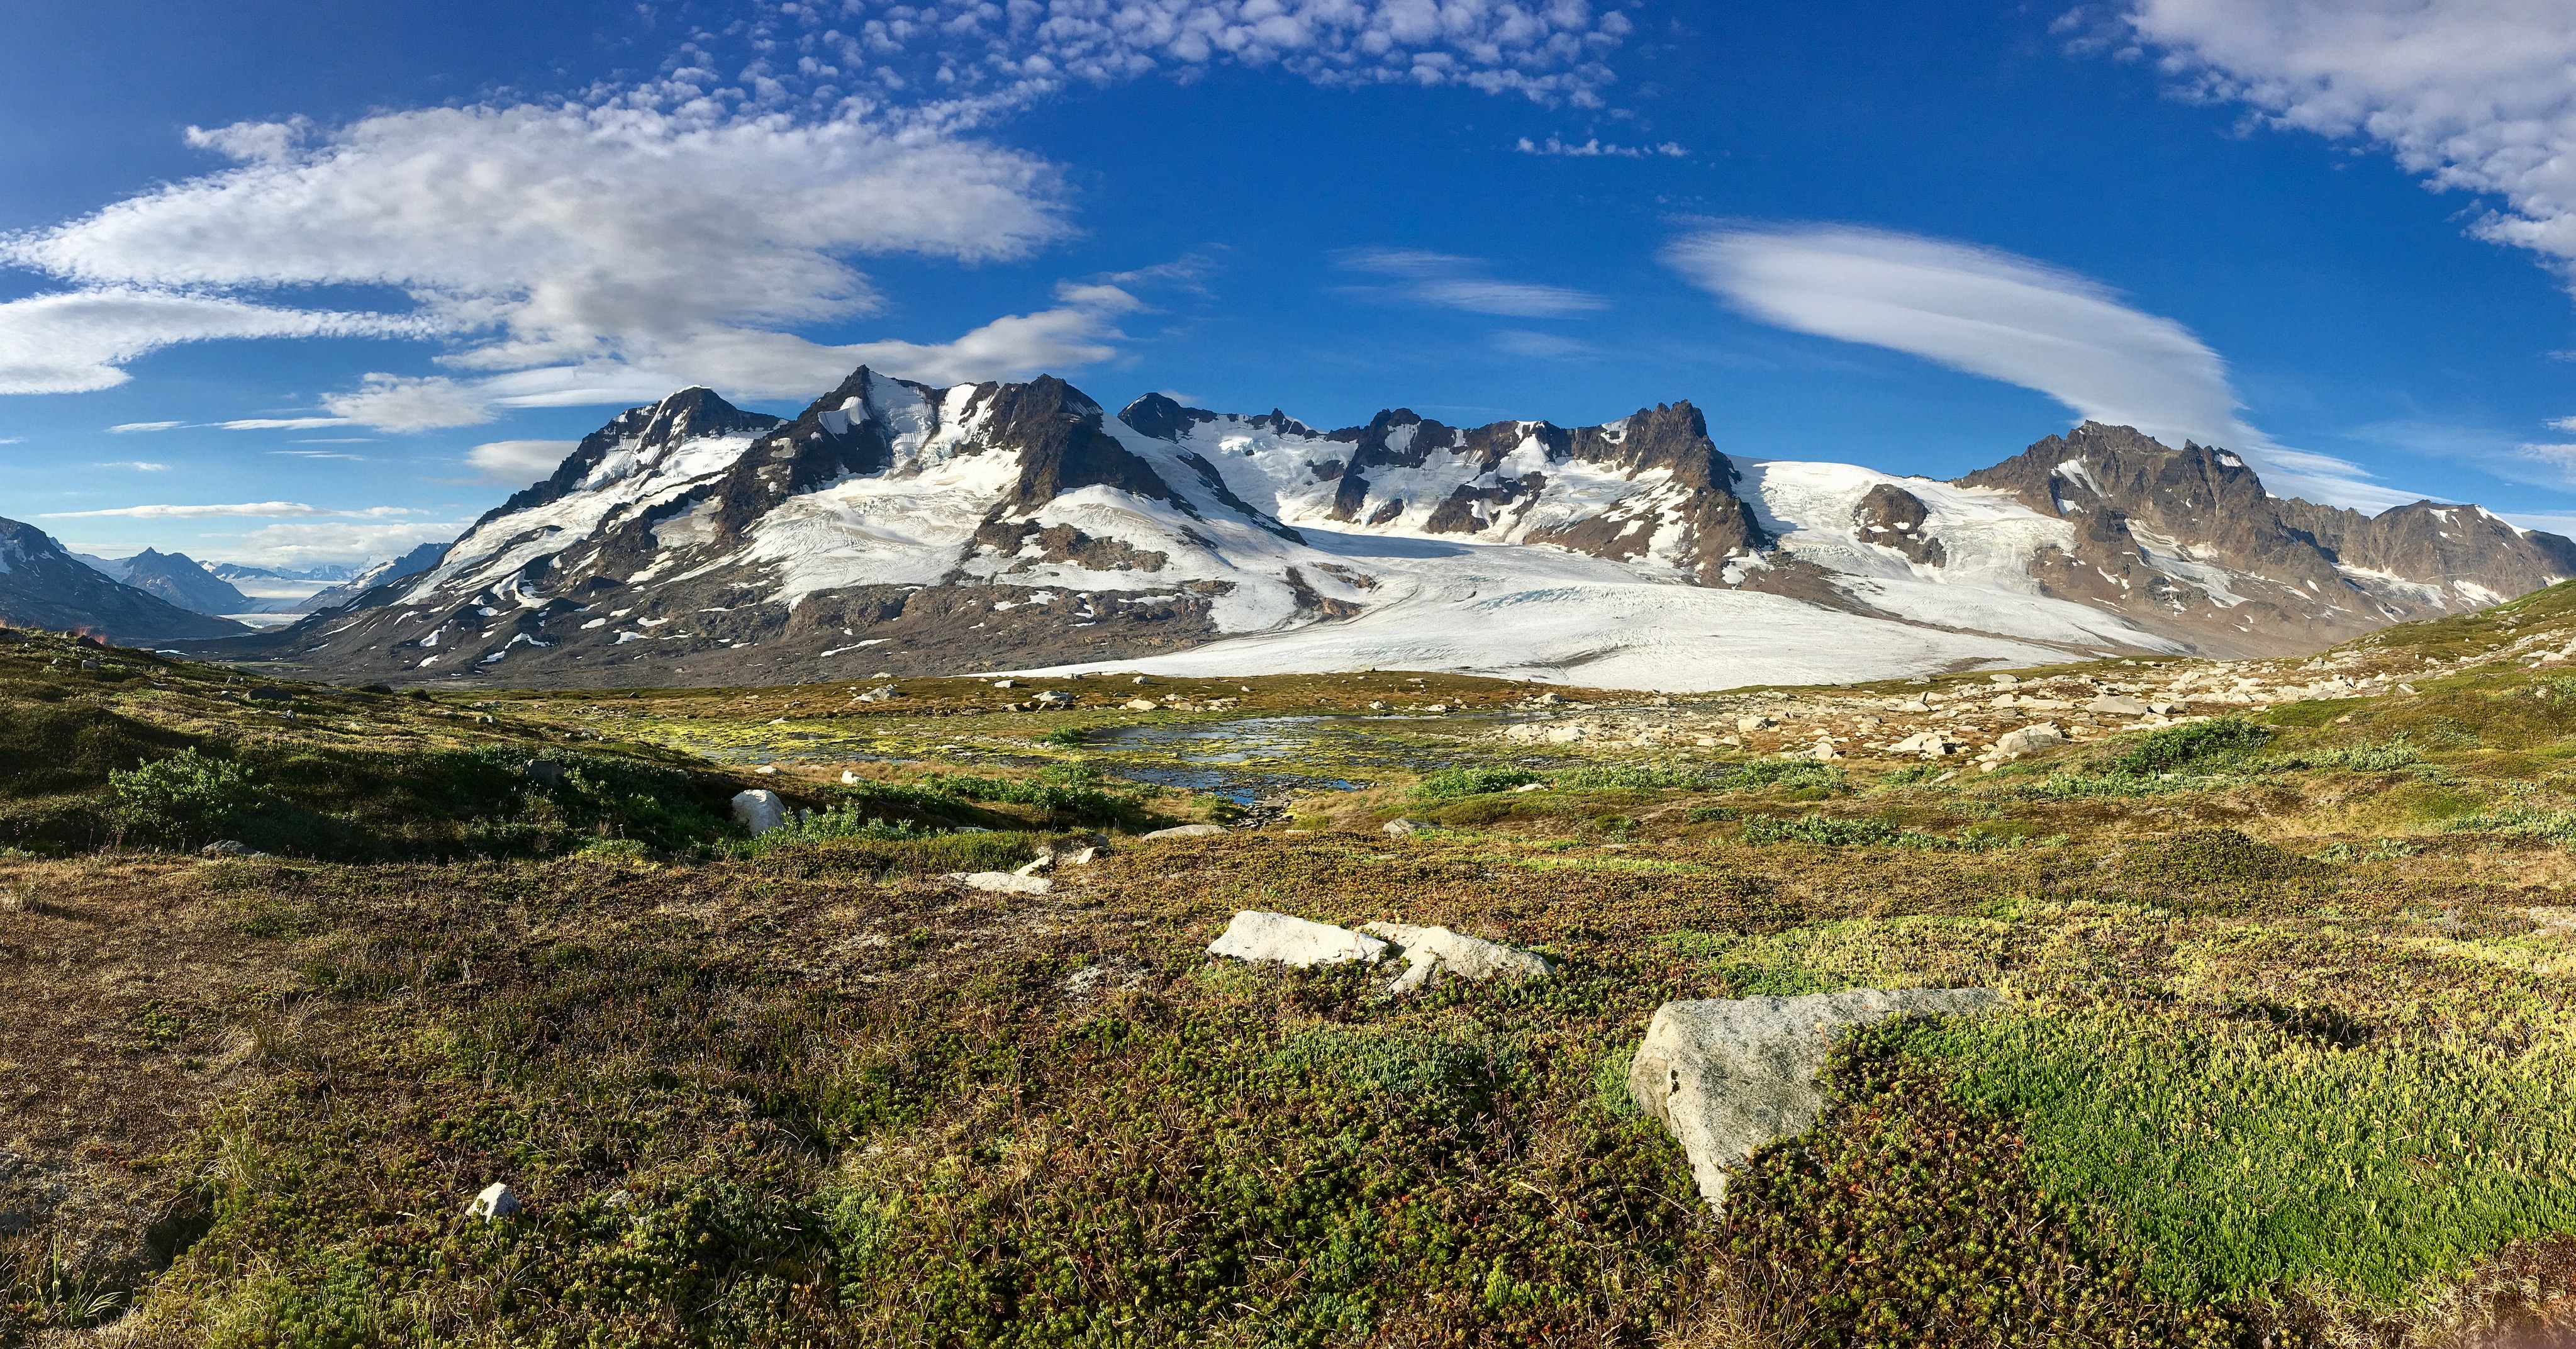
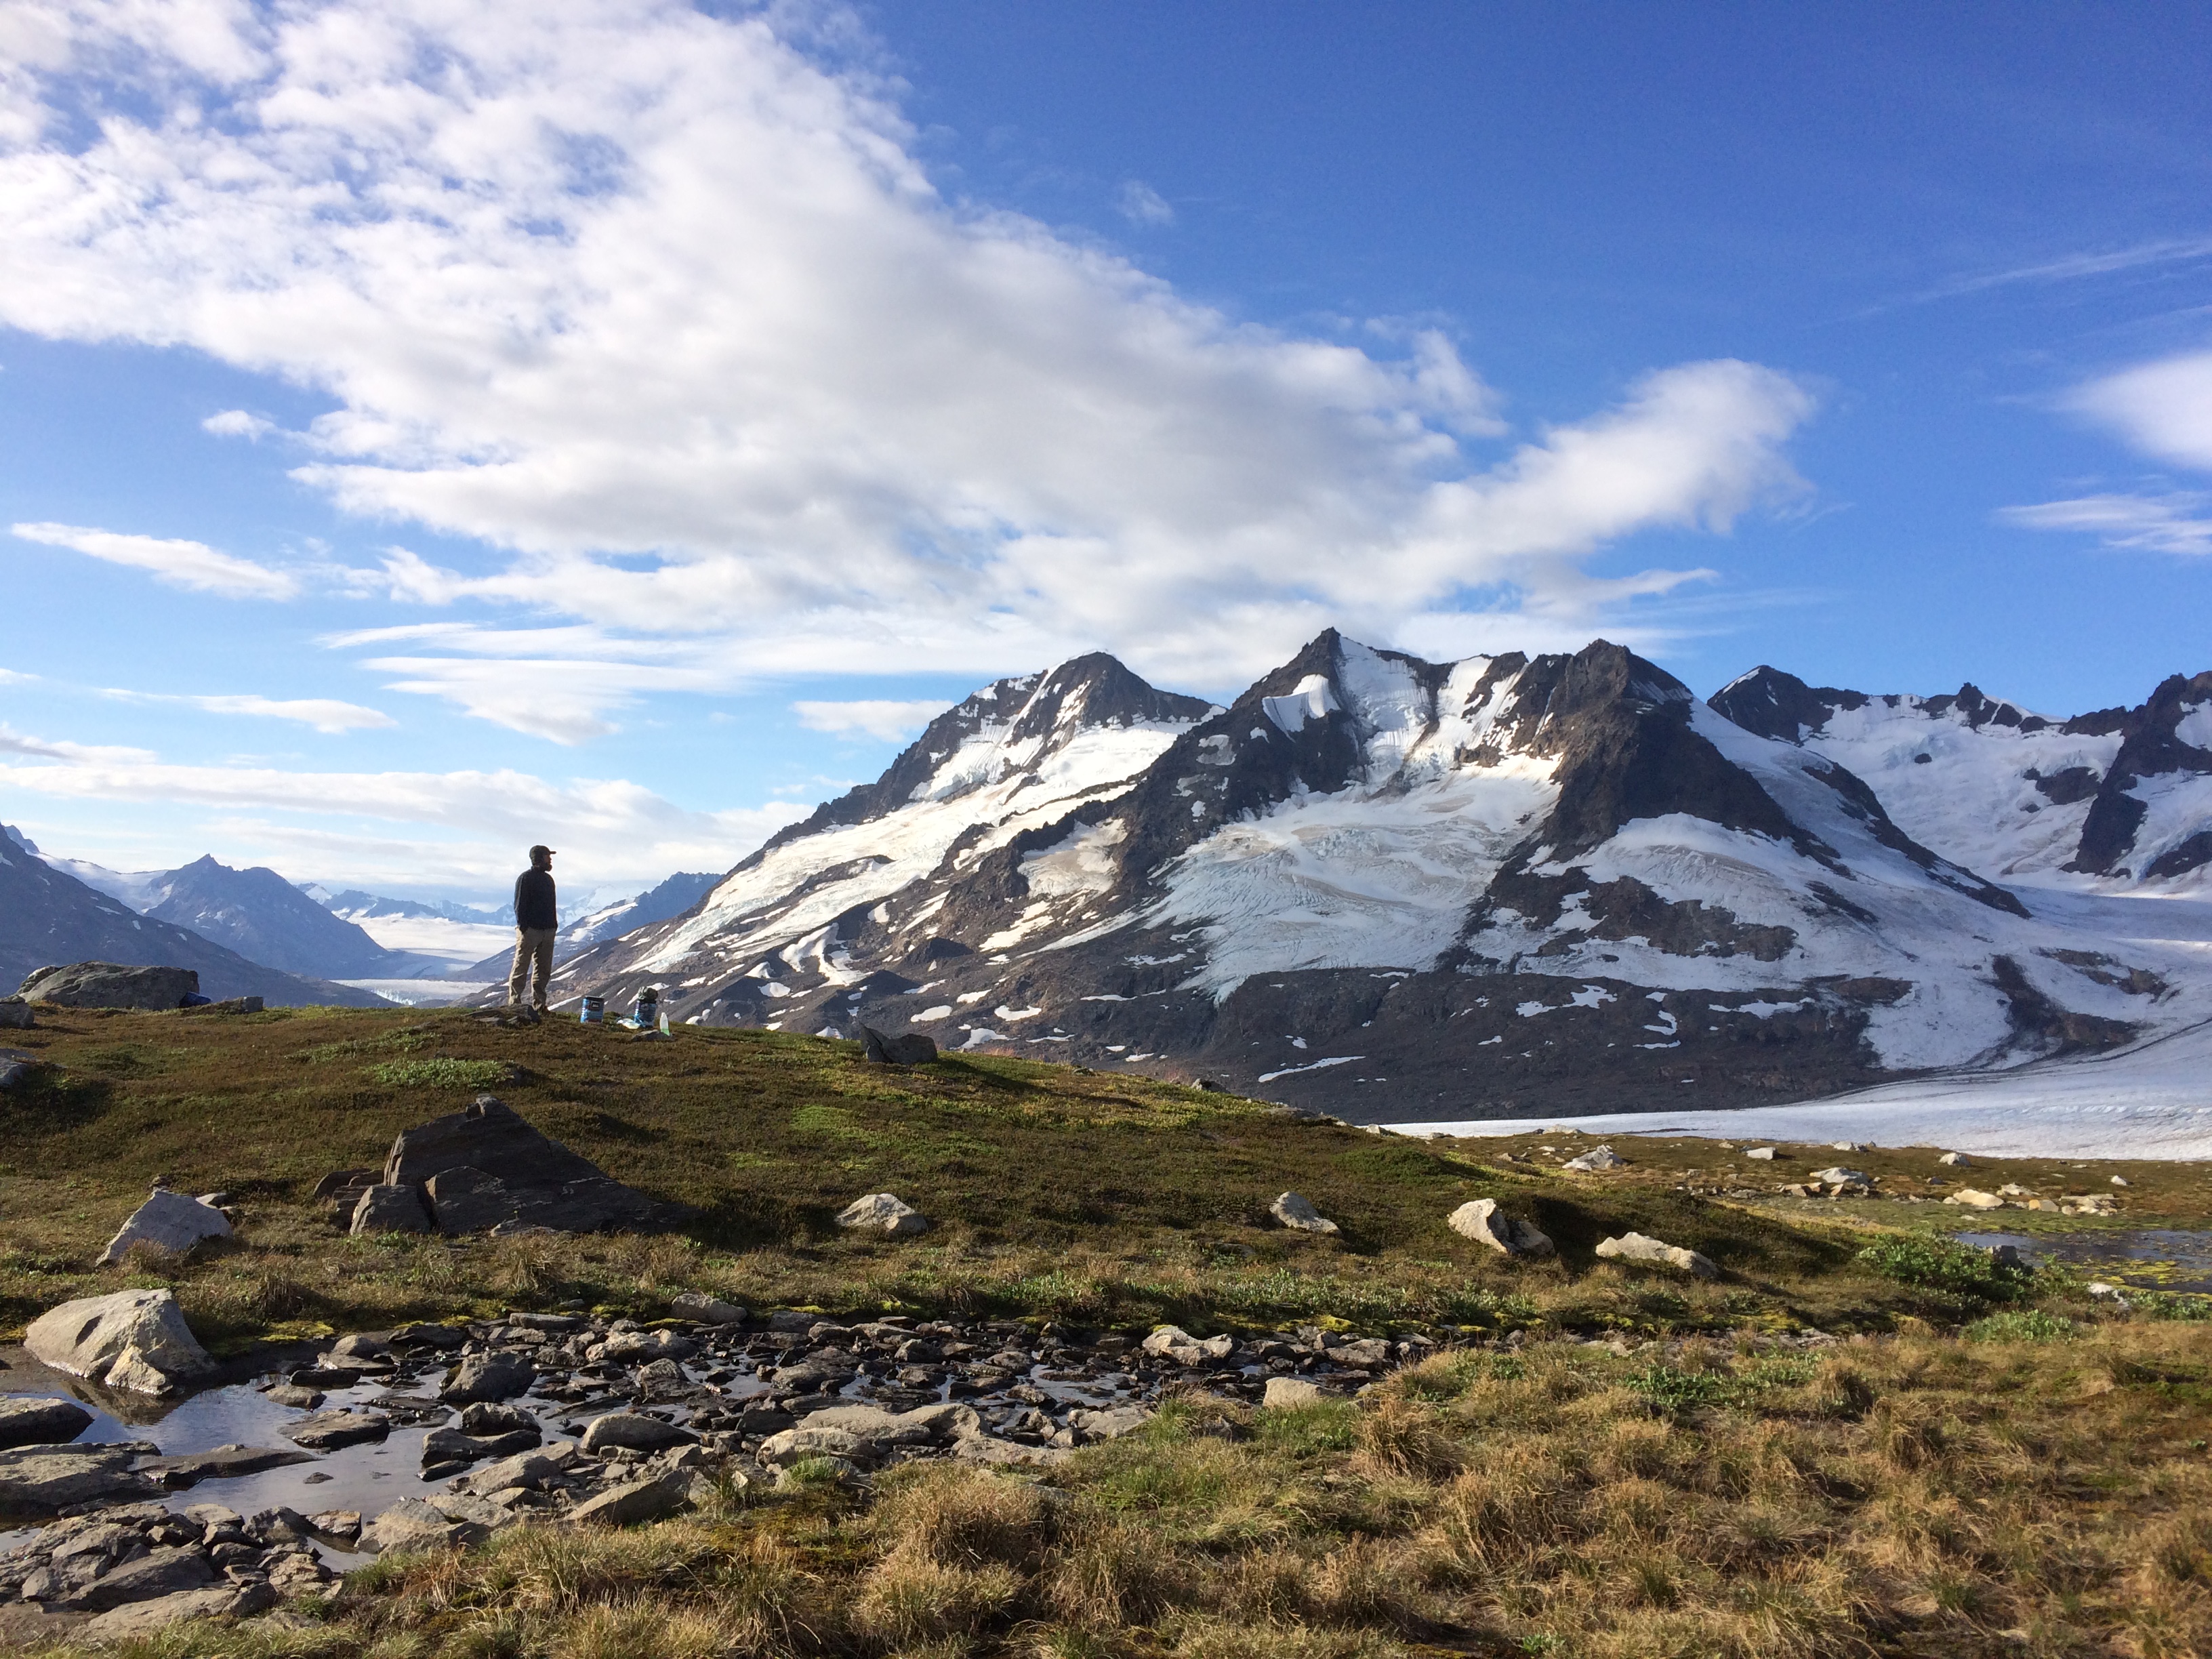
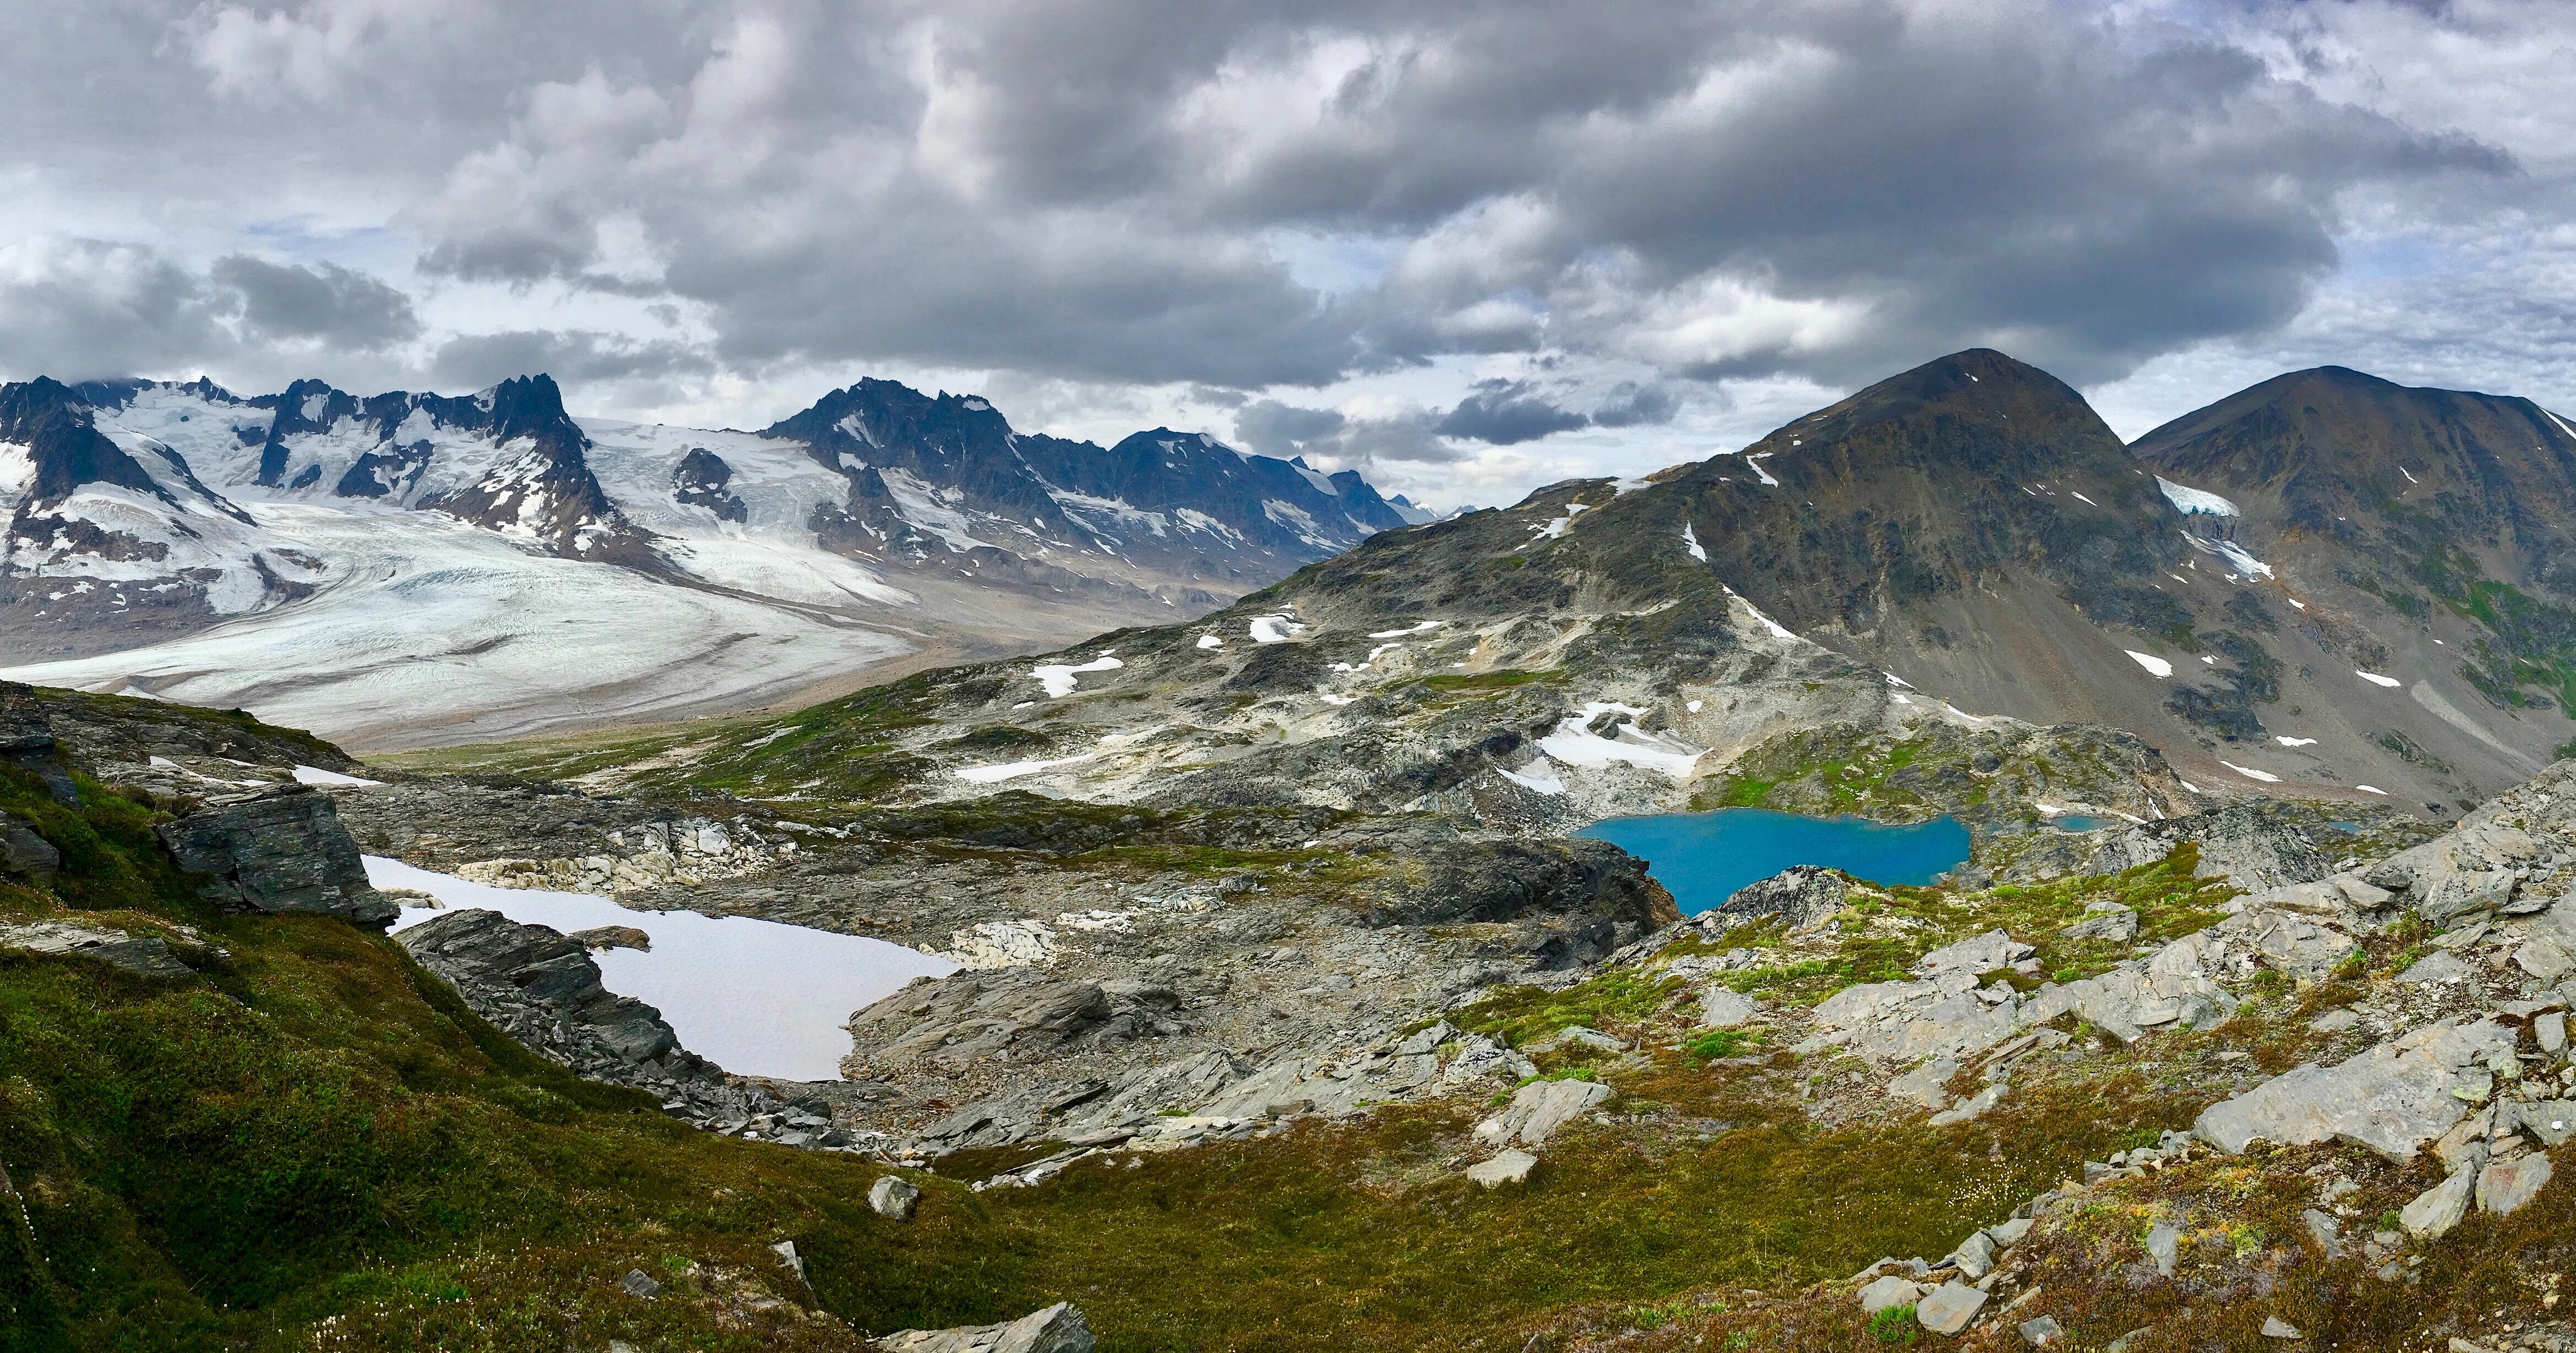
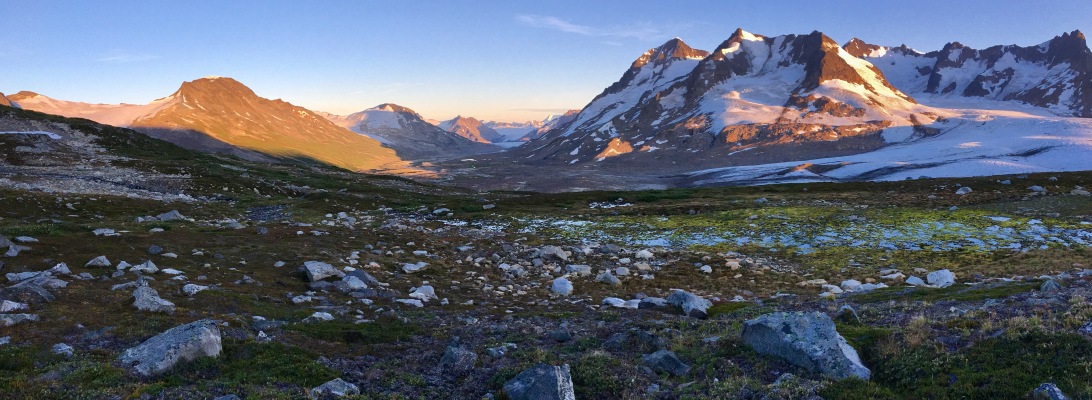
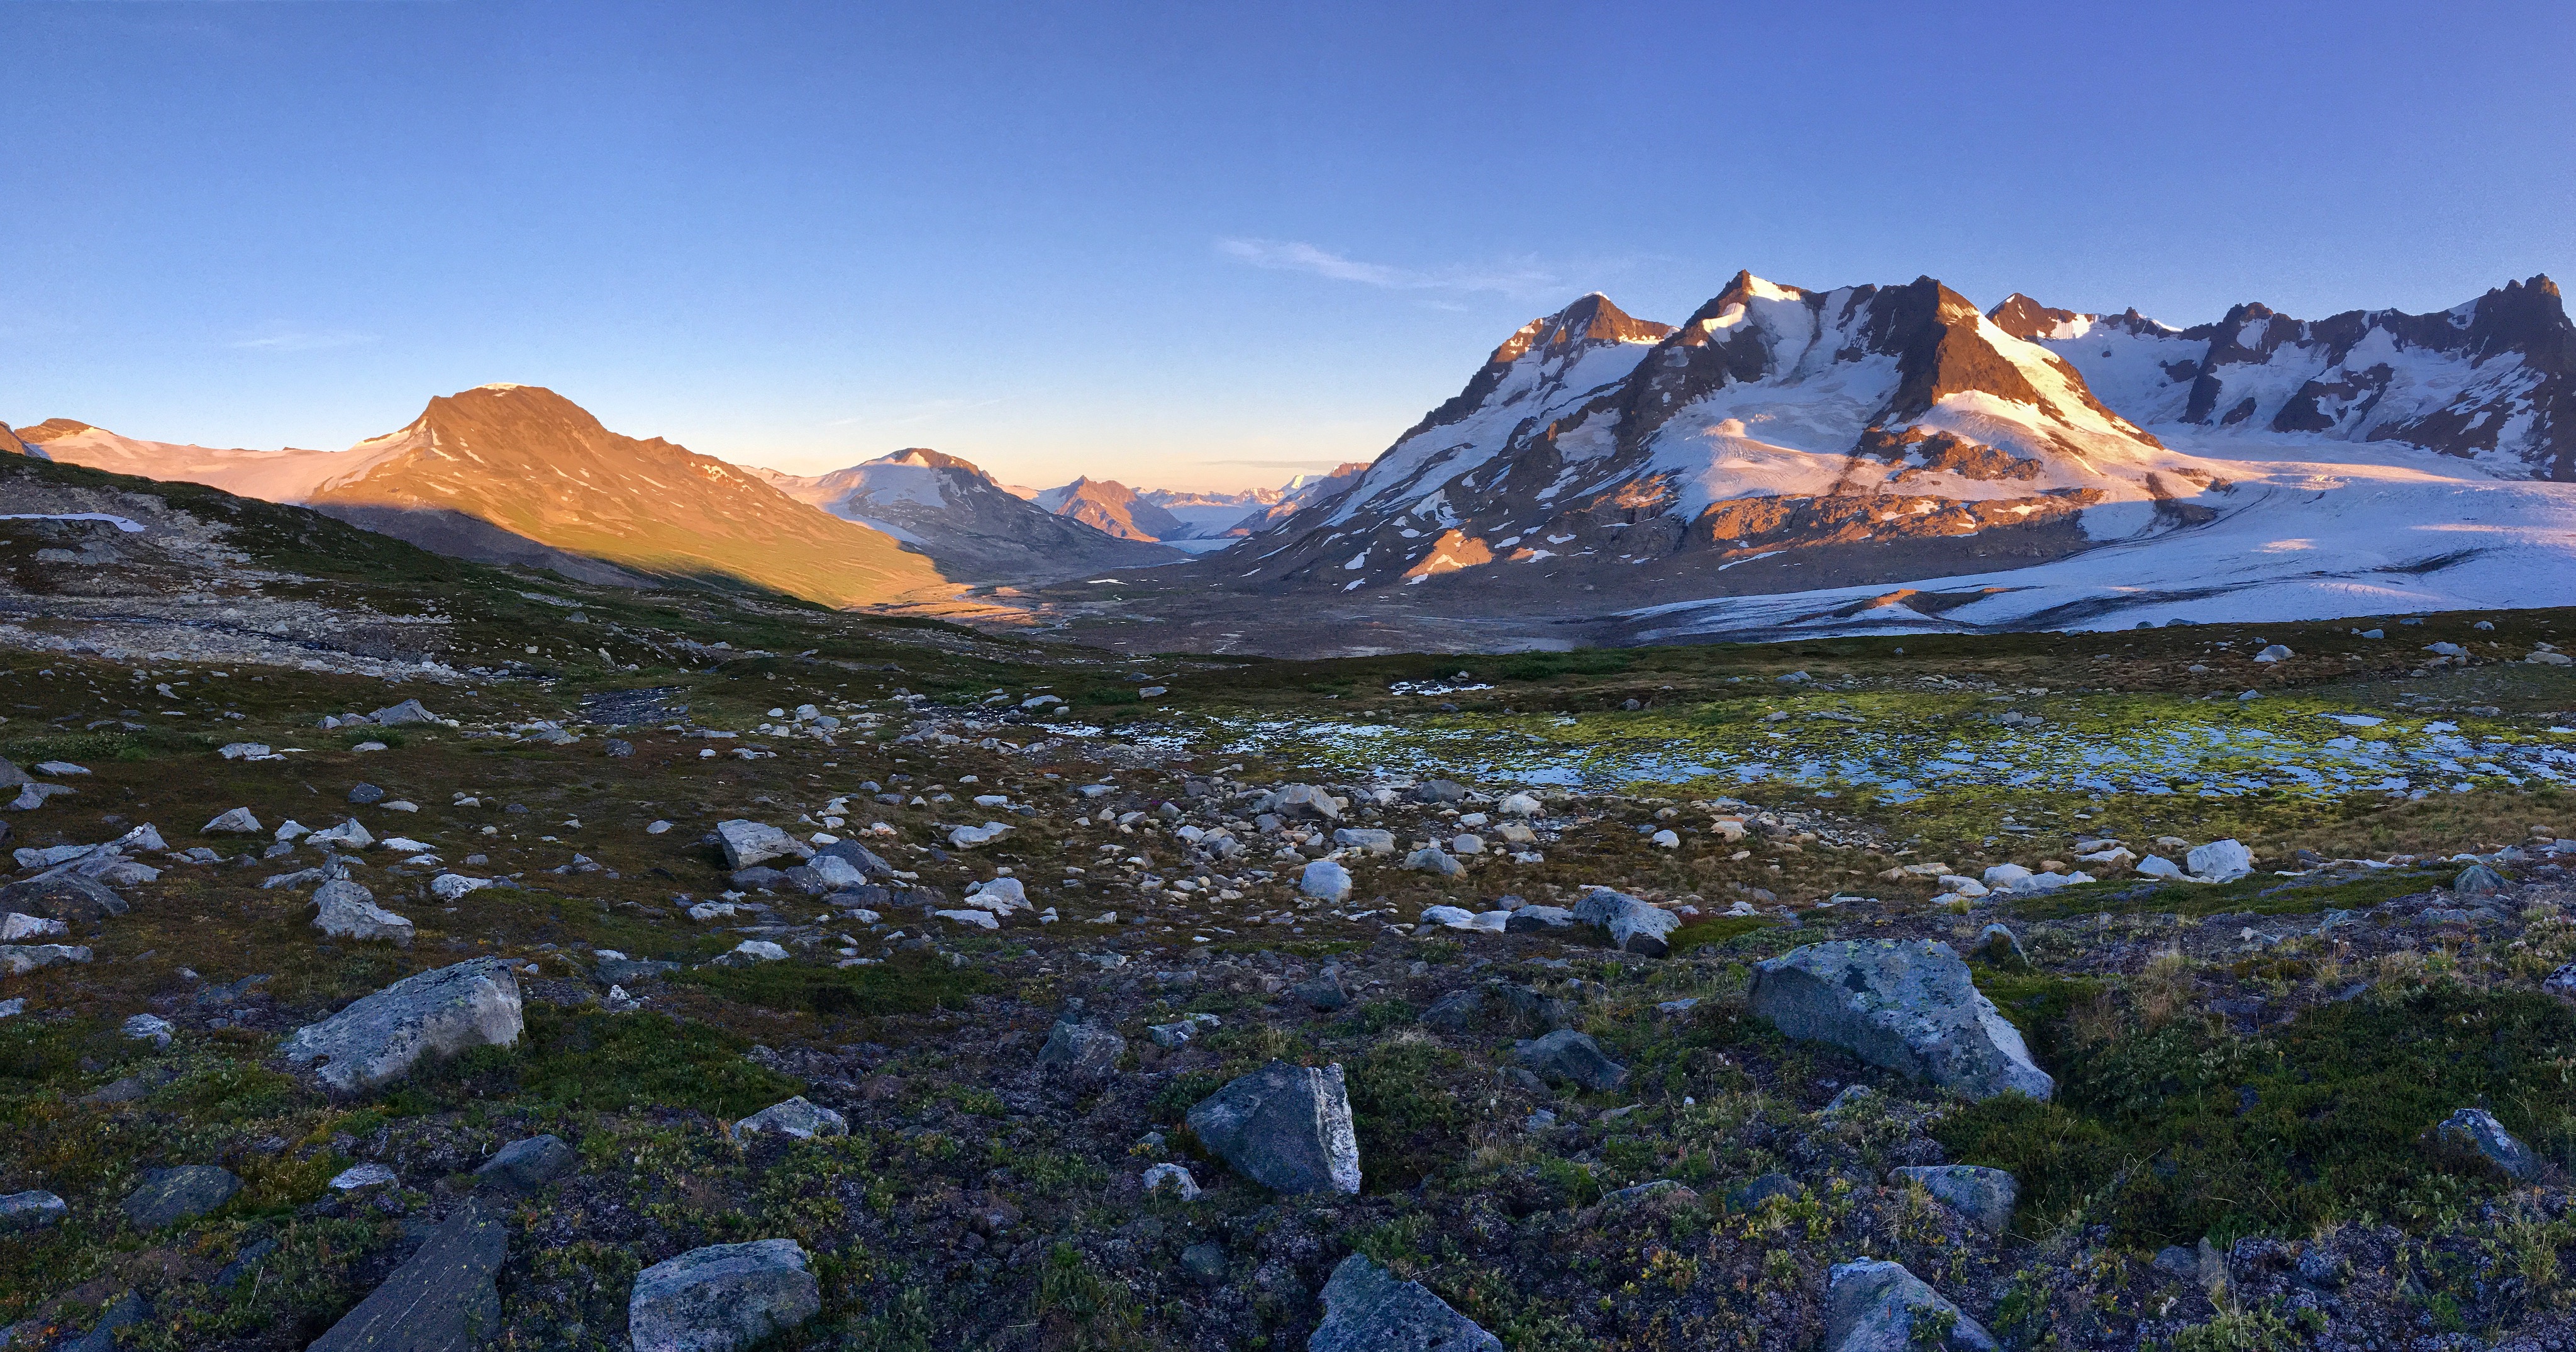
Our plan was to get to the second of two Titcomb Lakes and set up camp.  The weather, as we dropped elevation, was magnificent.  While we initially believed that Titcomb Basin would be a sorry consolation prize, it ended up being one of the most glorious and beautiful places we have ever hiked.  It was certainly no consolation prize.

img_1466

img_1469img_1473img_1475img_1476img_1484img_1490img_1791img_1496img_1497img_1499img_1501img_1503img_1505

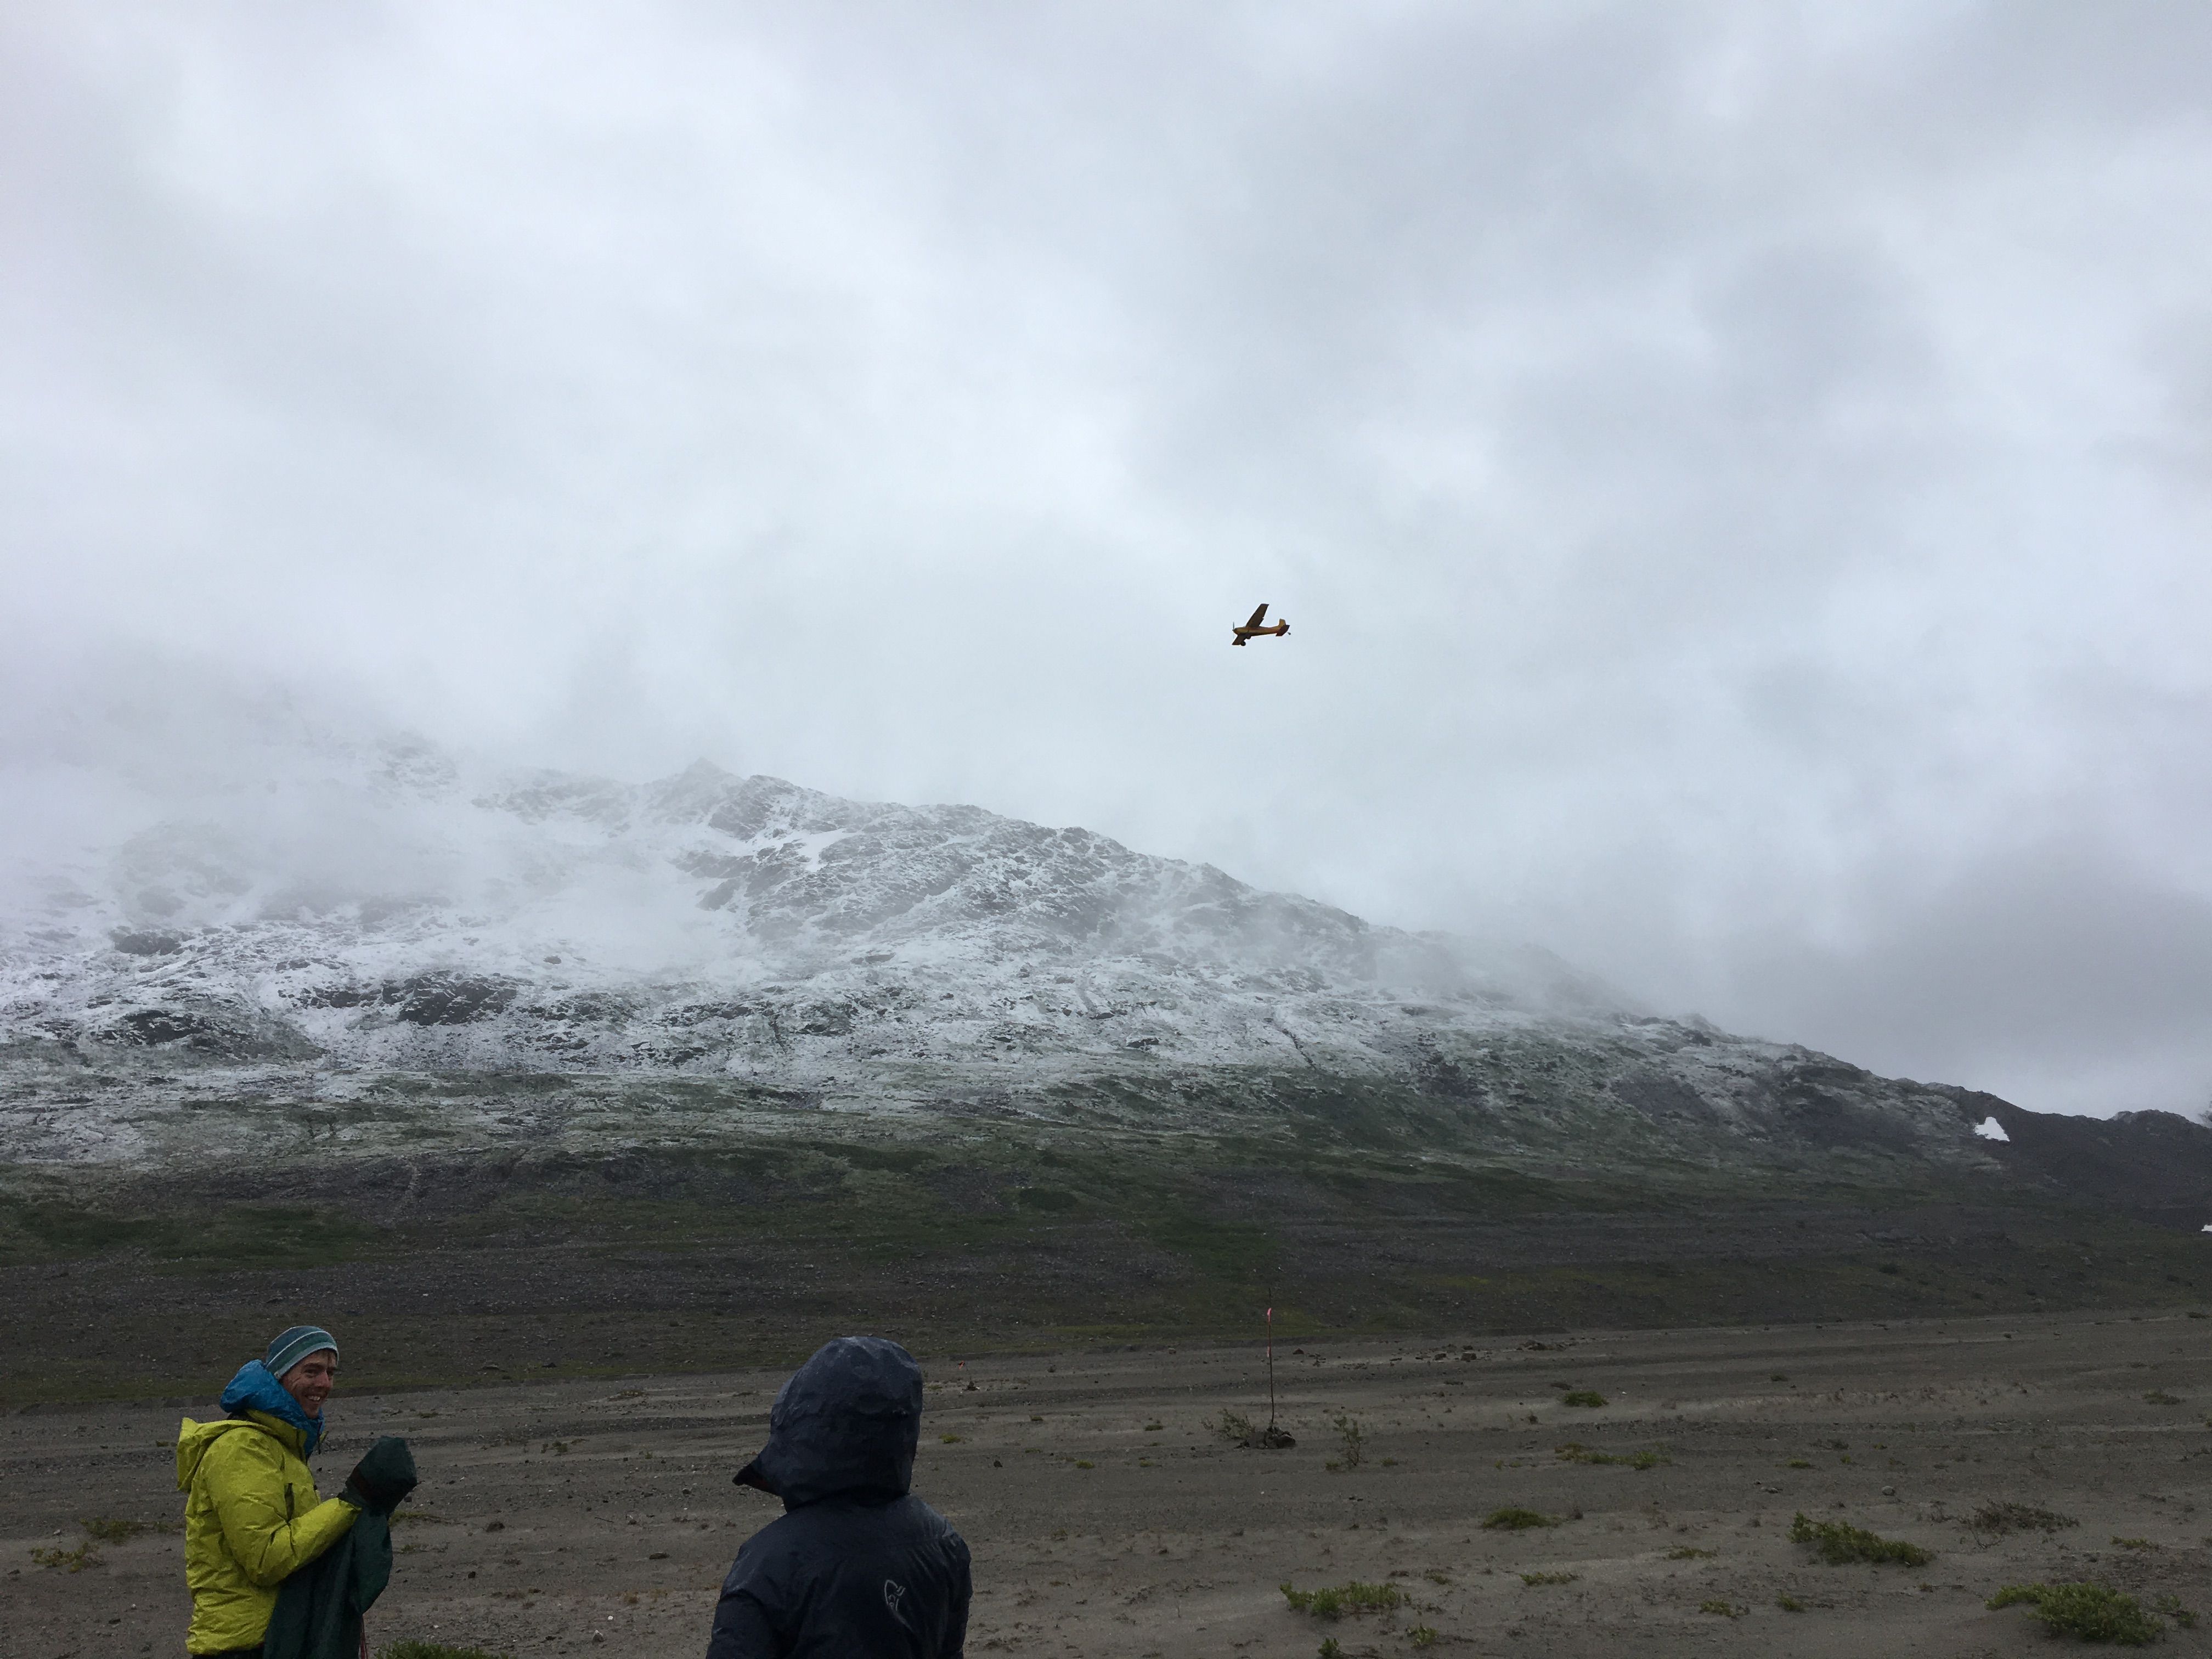
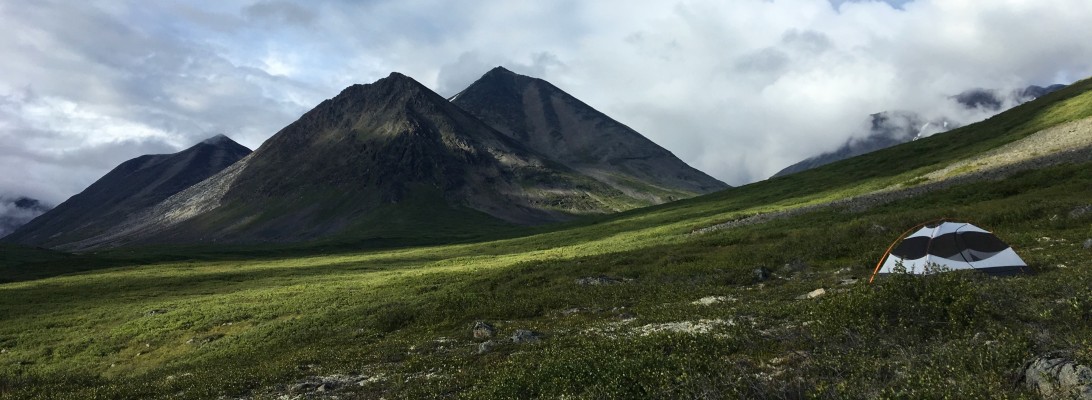
The day ended with a super sweet spot to camp with unbelievable 360-degree views.  As unpredictably as the day started, it ended as one of the most memorable and one of the most majestic.  Our next day would take us out of Titcomb Basin… over an hour away from our vehicle… which means that the adventure is really only just beginning.

img_1511img_1513img_1514img_1517img_1521

Wyoming: Wind River Range- Green River Lake to Three Forks Park- Day 1

img_1237-2

Wyoming: Wind River Range- Green River Lake to Three Forks Park

Total Mileage- 10.74 miles

Total Elevation Gain- 2033 feet

Total Elevation Loss- 2004 feet

screen-shot-2016-12-07-at-5-58-02-pm

screen-shot-2016-12-10-at-6-31-42-pm

Let’s start out with the fact that we had to alter our trip on Day 3 because we were unable to hit Bonney Pass due to ice and snow.  I will discuss this more on the Day 3 post, but if you are looking for a loop route that hits a significant portion of the Sierra High Route, you won’t find it here.  We took the conservative options and readjusted our route, opting not to test Mother Nature.  I believe that we attempted this route a week too late, as we started Day 1 on September 3.  Typically the first heavy snowfall doesn’t hit until the middle of the month.

Day 1 was beautiful as we approached Green River Lakes parking lot.  It was everything we hoped it would be- mid-60 degree weather with no bugs, blue skies, white puffy clouds.  We believed that the first week of September would be the sweet spot with no bugs, cool days/cold nights, and little to no snow.  We typically anchor our trips to Labor Day so we save a vacation day, however starting on this particular weekend meant more human activity than we really wanted.  We always hope for complete solitude, but everyone was no doubt trying to get in their last trip before the snow.  In retrospect, we should have considered the last week of August.  Had we done that we likely would have eliminated some of the people traffic and avoided the first big snow of the season.

img_1187img_1188img_1190img_1206

Our goal for Day 1 was to hit Three Forks Park (10.7 miles), which is a really nice, open basin area with plenty of camping opportunities at the confluence of Green River, Wells Creek, and Clark Creek.  As we left the Green River parking lot there were spectacular views of Square Top Mountain.  There are a couple of trail options from the parking lot.  We opted for Lakeside Trail that hugged the west side of the first lake.  There is also a trail on the east side of the lake that is a more direct route.  The east side trail is Highline Trail, also labeled Continental Divide Trail.  Either trail works.  If you take Lakeside Trail there is an eastward cut-across after the first lake that takes you over to Highline Trail.  While we had amazing views on Lakeside Trail, I would probably recommend taking the eastward trail simply because it is more direct and you may get better views of Square Top.

img_1220 img_1225 img_1234

After the eastward cut-across, we took a quick snack break.  We were at about the 3.5 mile mark.  The next three miles were relatively flat (a few ups and downs) with great views of Flattop Mountain and the second Green Lake.  The waters are an absolutely stunning Caribbean blue in which you can actually see fish swimming.  Later on the trip we stripped down and jumped in one of the lakes (more on that later), but the water temps in early September were in the 40’s.  Nice and shockingly cold.  The trail was well-established and visible worn for easy backpacking.
img_1236 img_1237-2 img_1242 img_1251 img_1258 img_1271 img_1747

The final three miles to Three Forks Park were a gradual ascent.  Overall, this was a very leisurely and beautiful 10.7 miles.  We averaged just under 2mph and it took us a little over six hours.  We could have very easily gone faster, but we took our time and enjoyed the views.  Three Forks Park is a really nice, open meadowy area with many camping options.  The only downside was that there were quite a few people camping in the area.  There were a couple of backpacking groups and then another group with horses, big tents, and a dog.  All in all it wasn’t too bad and didn’t distract us too much, but there is always this yearning to just get away from crowds and have complete solitude.  Again, this was a holiday weekend so we had to expect this.  Also, the popularity of the area has really grown over the years with more exposure and people talking about it.

img_1252img_1275img_1279img_1280 img_1281img_1282

Day Two will take us south and then eastward just passed Peak Lake where we had our most unpredictable night.

California: John Muir Trail- Bubbs Creek to Tyndall Creek- Day 6

John Muir Trail- Bubbs Creek to Tyndall Creek

Mileage- 12.7 miles

Elevation Gain- 4246 feet

Elevation Loss- 2755 feet
Bubbs Creek to Tyndall CreekBubbs Creek to Tyndall Creek Elevation

Our sixth day on the John Muir Trail in California took us from Bubbs Creek over the monster Forester Pass to Tyndall Creek. On this day we would travel 12.6 miles and conquer over 4200 feet of elevation. And our ascent would be 7.5 miles to Forester Pass. That is a long, long ascent. It feels as if it never ends. But more on that later.  The morning sun brought out the glowing, northeastern face of the East Vidette peak and the southwestern facing  Kearsarge Pinnacles.

IMG_1515 IMG_1520 IMG_1532IMG_1537

Our trek from Bubbs Creek toward Forester led us through the lodgepole pines and whitebark pines in the sub-alpine region and into areas with decreasing vegetation and significant and increasing piles of talus.  At about the five mile mark it actually looks as if you have made significant progress, as you have now left the trees behind and you now only see a trail amidst the broken and fragmented rocks.  But, the final two and a half miles to Forester Pass climbs an aggressive 2000 feet.  The map at the top of this post indicates my pace slowed significantly, as the red line represents a slower pace.  This was definitely my slowest pace throughout the entire trip.  It is hard to believe that the low oxygen level has such a profound effect.  While I will discuss this again on our Whitney summit day, the percent oxygen level going up to Forester was a little more than 65%.

IMG_1538IMG_1545IMG_1546IMG_1547

The benefit of stopping frequently to catch my breath was the opportunity to take pictures and savor the views, which were nothing short of astounding. Maybe I should have said breath-taking, literally (haha). The sloping talus piles of small, crumbly rock turned into massive broken boulders. The trail skillfully navigated through it all. And then there was a pristine lake just above 12,000 feet with the triangular Junction Peak towering in the background.  The epic views lead to a series of seemingly unending switchbacks amidst the scree with Forester at the top.  If you look closely you will see one of our guys at Forester Pass with the rest of our group scattered throughout the scree field heading up.  As a side note, if you happen to use the National Geographic Topographic Map for the John Muir Trail there is an error on the trail profile on page 16.  It shows a significant dip at the 12,200 mark and looks as if you have to go down a couple of hundred feet before going back up.  Well, the dip does not exist.  The trail goes up the entire way without any dip.  Anyway, just thought you may want to know that.

IMG_1556IMG_1552IMG_1551IMG_1554IMG_1555IMG_1556IMG_1558IMG_1561The view at the top of Forester was the best yet. It was expansive and massive with beautiful blue skies holding the billows of white clouds. This is the point at which one exits Kings Canyon National Park and enters Sequoia National Park. This is also the highest elevation of the trail before summiting Mt. Whitney. We took a much needed break at the top and posed for a few pics.
IMG_1570IMG_1564IMG_1569IMG_3565IMG_1576 The descent from Forester Pass has an aggressive descent down through a series of switchbacks down to an unnamed lake (as far as I know). Patrick was the first one down to it, so I will refer to it as Patrick Lake. Patrick Lake is a real stunner. After taking close to an hour break at the pass, we were FORCED to take another break at the lake because it was just that beautiful. We washed up, lied down on the grass, and just stared at the gorgeousness. Our numbers are probably off, but we tried to figure out how many people actually see this lake each year. We estimated a little over 300 people. Even if we are a bit off, the percentage of the U.S. population that gets to see this lake each year is a infinitesimally minuscule .000086% of the population. I don’t take any of this for granted. IMG_3575IMG_1583IMG_1593 With close to two hours of breaks, we still had between four to five miles before Tyndall Creek. The trail opens up into this wide expanse that we spied from Forester. No matter which direction we looked, it was special. As we pressed on throughout the afternoon, the cloud cover enveloped us. A few times we even felt a sprinkle of rain, but we knew the chances of rain were extraordinarily slim, even though the parks were praying for rain to slow down Rough Fire. Once we settled into our campsite near Tyndall Frog Ponds, the haze of Rough Fire greeted us. IMG_1605IMG_1609 The next day we would leave Tyndall and trek all the way to Guitar Lake, where we would camp, in preparation for our Whitney Summit.